Encryption 101: How to Enable Email Encryption on Outlook
 In a previous article, we provided a step-by-step guide on email encryption for webmail accounts. This article shows how to enable email encryption on Microsoft Outlook 2010.
To start encrypting your Outlook email, you'll need to get a Digital ID first. A Digital ID is an electronic signature that you can use to ‘sign’ your messages, to prove that the sender is in fact you and you alone. Don’t confuse it with the message signature, i.e. the ‘signature’ text at the bottom of emails – those can easily be copy-pasted no matter how flashy or formal they look.
How to generate a Digital ID:
- Click the File Tab.
- Click Options.
- Click Trust Center.
- Under Microsoft Outlook Trust Center, click Trust Center Settings.

- On the E-mail Security Tab, under Digital IDs (Certificates), click Get a Digital ID.
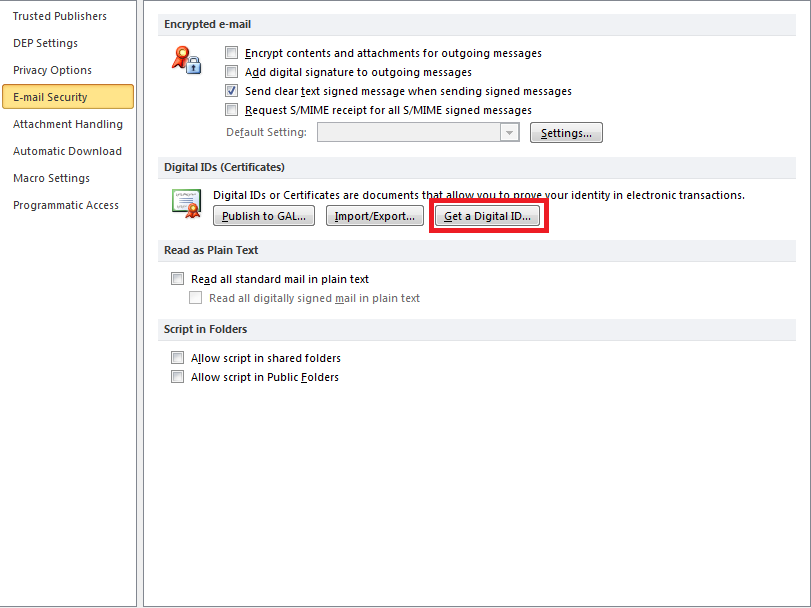
From there, follow the steps to get a Digital ID. Note: some services will charge you for a Digital ID.
Now, if you already have your own Digital ID, the next step is to share digital IDs with the person you plan on sharing encrypted messages with. To do that, you need to send them a digitally-signed message that uses the Digital ID you just got.
How to send a digitally-signed message:
- Compose a new message.
- In the Options Tab of the message editor, under More Options, then click on the Options Dialog Box Launcher in the rightmost corner. It’ll open up this dialog box:

- Click on Security Settings. Then, tick the box beside Add Digital Signature to this message. Click OK, then close the Window.
From there, you should see a new option in the Permission Group, namely the Sign Message button. Click that, compose your message, and then send it. From there, have the other party reply to it with a digitally-signed message of their own, so you can add their Digital ID.
To add their Digital ID, right-click on their name in the From box, then click Add to Outlook contacts. If you already have them added to your contact list, then simply select Update information of selected contact.
Set Outlook to encrypt your messages:
- open the Security Properties window (from the previous set of steps).
- Select ‘Encrypt message contents and attachments’ tickbox. Click OK, close, and then send your message.
That last step enables email encryption on MS Outlook. Again, remember that you need to be using the same encryption method with the person you’re sending the encrypted messages to.
Trend Micro easy worry-free email encryption solutions for businesses of any size. The end-to-end identity-based encryption solution features effortless key creation, no-maintenance key management, and a Web-based reader that your contacts can use. The reader features automatic decryption without having to install software, as well as support for Android, Blackberry, and iOS devices.
Like it? Add this infographic to your site:
1. Click on the box below. 2. Press Ctrl+A to select all. 3. Press Ctrl+C to copy. 4. Paste the code into your page (Ctrl+V).
Image will appear the same size as you see above.
Recent Posts
- Cracking the Isolation: Novel Docker Desktop VM Escape Techniques Under WSL2
- Azure Control Plane Threat Detection With TrendAI Vision One™
- Forecasting Future Outbreaks: A Behavioral and Predictive Approach to Proactive Cyber Risk Management
- Fault Lines in the AI Ecosystem: TrendAI™ State of AI Security Report
- The Industrialization of Botnets: Automation and Scale as a New Threat Infrastructure
 Fault Lines in the AI Ecosystem: TrendAI™ State of AI Security Report
 Cracking the Isolation: Novel Docker Desktop VM Escape Techniques Under WSL2
 The AI-fication of Cyberthreats: Trend Micro Security Predictions for 2026
 Stay Ahead of AI Threats: Secure LLM Applications With Trend Vision One