PE_VIRUX
Virut
Windows 2000, Windows XP, Windows Server 2003


Threat Type: File infector
Destructiveness: No
Encrypted:
In the wild: Yes
OVERVIEW
VIRUX variants have been spotted as early as 2009. These file infectors spread across removable drives and network shares. They take advantage of vulnerabilities to infect users' systems. VIRUX variants have also been found in websites that offer software license/serial numbers, key generators and program cracks.
Unlike most file infector families that use one method for infecting files, VIRUX variants use a combination of two or more infection methods. This makes detection and removal difficult. Furthermore, VIRUX infects file types such as .EXE, .SCR, .ASP, .HTM, and .PHP. A particular VIRUX variant injects malicious iframe code to infect script files.
When executed, VIRUX accesses IRC servers to receive malicious commands and download URLs. The said URLs lead to other malware including FAKEAV variants.
They terminate security-related applications and disable the Windows Firewall and Security plug-in. Some VIRUX malware also modify the affected systems' HOSTS file to block access to anti-malware sites. This is used to prevent the removal of the malware from affected systems.
TECHNICAL DETAILS
Installation
This file infector drops the following files:
- %Windows%\{random file name}.exe
(Note: %Windows% is the Windows folder, which is usually C:\Windows.)
Other System Modifications
This file infector adds the following registry keys:
HKEY_LOCAL_MACHINE\SYSTEM\CurrentControlSet\
Services\{random registry key name}
It adds the following registry entries:
HKEY_LOCAL_MACHINE\SYSTEM\CurrentControlSet\
Services\SharedAccess\Parameters\
FirewallPolicy\StandardProfile\AuthorizedApplications\
List
\??\%System%\winlogon.exe = "\??\%System%\winlogon.exe:*:enabled:@shell32.dll,-1"
Backdoor Routine
This file infector connects to any of the following IRC server(s):
- irc.{BLOCKEDf.pl
HOSTS File Modification
This file infector adds the following strings to the Windows HOSTS file:
- 127.0.0.1 {BLOCKED}F.pl
- 127.0.0.1 jL.{BLOCKED}a.pl
SOLUTION
NOTES:
Trend Micro OfficeScan 10 users are also urged to use the following features to protect from PE_VIRUX malware:
Enabling the Self-protection Feature
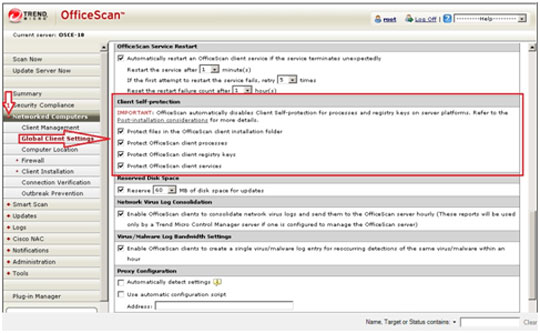
- Open the OfficeScan 10 Web console.
- In the left panel, click Networked Computers to expand its list of contents.
- Click Global Client Settings to open the user interface found in the right panel.
- In the right panel, locate Client Self-Protection and tick your preferred options in the list to ensure and enable self-protection against malware that can disable the software.
- At the bottom of the right panel, click Save
Enabling the Behavioral Monitoring Module
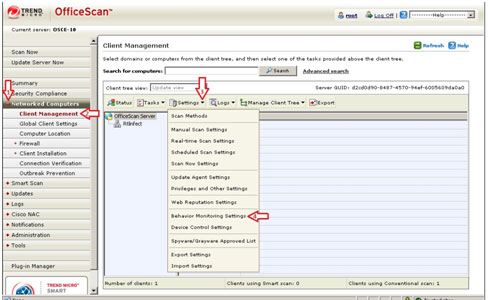
- Still in the OfficeScan 10 web console, in the left panel, click Networked Computers to expand its list of contents.
- Click Client Management to open the user interface on the right panel.
- In the right panel, click Settings. Choose Behavioral Monitoring Settings from the dropdown list.
- In the new window, configure the program's behavioral monitoring settings.
- Click Enable Malware Behavior Blocking.
- Click Enable Event Monitoring and set your policies and desired actions.
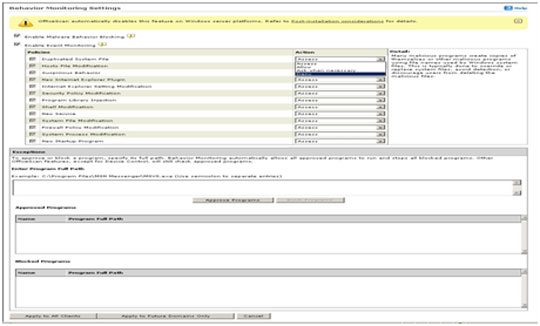
- At the bottom of the window, click Apply to All Clients.
Enabling the Device Access Control (DAC) Feature
- Still in the OfficeScan 10 Web console, in the left panel, click Networked Computers to expand its list of contents.
- Click Client Management to open user interface on the right panel.

- In the right panel, click Settings and choose Device Control Settings from the dropdown list. This opens a new window where you can configure the program's behavioral monitoring settings.
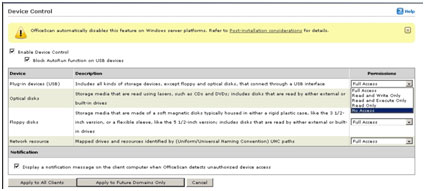
- Click Enable Device Control then Block Autorun function on USB devices after setting your desired permissions.
- At the bottom of the window, click Apply to All Clients.
Enabling Scan Network Drive
- Still in the OfficeScan 10 Web console, in the left panel, click Networked Computers to expand its list of contents.
- Click Client Management to open user interface on the right panel.
- In the right panel, click Settings and select Scan Settings>Real-Time Scan Settings.
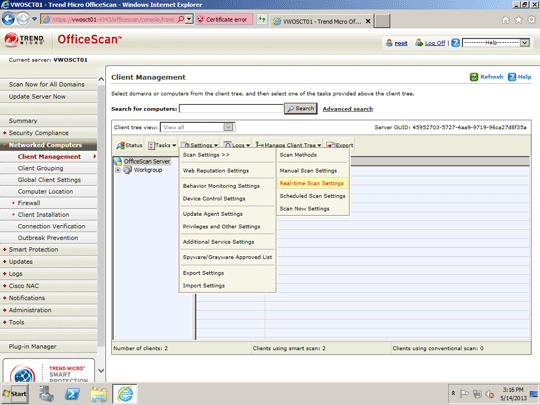
- Click All scannable files and Scan network drive.
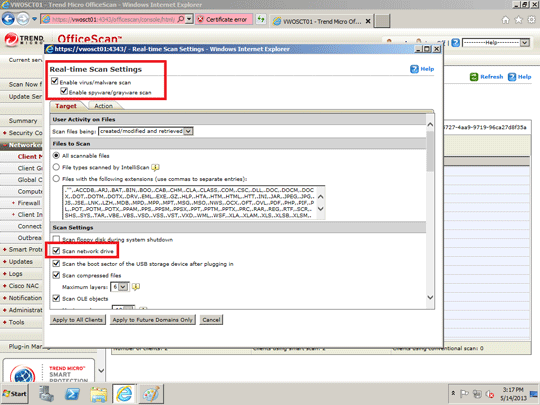
- At the bottom of the window, click Save.
Did this description help? Tell us how we did.