RANSOM_CRYPTESLA
Windows


Threat Type: Trojan
Destructiveness: No
Encrypted:
In the wild: Yes
OVERVIEW
This Trojan may be unknowingly downloaded by a user while visiting malicious websites.
It modifies the Internet Explorer Zone Settings.
It connects to certain websites to send and receive information.
TECHNICAL DETAILS
Arrival Details
This Trojan may be unknowingly downloaded by a user while visiting malicious websites.
Installation
This Trojan drops the following copies of itself into the affected system and executes them:
- %My Documents%\{random filen ame}.exe
(Note: %My Documents% is usually C:\Documents and Settings\{user name}\My Documents on Windows 2000, XP, and Server 2003, or C:\Users\{user name}\Documents on Windows Vista and 7.)
It drops the following component file(s):
- %My Documents%\desctop.ini
- %My Documents%\-!recover!-!file!-.txt
- {folders containing encrypted files}\-!RecOveR!-{random}++.Png
- {folders containing encrypted files}\-!RecOveR!-{random}++.Txt
- {folders containing encrypted files}\-!RecOveR!-{random}++.Htm
- %Desktop%\-!RecOveR!-{random}++.Png
- %Desktop%\-!RecOveR!-{random}++.Txt
(Note: %Desktop% is the desktop folder, where it usually is C:\Documents and Settings\{user name}\Desktop in Windows 2000, Windows Server 2003, and Windows XP (32- and 64-bit); C:\Users\{user name}\Desktop in Windows Vista (32- and 64-bit), Windows 7 (32- and 64-bit), Windows 8 (32- and 64-bit), Windows 8.1 (32- and 64-bit), Windows Server 2008, and Windows Server 2012.)
Autostart Technique
This Trojan adds the following registry entries to enable its automatic execution at every system startup:
HKEY_CURRENT_USER\Software\Microsoft\
Windows\CurrentVersion\Run
{random} = C:\WINDOWS\SYSTEM32\CMD.EXE /C START "%My Documents%\{random file name}.exe"
Other System Modifications
This Trojan adds the following registry keys:
HKEY_CURRENT_USER\Software\Axronics
It adds the following registry entries:
HKEY_LOCAL_MACHINE\SOFTWARE\Microsoft\
Windows\CurrentVersion\policies\
system
EnableLinkedConnections = "1"
Web Browser Home Page and Search Page Modification
This Trojan modifies the Internet Explorer Zone Settings.
Other Details
This Trojan connects to the following website to send and receive information:
- http://{random URLs based on variant}
It encrypts files with the following extensions:
- .3fr
- .7z
- .accdb
- .ai
- .amp
- .apk
- .arch00
- .arw
- .asset
- .avi
- .bar
- .bay
- .bc6
- .bc7
- .big
- .bik
- .bkf
- .bkp
- .blob
- .bsa
- .cas
- .cdr
- .cer
- .cfr
- .cr2
- .crt
- .crw
- .css
- .csv
- .d3dbsp
- .das
- .dazip
- .db0
- .dba
- .dbf
- .dcr
- .der
- .desc
- .dmp
- .dng
- .doc
- .docm
- .docx
- .dwg
- .dxg
- .epk
- .eps
- .erf
- .esm
- .ff
- .flv
- .forge
- .fos
- .fpk
- .fsh
- .gdb
- .gho
- .hkdb
- .hkx
- .hplg
- .hvpl
- .ibank
- .icxs
- .indd
- .itd
- .itdb
- .itl
- .itm
- .iwd
- .iwi
- .jpeg
- .jpg
- .js
- .kdb
- .kdc
- .kf
- .layout
- .lbf
- .litemod
- .lrf
- .ltx
- .lvl
- .m2
- .m3u
- .m4a
- .mcmeta
- .mdb
- .mdbackup
- .mdd
- .mddata
- .mdf
- .mef
- .menu
- .mlx
- .mov
- .mp4
- .mpqge
- .mrwref
- .ncf
- .nrw
- .ntl
- .odb
- .odc
- .odm
- .odp
- .ods
- .odt
- .orf
- .p12
- .p7b
- .p7c
- .pak
- .pdd
- .pef
- .pem
- .pfx
- .pkb
- .pkpass
- .png
- .ppt
- .pptm
- .pptx
- .psd
- .psk
- .pst
- .ptx
- .py
- .qdf
- .qic
- .r3d
- .raf
- .rar
- .raw
- .rb
- .re4
- .rgss3a
- .rim
- .rofl
- .rtf
- .rw2
- .rwl
- .sav
- .sb
- .sid
- .sidd
- .sidn
- .sie
- .sis
- .slm
- .snx
- .sql
- .sr2
- .srf
- .srw
- .sum
- .svg
- .syncdb
- .t12
- .t13
- .tax
- .tor
- .txt
- .upk
- .vcf
- .vdf
- .vfs
- .vfs0
- .vpk
- .vpp_pc
- .vtf
- .w3x
- .wallet
- .wb2
- .wma
- .wmo
- .wmv
- .wotreplay
- .wpd
- .wps
- .x3f
- .xf
- .xlk
- .xls
- .xlsb
- .xlsm
- .xlsx
- .xxx
- .zip
- .ztm
- .ztmp
It opens the following files:
- %Desktop%\-!RecOveR!-{random}++.Png
- %Desktop%\-!RecOveR!-{random}++.Tx
(Note: %Desktop% is the desktop folder, where it usually is C:\Documents and Settings\{user name}\Desktop in Windows 2000, Windows Server 2003, and Windows XP (32- and 64-bit); C:\Users\{user name}\Desktop in Windows Vista (32- and 64-bit), Windows 7 (32- and 64-bit), Windows 8 (32- and 64-bit), Windows 8.1 (32- and 64-bit), Windows Server 2008, and Windows Server 2012.)
It does the following:
- Adjusts user privileges
NOTES:
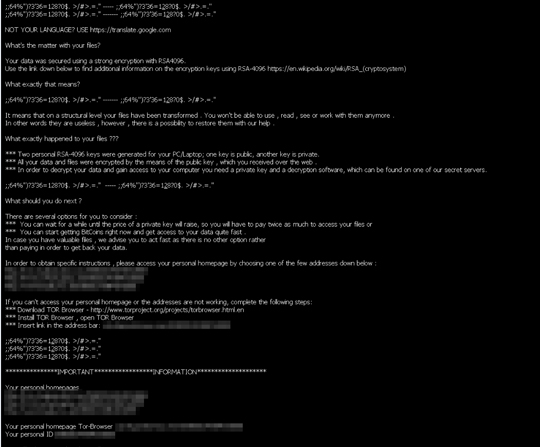
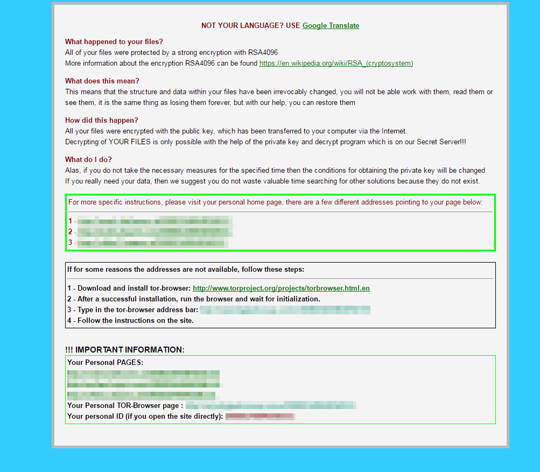
The dropped ransom notes contain the following information:

It deletes shadow copies by executing the following command:
vssadmin.exe Delete Shadows /For=C: /quiet
It terminates processes containing the following strings:
- taskmg
- regedi
- procex
- msconfi
- cmd
SOLUTION
Step 1
Before doing any scans, Windows XP, Windows Vista, and Windows 7 users must disable System Restore to allow full scanning of their computers.
Step 2
Note that not all files, folders, and registry keys and entries are installed on your computer during this malware's/spyware's/grayware's execution. This may be due to incomplete installation or other operating system conditions. If you do not find the same files/folders/registry information, please proceed to the next step.
Step 3
Scan your computer with your Trend Micro product and note files detected as RANSOM_CRYPTESLA
Step 4
Restart in Safe Mode
Step 5
Delete this registry value
Important: Editing the Windows Registry incorrectly can lead to irreversible system malfunction. Please do this step only if you know how or you can ask assistance from your system administrator. Else, check this Microsoft article first before modifying your computer's registry.
- In HKEY_CURRENT_USER\Software\Microsoft\Windows\CurrentVersion\Run
- {random} = C:\WINDOWS\SYSTEM32\CMD.EXE /C START "%My Documents%\{random file name}.exe"
- {random} = C:\WINDOWS\SYSTEM32\CMD.EXE /C START "%My Documents%\{random file name}.exe"
- In HKEY_LOCAL_MACHINE\SOFTWARE\Microsoft\Windows\CurrentVersion\policies\system
- EnableLinkedConnections = "1"
- EnableLinkedConnections = "1"
Step 6
Delete this registry key
Important: Editing the Windows Registry incorrectly can lead to irreversible system malfunction. Please do this step only if you know how or you can ask assistance from your system administrator. Else, check this Microsoft article first before modifying your computer's registry.
- In HKEY_CURRENT_USER\Software
- Axronics
- Axronics
Step 7
Search and delete these files
- %My Documents%\desctop.ini
- %My Documents%\-!recover!-!file!-.txt
- {folders containing encrypted files}\-!RecOveR!-{random}++.Png
- {folders containing encrypted files}\-!RecOveR!-{random}++.Txt
- {folders containing encrypted files}\-!RecOveR!-{random}++.Htm
- %Desktop%\-!RecOveR!-{random}++.Png
- %Desktop%\-!RecOveR!-{random}++.Txt
Step 8
Restart in normal mode and scan your computer with your Trend Micro product for files detected as RANSOM_CRYPTESLA. If the detected files have already been cleaned, deleted, or quarantined by your Trend Micro product, no further step is required. You may opt to simply delete the quarantined files. Please check this Knowledge Base page for more information.
Step 9
Restore encrypted files from backup.
Did this description help? Tell us how we did.