RANSOM_LOCKY.PUY
Windows


Threat Type: Trojan
Destructiveness: No
Encrypted: Yes
In the wild: Yes
OVERVIEW
This ransomware is delivered via the Magnitude exploit kit exploiting the Adobe Flash Player vulnerability CVE-2016-1019.
To get a one-glance comprehensive view of the behavior of this Trojan, refer to the Threat Diagram shown below.
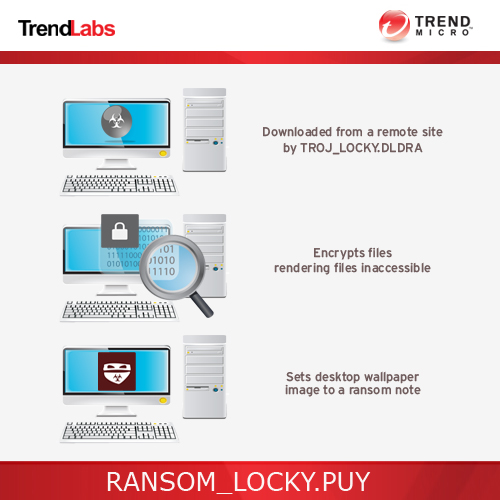
This Trojan arrives on a system as a file dropped by other malware or as a file downloaded unknowingly by users when visiting malicious sites. It may be downloaded by other malware/grayware from remote sites.
It connects to certain websites to send and receive information. It gathers information and reports it to its servers.
TECHNICAL DETAILS
Arrival Details
This Trojan arrives on a system as a file dropped by other malware or as a file downloaded unknowingly by users when visiting malicious sites.
It may be downloaded by the following malware/grayware from remote sites:
- TROJ_LOCKY.DLDRA
It may be downloaded from the following remote site(s):
- http://our.{BLOCKED}hasanjay.com.np/bg.gif
Installation
This Trojan drops the following files:
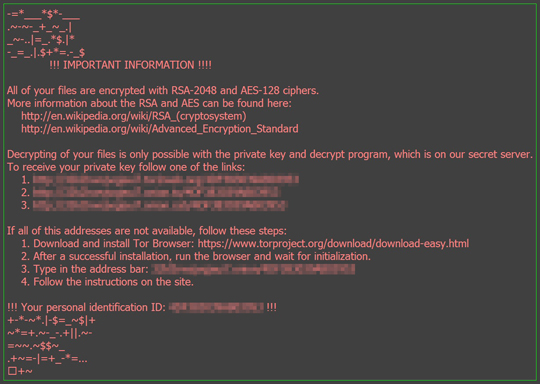
- %Desktop%\_HELP_instructions.txt - ransom note
- %Desktop%\_HELP_instructions.bmp - image used as wallpaper
- {folders containing encrypted files}\_HELP_instructions.txt - ransom note
(Note: %Desktop% is the desktop folder, where it usually is C:\Documents and Settings\{user name}\Desktop in Windows 2000, Windows Server 2003, and Windows XP (32- and 64-bit); C:\Users\{user name}\Desktop in Windows Vista (32- and 64-bit), Windows 7 (32- and 64-bit), Windows 8 (32- and 64-bit), Windows 8.1 (32- and 64-bit), Windows Server 2008, and Windows Server 2012.)
It drops the following copies of itself into the affected system:
- %User Temp%\svchost.exe
(Note: %User Temp% is the user's temporary folder, where it usually is C:\Documents and Settings\{user name}\Local Settings\Temp on Windows 2000, Windows Server 2003, and Windows XP (32- and 64-bit); C:\Users\{user name}\AppData\Local\Temp on Windows Vista (32- and 64-bit), Windows 7 (32- and 64-bit), Windows 8 (32- and 64-bit), Windows 8.1 (32- and 64-bit), Windows Server 2008, and Windows Server 2012.)
Autostart Technique
This Trojan adds the following registry entries to enable its automatic execution at every system startup:
HKEY_CURRENT_USER\Software\Microsoft\
Windows\CurrentVersion\Run
Locky = "%User Temp%\svchost.exe"
Other System Modifications
This Trojan modifies the following file(s):
- It encrypts files in fixed, removable and RAM disk drives.
- It renames the encrypted files to {unique ID per victim}{identifier}.locky
It adds the following registry entries as part of its installation routine:
HKEY_CURRENT_USER\Control Panel\Desktop
Wallpaper = "%Desktop%\_HELP_instructions.bmp"
It adds the following registry keys as part of its installation routine:
HKEY_CURRENT_USER\Software\{random characters}
It sets the system's desktop wallpaper to the following image:
Other Details
This Trojan connects to the following website to send and receive information:
- http://{BLOCKED}.{BLOCKED}.181.164/submit.php
- http://{BLOCKED}.{BLOCKED}.119.177/submit.php
- {Domain Generated Algorithm}.{ru, info, biz, work, pl ,org, pw, xyz}
It sends the following information in encrypted form:id={victim ID}&act={getkey, gettext, stats}&affid={affiliate ID}&lang={computer language}&corp={value}&serv={value}&os={operating system}&sp={service pack}&x64={0,1}
It encrypts files with the following extensions:
- .n64
- .m4u
- .m3u
- .mid
- .wma
- .flv
- .3g2
- .mkv
- .3gp
- .mp4
- .mov
- .avi
- .asf
- .mpeg
- .vob
- .mpg
- .wmv
- .fla
- .swf
- .wav
- .mp3
- .qcow2
- .vdi
- .vmdk
- .vmx
- .gpg
- .aes
- .ARC
- .PAQ
- .tar
- .bz2
- .tbk
- .bak
- .tar
- .tgz
- .gz
- .7z
- .rar
- .zip
- .djv
- .djvu
- .svg
- .bmp
- .png
- .gif
- .raw
- .cgm
- .jpeg
- .jpg
- .tif
- .tiff
- .NEF
- .psd
- .cmd
- .bat
- .sh
- .class
- .jar
- .java
- .rb
- .asp
- .cs
- .brd
- .sch
- .dch
- .dip
- .pl
- .vbs
- .vb
- .js
- .h
- .asm
- .pas
- .cpp
- .c
- .php
- .ldf
- .mdf
- .ibd
- .MYI
- .MYD
- .frm
- .odb
- .dbf
- .db
- .mdb
- .sql
- .SQLITEDB
- .SQLITE3
- .011
- .010
- .009
- .008
- .007
- .006
- .005
- .004
- .003
- .002
- .001
- .pst
- .onetoc2
- .asc
- .lay6
- .lay
- .ms11
- .sldm
- .sldx
- .ppsm
- .ppsx
- .ppam
- .docb
- .mml
- .sxm
- .otg
- .odg
- .uop
- .potx
- .potm
- .pptx
- .pptm
- .std
- .sxd
- .pot
- .pps
- .sti
- .sxi
- .otp
- .odp
- .wb2
- .123
- .wks
- .wk1
- .xltx
- .xltm
- .xlsx
- .xlsm
- .xlsb
- .slk
- .xlw
- .xlt
- .xlm
- .xlc
- .dif
- .stc
- .sxc
- .ots
- .ods
- .hwp
- .602
- .dotm
- .dotx
- .docm
- .docx
- .DOT
- .3dm
- .max
- .3ds
- .xml
- .txt
- .CSV
- .uot
- .RTF
- .XLS
- .PPT
- .stw
- .sxw
- .ott
- .odt
- .DOC
- .pem
- .p12
- .csr
- .crt
- .key
- wallet.dat
It gathers the following information and reports it to its servers:
- Language of affected system
- number of failed encrypted files
- number of encrypted files
- OS architecture (if 64bit)
- victim ID
NOTES:
This ransomware prevents encrypting files containing any of the strings in its full path name:
- AppData
- Application Data
- Program Files
- temp
- $Recycle.Bin
- System Volume Information
- Boot
- Windows
- winnt
- thumbs.db
After encryption of files, it uninstalls itself by deleting its autorun registry and its copy.
SOLUTION
Step 1
Before doing any scans, Windows XP, Windows Vista, and Windows 7 users must disable System Restore to allow full scanning of their computers.
Step 2
Note that not all files, folders, and registry keys and entries are installed on your computer during this malware's/spyware's/grayware's execution. This may be due to incomplete installation or other operating system conditions. If you do not find the same files/folders/registry information, please proceed to the next step.
Step 3
Remove the malware/grayware file that dropped/downloaded RANSOM_LOCKY.PUY. (Note: Please skip this step if the threat(s) listed below have already been removed.)
Step 4
Restart in Safe Mode
Step 5
Delete this registry value
Important: Editing the Windows Registry incorrectly can lead to irreversible system malfunction. Please do this step only if you know how or you can ask assistance from your system administrator. Else, check this Microsoft article first before modifying your computer's registry.
- In HKEY_CURRENT_USER\Software\Microsoft\Windows\CurrentVersion\Run
- Locky = "%User Temp%\svchost.exe"
- Locky = "%User Temp%\svchost.exe"
- In HKEY_CURRENT_USER\Control Panel\Desktop
- Wallpaper = "Desktop%\_HELP_instructions.bmp"
- Wallpaper = "Desktop%\_HELP_instructions.bmp"
Step 6
Search and delete this file
- %Desktop%_HELP_instructions.bmp
- %Desktop%_HELP_instructions.txt
- {folders containing encrypted files}\_HELP_instructions.txt
Step 7
Restart in normal mode and scan your computer with your Trend Micro product for files detected as RANSOM_LOCKY.PUY. If the detected files have already been cleaned, deleted, or quarantined by your Trend Micro product, no further step is required. You may opt to simply delete the quarantined files. Please check this Knowledge Base page for more information.
Step 8
The following created files/folders/registry keys/registry entries cannot be identified by the user since there are no reference values in the created key. The only way it can be identified is by comparing the present system information with a backup. Note that the said components do not have to be deleted since it won't be harmful to the system.
- HKEY_CURRENT_USER\Software\{random characters}
Step 9
Restore encrypted files from backup.
Did this description help? Tell us how we did.