Ransom.Win32.LOCKERGOGA.THBOGAI
Trojan-Ransom.LockerGoga(IKARUS); Win32/Filecoder.LockerGoga.B trojan(NOD32)
Windows


Threat Type: Ransomware
Destructiveness: No
Encrypted: No
In the wild: Yes
OVERVIEW
This Ransomware arrives on a system as a file dropped by other malware or as a file downloaded unknowingly by users when visiting malicious sites.
It encrypts files with specific file extensions.
TECHNICAL DETAILS
Arrival Details
This Ransomware arrives on a system as a file dropped by other malware or as a file downloaded unknowingly by users when visiting malicious sites.
Installation
This Ransomware drops a copy of itself in the following folders using different file names:
- %User Temp%\hvwfcsky{4-5 random numbers}.exe
(Note: %User Temp% is the current user's Temp folder, which is usually C:\Documents and Settings\{user name}\Local Settings\Temp on Windows 2000, XP, and Server 2003, or C:\Users\{user name}\AppData\Local\Temp on Windows Vista, 7, and 8.)
It adds the following processes:
- %User Temp%\hvwfcsky{4-5 random numbers}.exe -w (if no parameter)
(Note: %User Temp% is the current user's Temp folder, which is usually C:\Documents and Settings\{user name}\Local Settings\Temp on Windows 2000, XP, and Server 2003, or C:\Users\{user name}\AppData\Local\Temp on Windows Vista, 7, and 8.)
Other Details
This Ransomware accepts the following parameters:
- -w = allows encryption of all file types
- -v = display version
- -h = help message
- -m = email used in ransom note
- -e = erase file
- -l = create log file
- -j = allow multi threading
- -f = input file
- -r = dry run
- {filename} -w = encrypt a specific file
Ransomware Routine
This Ransomware encrypts files with the following extensions:
- .doc
- .dot
- .docx
- .docb
- .dotx
- .dotb
- .wbk
- .xlm
- .xlsx
- .xltx
- .xlsb
- .xlw
- .ppt
- .pps
- .pot
- .potx
- .ppsx
- .pptx
- .sldx
- .db
- .sql
It appends the following extension to the file name of the encrypted files:
- .locked
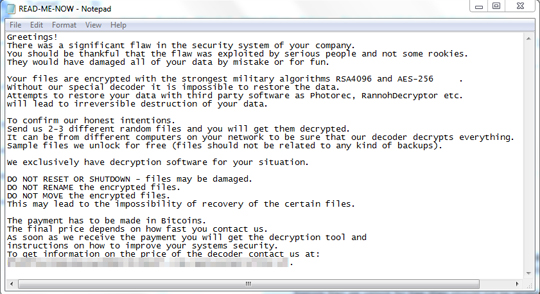
It leaves text files that serve as ransom notes containing the following text:
- READ-ME-NOW.txt
SOLUTION
Step 1
Before doing any scans, Windows 7, Windows 8, Windows 8.1, and Windows 10 users must disable System Restore to allow full scanning of their computers.
Step 2
Note that not all files, folders, and registry keys and entries are installed on your computer during this malware's/spyware's/grayware's execution. This may be due to incomplete installation or other operating system conditions. If you do not find the same files/folders/registry information, please proceed to the next step.
Step 3
Restart in Safe Mode
Step 4
Search and delete these files
- %User Temp%\hvwfcsky{4-5 random numbers}.exe
- READ-ME-NOW.txt
Step 5
Restart in normal mode and scan your computer with your Trend Micro product for files detected as Ransom.Win32.LOCKERGOGA.THBOGAI. If the detected files have already been cleaned, deleted, or quarantined by your Trend Micro product, no further step is required. You may opt to simply delete the quarantined files. Please check this Knowledge Base page for more information.
Step 6
Restore encrypted files from backup.
Did this description help? Tell us how we did.