BKDR_BLACKEN.A
Backdoor.Win32.Fonten.k (Kaspersky), Win32/Rootkit.BlackEnergy.BA (ESET)
Windows


Threat Type: Backdoor
Destructiveness: No
Encrypted: Yes
In the wild: Yes
OVERVIEW
This malware is the payload of the exploit related to Sandworm zero-day vulnerability. The said vulnerability has been covered in MS14-060 and believed to be used in cyber attacks against European sectors and industries.
To get a one-glance comprehensive view of the behavior of this Backdoor, refer to the Threat Diagram shown below.
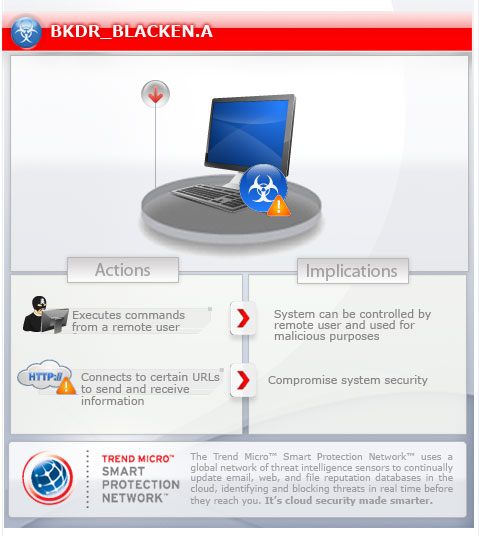
This backdoor may be downloaded from remote sites by other malware.
It executes commands from a remote malicious user, effectively compromising the affected system. It connects to a website to send and receive information.
TECHNICAL DETAILS
Arrival Details
This backdoor may be downloaded from remote site(s) by the following malware:
Installation
This backdoor drops the following component file(s):
- %AppDataLocal%\FONTCACHE.DAT - detected as BKDR_BLACKEN.A
This is executed as follows:
rundll32.exe AppDataLocal%\FONTCACHE.DAT,MakeCache
(Note: %AppDataLocal% is the Application Data folder found in Local Settings, where it is usually C:\Documents and Settings\{user name}\Local Settings\Application Data on Windows 2000, Windows Server 2003, and Windows XP (32- and 64-bit); C:\Users\{user name}\AppData\Local on Windows Vista (32- and 64-bit), Windows 7 (32- and 64-bit), Windows 8 (32- and 64-bit), Windows 8.1 (32- and 64-bit), Windows Server 2008, and Windows Server 2012.)
Autostart Technique
This backdoor drops the following file(s) in the Windows User Startup folder to enable its automatic execution at every system startup:
- %User Startup%\{GUID}.lnk
(Note: %User Startup% is the current user's Startup folder, which is usually C:\Windows\Profiles\{user name}\Start Menu\Programs\Startup on Windows 98 and ME, C:\WINNT\Profiles\{user name}\Start Menu\Programs\Startup on Windows NT, and C:\Documents and Settings\{User name}\Start Menu\Programs\Startup.)
Other System Modifications
This backdoor adds the following registry entries as part of its installation routine:
HKEY_CURRENT_USER\Software\Microsoft\
Internet Explorer\Main
Check_Associations = "no"
HKEY_CURRENT_USER\Software\Microsoft\
Internet Explorer\Main
DisableFirstRunCustomize = "1"
HKEY_CURRENT_USER\Software\Microsoft\
Internet Explorer\Main
NoProtectedModeBanner = "1"
HKEY_CURRENT_USER\Software\Microsoft\
Internet Explorer\InformationBar
FirstTime = "0"
HKEY_CURRENT_USER\Software\Microsoft\
Internet Explorer\New Windows
PopupMgr = "no"
HKEY_CURRENT_USER\Software\Microsoft\
Internet Explorer\PhishingFilter
Enabled = "0"
HKLM\SOFTWARE\Microsoft\
Windows\CurrentVersion\Internet Settings\
Cache
Persistent = "0"
HKEY_CURRENT_USER\Software\Microsoft\
Internet Explorer\TabbedBrowsing
WarnOnClose = "0"
HKEY_CURRENT_USER\Software\Microsoft\
Internet Explorer\TabbedBrowsing
WarnOnCloseAdvanced = "0"
HKEY_CURRENT_USER\Software\Microsoft\
Internet Explorer\Recovery
NoReopenLastSession = "1"
HKEY_CURRENT_USER\Software\Microsoft\
Windows NT\CurrentVersion\AppCompatFlags\
Layers
%System%\rundll32.exe = "DisableNXShowUI"
Backdoor Routine
This backdoor executes the following commands from a remote malicious user:
- Uninstall itself
- Load Plugin
- Unload Plugin
- Update config
- Download and execute arbitrary file
- Update DLL component
It connects to the following websites to send and receive information:
- {BLOCKED}5.{BLOCKED}3.193.131/{BLOCKED}c2VhdHJlaWRlczk0/dirconf/check.php
- sends the following: id={malware id}&bid={build id}=&nm={value}&cn={value}&num={value}
SOLUTION
Step 1
Before doing any scans, Windows XP, Windows Vista, and Windows 7 users must disable System Restore to allow full scanning of their computers.
Step 2
Remove the malware/grayware file that dropped/downloaded BKDR_BLACKEN.A. (Note: Please skip this step if the threat(s) listed below have already been removed.)
- TROJ_MDLOAD.PGTY
Step 3
Restart in Safe Mode
Step 4
Delete this registry value
Important: Editing the Windows Registry incorrectly can lead to irreversible system malfunction. Please do this step only if you know how or you can ask assistance from your system administrator. Else, check this Microsoft article first before modifying your computer's registry.
- In HKEY_CURRENT_USER\Software\Microsoft\Internet Explorer\Main
- Check_Associations = "no"
- Check_Associations = "no"
- In HKEY_CURRENT_USER\Software\Microsoft\Internet Explorer\InformationBar
- FirstTime = "0"
- FirstTime = "0"
- In HKEY_CURRENT_USER\Software\Microsoft\Internet Explorer\New Windows
- PopupMgr = "no"
- PopupMgr = "no"
- In HKEY_CURRENT_USER\Software\Microsoft\Internet Explorer\PhishingFilter
- Enabled = "0"
- Enabled = "0"
- In HKEY_LOCAL_MACHINE\SOFTWARE\Microsoft\Windows\CurrentVersion\Internet Settings\Cache
- Persistent = "0"
- Persistent = "0"
- In HKEY_CURRENT_USER\Software\Microsoft\Internet Explorer\TabbedBrowsing
- WarnOnClose = "0"
- WarnOnClose = "0"
- In HKEY_CURRENT_USER\Software\Microsoft\Internet Explorer\TabbedBrowsing
- WarnOnCloseAdvanced = "0"
- WarnOnCloseAdvanced = "0"
- In HKEY_CURRENT_USER\Software\Microsoft\Internet Explorer\Main
- DisableFirstRunCustomize = "1"
- DisableFirstRunCustomize = "1"
- In HKEY_CURRENT_USER\Software\Microsoft\Internet Explorer\Recovery
- NoReopenLastSession = "1"
- NoReopenLastSession = "1"
- In HKEY_CURRENT_USER\Software\Microsoft\Internet Explorer\Main
- NoProtectedModeBanner = "1"
- NoProtectedModeBanner = "1"
- In HKEY_CURRENT_USER\Software\Microsoft\Windows NT\CurrentVersion\AppCompatFlags\Layers
- %System%\rundll32.exe = "DisableNXShowUI"
- %System%\rundll32.exe = "DisableNXShowUI"
Step 5
Search and delete this file
- %User Startup%\{GUID}.lnk
Step 6
Restart in normal mode and scan your computer with your Trend Micro product for files detected as BKDR_BLACKEN.A. If the detected files have already been cleaned, deleted, or quarantined by your Trend Micro product, no further step is required. You may opt to simply delete the quarantined files. Please check this Knowledge Base page for more information.
Did this description help? Tell us how we did.