TSPY_ONLINEG.EW
PWS:Win32/OnLineGames.LH(Microsoft), Bloodhound.Gampass.E(Norton), PWS-Mmorpg!bdw(McAfee), W32/Onlinegames.PWZ!tr(Fortinet), Trojan.Win32.Genome(Ikarus), a variant of Win32/PSW.WOW.NVE trojan(Eset)
Windows 2000, Windows Server 2003, Windows XP (32-bit, 64-bit), Windows Vista (32-bit, 64-bit), Windows 7 (32-bit, 64-bit)


Threat Type: Spyware
Destructiveness: No
Encrypted:
In the wild: Yes
OVERVIEW
This spyware arrives as a component bundled with malware/grayware packages.
TECHNICAL DETAILS
Arrival Details
This spyware arrives as a component bundled with malware/grayware packages.
Autostart Technique
This spyware adds the following registry entries to enable its automatic execution at every system startup:
HKEY_CURRENT_USER\Software\Microsoft\
Windows\CurrentVersion\Run
Disker = "rundll32.exe {malware path}\{malware name}.dll, DW"
Other System Modifications
This spyware adds the following registry entries:
HKEY_LOCAL_MACHINE\SOFTWARE\Microsoft\
Windows NT\CurrentVersion\Windows
LoadAppInit_DLLs = "1"
Other Details
This spyware connects to the following possibly malicious URL:
- http://www.{BLOCKED}nef.com
SOLUTION
Step 1
Before doing any scans, Windows XP, Windows Vista, and Windows 7 users must disable System Restore to allow full scanning of their computers.
Step 2
Restart in Safe Mode
Step 3
Delete this registry value
Important: Editing the Windows Registry incorrectly can lead to irreversible system malfunction. Please do this step only if you know how or you can ask assistance from your system administrator. Else, check this Microsoft article first before modifying your computer's registry.
- In HKEY_CURRENT_USER\Software\Microsoft\Windows\CurrentVersion\Run
- Disker = "rundll32.exe {malware path}\{malware name}.dll, DW"
- Disker = "rundll32.exe {malware path}\{malware name}.dll, DW"
- In HKEY_LOCAL_MACHINE\SOFTWARE\Microsoft\Windows NT\CurrentVersion\Windows
- LoadAppInit_DLLs = "1"
- LoadAppInit_DLLs = "1"
Step 4
Restart in normal mode and scan your computer with your Trend Micro product for files detected as TSPY_ONLINEG.EW. If the detected files have already been cleaned, deleted, or quarantined by your Trend Micro product, no further step is required. You may opt to simply delete the quarantined files. Please check this Knowledge Base page for more information.
Step 5
Restore a file/s that has/have been corrupted/modified by this malware/grayware
To restore system files:
• For Windows 2000:
- Insert your Windows 2000 Installation CD in your CD-ROM drive.
- Click Start>Run.
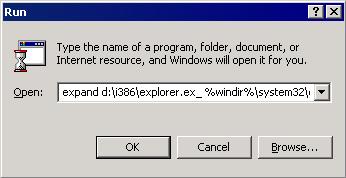
- In the Open text box, type the following then click OK:
expand D:\i386\{file to restore}.ex_ %windir%\system32\{file to restore}.exe
• For Windows XP and Windows Server 2003:
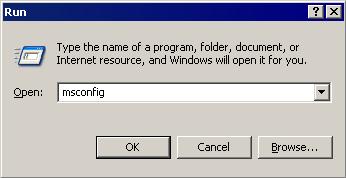
- Click Start>Run.
- In the Open text box, type the following then click OK:
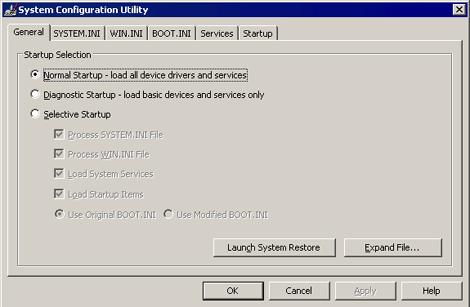
MSCONFIG - Make sure that the option Normal startup - load all device drivers and services option is selected.
- Click the Expand button.
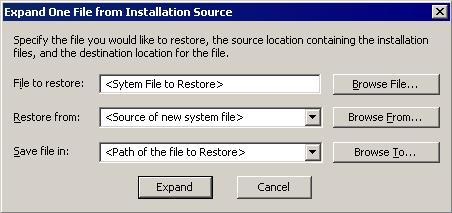
- In the dialog box that appears, type the following:
- File to restore contains the path and file name of the file you wish to restore.
- Restore from contains the path to the Windows CAB files. This path may vary from machine to machine. It may be in a local drive, in a network drive, or in a CD-ROM. In the local drive, it is usually in C:\WINDOWS\OPTIONS\INSTALL.
- Save file in contains the path of the file you wish to restore (Do not include the file name).
- Click the Expand button.
Did this description help? Tell us how we did.