Arrival Details
This Ransomware arrives on a system as a file dropped by other malware or as a file downloaded unknowingly by users when visiting malicious sites.
Autostart Technique
This Ransomware adds the following registry entries to enable its automatic execution at every system startup:
HKEY_CURRENT_USER\Software\Microsoft\
Windows\CurrentVersion\Run
WidnowsNetworkingSvc = {Malware Path}\{Malware Name}
HKEY_CURRENT_USER\Software\Microsoft\
Windows\CurrentVersion\Run
WidnowsNetworkingSvcn = %Desktop%\READ_DECRYPT_FILES.txt
Other System Modifications
This Ransomware adds the following registry keys:
HKEY_LOCAL_MACHINE\SOFTWARE\Microsoft\
SystemCertificates\AuthRoot\Certificates\
DAC9024F54D8F6DF94935FB1732638CA6AD77C13
Blob = {hex code}
It changes the desktop wallpaper by modifying the following registry entries:
HKEY_CURRENT_USER\Control Panel\Desktop
Wallpaper = %User Profile%\Pictures\626.jpg
HKEY_CURRENT_USER\Control Panel\Desktop
Wallpaper = %User Temp%\BGInfo.bmp
Download Routine
This Ransomware connects to the following URL(s) to download its component file(s):
- http://{BLOCKED}.{BLOCKED}chive.com/icons/alecive/flatwoken/512/Apps-Lock-icon.png
Other Details
This Ransomware drops the following file(s)/component(s):
- %Application Data%\id.bin - contains ID
(Note: %Application Data% is the Application Data folder, where it usually is C:\Documents and Settings\{user name}\Application Data on Windows 2000, Windows Server 2003, and Windows XP (32- and 64-bit); C:\Users\{user name}\AppData\Roaming on Windows Vista (32- and 64-bit), Windows 7 (32- and 64-bit), Windows 8 (32- and 64-bit), Windows 8.1 (32- and 64-bit), Windows Server 2008, and Windows Server 2012.)
It does the following:
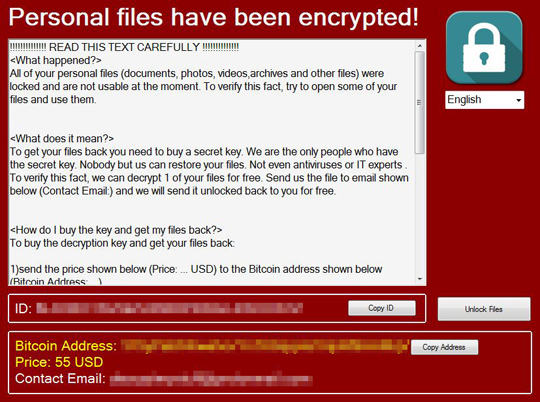
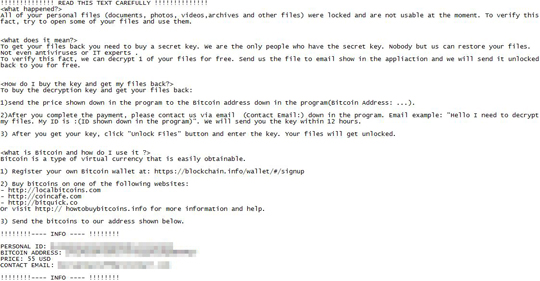
- Displays the following window:
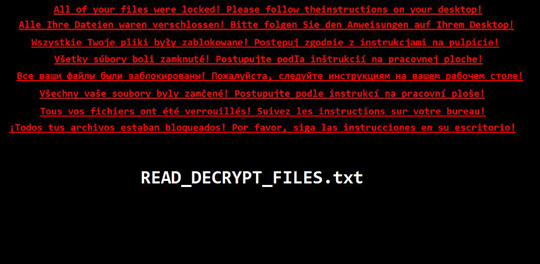
- Desktop wallpaper displays the following:
Ransomware Routine
This Ransomware avoids encrypting files with the following strings in their file name:
- .cfg
- .chm
- .config
- .dll
- .exe
- .hlp
- .ini
- .pdb
It appends the following extension to the file name of the encrypted files:
It drops the following file(s) as ransom note:
- %User Profile%\Downloads\READ_DECRYPT_FILES.txt
- %User Profile%\Pictures\READ_DECRYPT_FILES.txt
- %User Profile%\Videos\READ_DECRYPT_FILES.txt
- %User Profile%\Music\READ_DECRYPT_FILES.txt
- %Desktop%\READ_DECRYPT_FILES.txt
Step 1
Before doing any scans, Windows XP, Windows Vista, and Windows 7 users must disable System Restore to allow full scanning of their computers.
Step 2
Note that not all files, folders, and registry keys and entries are installed on your computer during this malware's/spyware's/grayware's execution. This may be due to incomplete installation or other operating system conditions. If you do not find the same files/folders/registry information, please proceed to the next step.
Step 3
Identify and terminate files detected as RANSOM_BRICKR.A
[ Learn More ]
[ back ]
- Windows Task Manager may not display all running processes. In this case, please use a third-party process viewer, preferably Process Explorer, to terminate the malware/grayware/spyware file. You may download the said tool here.
- If the detected file is displayed in either Windows Task Manager or Process Explorer but you cannot delete it, restart your computer in safe mode. To do this, refer to this link for the complete steps.
- If the detected file is not displayed in either Windows Task Manager or Process Explorer, continue doing the next steps.
To terminate the malware/grayware/spyware process:
- Scan your computer with your Trend Micro product and take note of the name of the malware/grayware/spyware detected.
- Open Windows Task Manager. To do this, press CTRL+SHIFT+ESC.
- View the list of all running programs. To do this:
• For Windows 2000, XP, Server 2003, Vista, 7 and Server 2008 users, click the Processes tab.
• For Windows 8, 8.1 and Server 2012 users, click the Details tab. - In the list of running programs, locate a malware/grayware/spyware file detected earlier.
- Select the detected files, then press either the End Task or the End Process button, depending on the version of Windows you are using.
- Do the same for the remaining detected malware/grayware/spyware files in the list of running programs.
- To check if the malware/grayware/spyware process has been terminated, close Task Manager, and then open it again.
- Close Task Manager.
Step 4
Restart in Safe Mode
[ Learn More ]
[ back ]
To restart in Safe Mode:
• For Windows 2000 users
- Restart your computer.
- Press F8 when you see the Starting Windows bar at the bottom of the screen.
- Choose the Safe Mode option from the Windows Advanced Options menu then press Enter.
• For Windows XP users
- Restart your computer.
- Press F8 after the Power-On Self Test (POST) routine is done. If the Windows Advanced Options menu does not appear, try restarting then pressing F8 several times when the POST screen appears.
- Choose the Safe Mode option from the Windows Advanced Options menu then press Enter.
• For Windows Server 2003 users
- Restart your computer.
- Press F8 after Windows starts up. If the Windows Advanced Options menu does not appear, try restarting again and pressing F8 several times afterward.
- On the Windows Advanced Option menu, use the arrow keys to select Safe Mode then press Enter.
• For Windows Vista, Windows 7, and Windows Server 2008 users
- Restart your computer.
- Press F8 after the Power-On Self Test (POST) routine is done. If the Advanced Boot Options menu does not appear, try restarting and then pressing F8 several times after the POST screen is displayed.
- On the Advanced Boot Options menu, use the arrow keys to select the Safe Mode option, and then press Enter.
• For Windows 8, Windows 8.1, and Windows Server 2012 users
- Access the Charms bar by moving your mouse pointer to the upper right corner of the screen.
- Move your mouse pointer down and click Settings>Change your PC Settings.
- In the left panel, click General.
- In the right panel, scroll down to the bottom to find the Advanced startup section, then click the Restart now button and wait for the system to restart.
- In the Advanced Startup menu, click Troubleshoot>Advanced Options>Startup Settings>Restart and wait for the system to restart.
- In the Startup Settings menu, press 4 to enable safe mode.
Step 5
Delete this registry value
[ Learn More ]
[ back ]
Important: Editing the Windows Registry incorrectly can lead to irreversible system malfunction. Please do this step only if you know how or you can ask assistance from your system administrator. Else, check this Microsoft article first before modifying your computer's registry.
- In HKEY_CURRENT_USER\Software\Microsoft\Windows\CurrentVersion\Run
- WidnowsNetworkingSvc = {Malware Path}\{Malware Name}
- In HKEY_CURRENT_USER\Software\Microsoft\Windows\CurrentVersion\Run
- WidnowsNetworkingSvcn = %Desktop%\READ_DECRYPT_FILES.txt
To delete the registry value this malware created:
- Open Registry Editor. To do this:
» For Windows 2000, Windows XP, and Windows Server 2003 users, click Start>Run, type regedit in the text box provided, and then press Enter.
» For Windows Vista, Windows 7, and Windows Server 2008 users, click the Start button, type regedit in the Search input field then press Enter.
» For Windows 8, Windows 8.1, and Windows Server 2012 users, right-click on the lower left corner of the screen, click Run, type regedit in the text box provided, and then press Enter. - In the left panel of the Registry Editor window, double-click the following:
HKEY_CURRENT_USER>Software>Microsoft>Windows>CurrentVersion>Run - In the right panel, locate and delete the entry:
WidnowsNetworkingSvc = {Malware Path}\{Malware Name} - Again In the right panel, locate and delete the entry:
WidnowsNetworkingSvcn = %Desktop%\READ_DECRYPT_FILES.txt - Close Registry Editor.
Step 6
Delete this registry key
[ Learn More ]
[ back ]
Important: Editing the Windows Registry incorrectly can lead to irreversible system malfunction. Please do this step only if you know how or you can ask assistance from your system administrator. Else, check this Microsoft article first before modifying your computer's registry.
- In HKEY_LOCAL_MACHINE\SOFTWARE\Microsoft\SystemCertificates\AuthRoot\Certificates\DAC9024F54D8F6DF94935FB1732638CA6AD77C13
To delete registry keys this malware/grayware created:
- Open Registry Editor. To do this:
» For Windows 2000, Windows XP, and Windows Server 2003 users, click Start>Run, type regedit in the text box provided, and then press Enter.
» For Windows Vista, Windows 7, and Windows Server 2008 users, click the Start button, type regedit in the Search input field then press Enter.
» For Windows 8, Windows 8.1, and Windows Server 2012 users, right-click on the lower left corner of the screen, click Run, type regedit in the text box provided, and then press Enter. - In the left panel of the Registry Editor window, double-click the following:
HKEY_LOCAL_MACHINE>SOFTWARE>Microsoft>SystemCertificates>AuthRoot>Certificates>DAC9024F54D8F6DF94935FB1732638CA6AD77C13 - Still in the left panel, locate and delete the key:
Blob = {hex code} - Close Registry Editor.
Step 7
Search and delete these files
[ Learn More ]
[ back ]
There may be some files that are hidden. Please make sure you check the
Search Hidden Files and Folders checkbox in the "More advanced options" option to include all hidden files and folders in the search result.
- %Application Data%\id.bin
- %User Profile%\Downloads\READ_DECRYPT_FILES.txt
- %User Profile%\Pictures\READ_DECRYPT_FILES.txt
- %User Profile%\Videos\READ_DECRYPT_FILES.txt
- %User Profile%\Music\READ_DECRYPT_FILES.txt
- %Desktop%\READ_DECRYPT_FILES.txt
- %User Profile%\Pictures\626.jpg
To delete malware/grayware files:
For Windows 2000, Windows XP, and Windows Server 2003:
- Right-click Start then click Search....
- In the File name* input box, type
- %Application Data%\id.bin
- %User Profile%\Downloads\READ_DECRYPT_FILES.txt
- %User Profile%\Pictures\READ_DECRYPT_FILES.txt
- %User Profile%\Videos\READ_DECRYPT_FILES.txt
- %User Profile%\Music\READ_DECRYPT_FILES.txt
- %Desktop%\READ_DECRYPT_FILES.txt
- %User Profile%\Pictures\626.jpg
- In the Look In drop-down list, select My Computer then press Enter.
- Once located, select the file then press SHIFT+DELETE to delete it.
- Repeat the said steps for all files listed.
*Note: The file name input box title varies depending on the Windows version (e.g. Search for files or folders named or All or part of the file name.).
For Windows Vista, Windows 7, Windows Server 2008, Windows 8, Windows 8.1, and Windows Server 2012:
- Open a Windows Explorer window.
- For Windows Vista, 7, and Server 2008 users, click Start>Computer.
- For Windows 8, 8.1, and Server 2012 users, right-click on the lower left corner of the screen, then click File Explorer.
- In the Search Computer/This PC input box, type:
- %Application Data%\id.bin
- %User Profile%\Downloads\READ_DECRYPT_FILES.txt
- %User Profile%\Pictures\READ_DECRYPT_FILES.txt
- %User Profile%\Videos\READ_DECRYPT_FILES.txt
- %User Profile%\Music\READ_DECRYPT_FILES.txt
- %Desktop%\READ_DECRYPT_FILES.txt
- %User Profile%\Pictures\626.jpg
- Once located, select the file then press SHIFT+DELETE to delete it.
- Repeat the said steps for all files listed.
*Note: Read the following Microsoft page if these steps do not work on Windows 7.
Step 8
Reset your Desktop properties
[ Learn More ]
[ back ]
To restore your wallpaper:
- Click Start>Settings>Control Panel.
- Double-click the Display option and click the Background tab.
- Click the Browse button to select your preferred wallpaper or select an image from the Windows built-in wallpapers.
- Choose OK to apply the changes.
Step 9
Restart in normal mode and scan your computer with your Trend Micro product for files detected as RANSOM_BRICKR.A. If the detected files have already been cleaned, deleted, or quarantined by your Trend Micro product, no further step is required. You may opt to simply delete the quarantined files. Please check this Knowledge Base page for more information.
Step 10
Restore encrypted files from backup.


