Despite its relative novelty in the market, Kubernetes is now the third most wanted platform among developers as of early this year. Given the platform’s popularity and high adoption rates, it’s important for developers to ensure that Kubernetes security is always prioritized.
In a previous article, we gave an overview on how to secure the 4 Cs (cloud, cluster, container, and code) of cloud-native systems and the importance of applying security principles such as least privilege and defense-in-depth. We also tackled the common risks and threats that might affect Kubernetes deployments.
To help developers further in keeping Kubernetes deployments as secure as possible, we detail some of the basic steps of securing Kubernetes clusters.
[Read our guide on securing worker nodes]
If you run your clusters using managed services such as Azure Kubernetes Service (AKS), Amazon Elastic Kubernetes Service (Amazon EKS), or Google Kubernetes Engine (GKE), the cloud provider handles control plane security. Despite this, it’s always good to gain a better understanding of the available security options and to make sure that your cloud provider is following the recommended security best practices.
However, if you must deploy and maintain your own control planes for any compliance- or business-related reason, it’s a must that you carefully apply the settings discussed here in your Kubernetes clusters for better protection of your overall Kubernetes environments.
The control plane
The Kubernetes control plane serves as the main node of your cluster as it manages the worker nodes. It is the brain that keeps this complex system up, running, and in a good state.
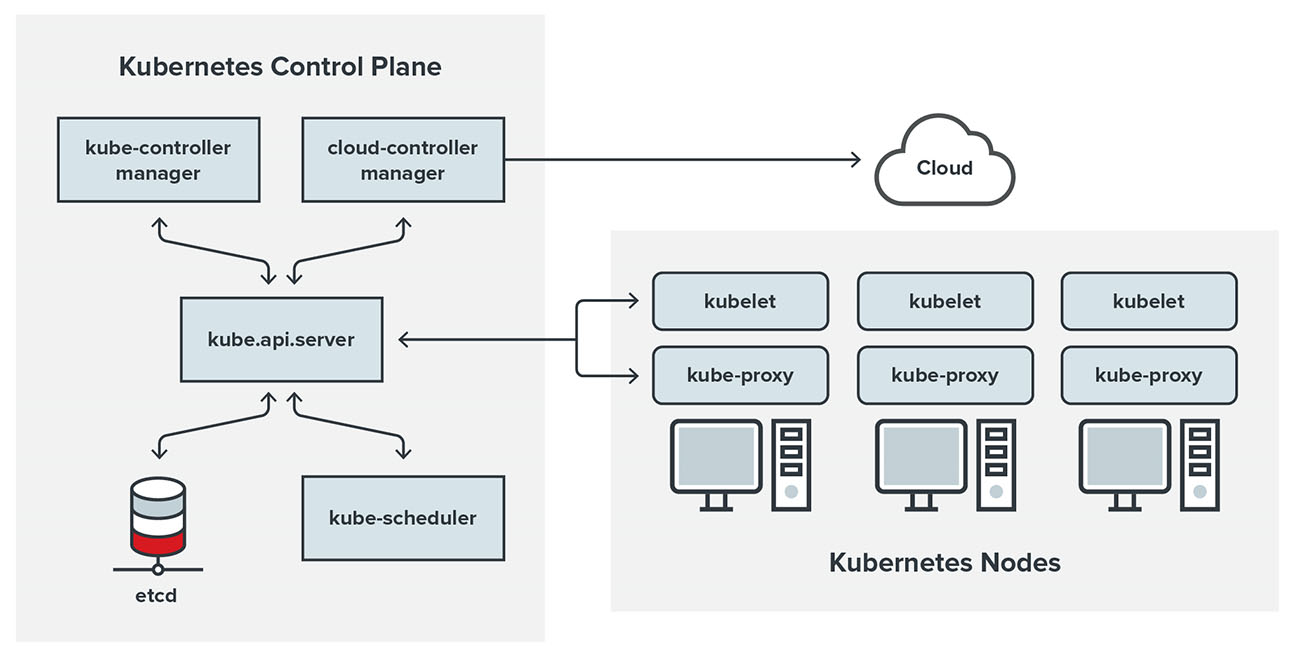
Figure 1. A diagram of a Kubernetes cluster and its components
Image credit: Kubernetes.io
Based on the preceding diagram, the main components that power the cluster are located in the control plane. The diagram also shows that all communications go through the kube API server or kube-apiserver, which is basically a REST API that defines and controls all of Kubernetes’s management and operational functions. Malicious actors will try to get access to the kube-apiserver and the control plane, and once these are compromised, they can then proceed to compromising the whole cluster by manipulating the pods (where containers are placed) by deploying new ones, editing already running ones, or even completely removing them.
How to secure the control plane and its main components
One of the basic things that you can do to secure the control plane is to perform integrity monitoring for the most critical Kubernetes files. By doing this, you will be alerted immediately of any change in the configuration. From a Kubernetes security perspective, critical files are those that can affect the entire cluster when compromised. A list of the main files and directories that you would need to constantly monitor, along with the recommended ownership and permission levels, are detailed in the latest CIS Kubernetes Benchmark v1.5.1. It should be noted that most of these are the default values of the Kubernetes installation, so you already have a baseline to start with:
|
File or directory |
Recommended ownership |
Recommended permission (or more restrictive) |
|
/etc/kubernetes/manifests/kube-apiserver.yaml |
root:root |
644 |
|
/etc/kubernetes/manifests/kube-controller-manager.yaml |
root:root |
644 |
|
/etc/kubernetes/manifests/kube-scheduler.yaml |
root:root |
644 |
|
/etc/kubernetes/manifests/etcd.yaml |
root:root |
644 |
|
Container Network Interface file |
root:root |
644 |
|
/var/lib/etcd |
etcd:etcd |
700 |
|
/etc/kubernetes/admin.conf |
root:root |
644 |
|
/etc/kubernetes/scheduler.conf |
root:root |
644 |
|
/etc/kubernetes/controller-manager.conf |
root:root |
644 |
|
/etc/kubernetes/pki/ |
root:root |
---* |
|
Kubernetes PKI certificate file: /etc/kubernetes/pki/*.crt |
root:root |
644 |
|
Kubernetes PKI key file: /etc/kubernetes/pki/*.key |
root:root |
600 |
* The CIS Kubernetes Benchmark doesn't state recommended permissions for this directory
The API server
There are still organizations that make the critical mistake of leaving the kube-apiserver publicly exposed. Exposing your API server to the public is the most common entry point for attackers, and allows them to take over your cluster. Although this is not enabled by default now, some engineers might end up enabling it for testing purposes and forget to revert those changes once testing is done. This issue might escalate over time, especially during the pandemic where most people work from home. At this very moment, there are attackers and bots that are constantly searching the internet for open Kubernetes API servers so that they can brute force their way into them and try to exploit them. This is what happened to Tesla, when one of their Kubernetes consoles was found to be publicly accessible and was abused for illegal cryptocurrency mining operations.
How to secure the kube-apiserver
It’s important to learn how to check that your kube-apiserver is not exposed to the internet. One simple way to check is by attempting to hit your API server from an external IP. If you’re able to do so, that means that other machines have the ability to do the same — unless, of course, you have restricted it to your own IP.
You can try this curl request to see if your API is public-facing or otherwise: https://my-control-plane-ip:6443/api
If you get a response from this curl request, such as the one below, then it means your API is publicly available and is exposed to the world:

Figure 2. An example of a response after performing a curl request to check if an API is publicly accessible or not
Still, getting a response like this shouldn’t automatically be cause for panic. Fortunately, there are different ways to apply a fix, which would depend on how your engineers will access the API. We believe, however, that the best and safest option is the following.
Allow engineers to access the cluster API only via the internal network (or the corporate VPN). This can be easily accomplished by setting the proper firewall or security groups rules (in the case of AWS). The only thing you’d have to consider here is the possibility of emergency situation, during which your cluster admin wouldn’t have ready access to the company laptop or a VPN. In such a situation, there would then be a need to grant access to the cluster by safelisting the cluster admin’s IP, preferably to the specific API port.
You can also limit the access to your cluster on GKE via the master authorized networks settings, thereby creating another layer of protection in case someone is able to tamper with your firewall rules. Here’s the command to do that:
gcloud container clusters create --enable-master-authorized-networks --master-authorized-networks=CIDR
More information about this feature can be found on GKE’s official documentation.
Another thing that you can do is to check and validate if your kube-apiserver has the proper recommended security settings by running this simple command on your control plane node:
ps -ef | grep kube-apiserver
Here is a sample of the output of this command:

Figure 3. Output of checking if the kube-apiserver has the proper recommended security settings
Since this a cluster that was just created via the kubeadm tool and with the default settings, we can analyze the values. The list below contains some of the security configurations recommended to be applied in your kube-apiserver from the CIS Foundation Benchmarks:
|
CIS # |
Name |
Value |
Default |
|
1.2.1 |
Ensure that the –anonymous-auth argument is set to false or not set |
Not set |
Y |
|
1.2.2 |
Ensure that the –basic-auth-file argument is not set |
Not set |
Y |
|
1.2.3 |
Ensure that the –token-auth-file parameter is not set |
Not set |
Y |
|
1.2.4 |
Ensure that the –kubelet-https argument is set to true or doesn't exist |
Not set |
Y |
|
1.2.5 |
Ensure that the –kubelet-client-certificate and –kubelet-client-key arguments are set as appropriate |
/etc/kubernetes/pki/apiserver-kubelet-client.crt /etc/kubernetes/pki/apiserver-kubelet-client.key |
Y |
|
1.2.6 |
Ensure that the –kubelet-certificate-authority argument is set as appropriate |
N/S |
N |
|
1.2.7 |
Ensure that the –authorization-mode argument is not set to AlwaysAllow |
Node, RBAC |
Y |
|
1.2.8 |
Ensure that the –authorization-mode argument includes Node |
Node, RBAC |
Y |
|
1.2.9 |
Ensure that the –authorization-mode argument includes RBAC |
Node, RBAC |
Y |
|
1.2.10 |
Ensure that the admission control plugin EventRateLimit is set |
Not set |
N |
|
1.2.11 |
Ensure that the admission control plugin AlwaysAdmit is not set |
Not set |
N |
|
1.2.12 |
Ensure that the admission control plugin AlwaysPullImages is set |
Not set |
N |
|
1.2.13 |
Ensure that the admission control plugin SecurityContextDeny is set if PodSecurityPolicy is not used |
Not set |
N |
|
1.2.14 |
Ensure that the admission control plugin ServiceAccount is set |
Not set |
N |
|
1.2.15 |
Ensure that the admission control plugin NamespaceLifecycle is set |
Not set |
N |
|
1.2.16 |
Ensure that the admission control plugin PodSecurityPolicy is set |
Not set |
N |
|
1.2.17 |
Ensure that the admission control plugin NodeRestriction is set |
NodeRestriction |
Y |
|
1.2.18 |
Ensure that the –insecure-bind-address argument is not set |
Not set |
Y |
|
1.2.19 |
Ensure that the –insecure-port argument is set to 0 |
0 |
Y |
|
1.2.20 |
Ensure that the –secure-port argument is not set to 0 |
6443 |
Y |
|
1.2.21 |
Ensure that the –profiling argument is set to false |
Not set |
N |
|
1.2.22 |
Ensure that the –audit-log-path argument is set |
Not set |
N |
|
1.2.23 |
Ensure that the –audit-log-maxage argument is set to 30 or as appropriate |
Not set |
N |
|
1.2.24 |
Ensure that the –audit-log-maxbackup argument is set to 10 or as appropriate |
Not set |
N |
|
1.2.25 |
Ensure that the –audit-log-maxsize argument is set to 100 or as appropriate |
Not set |
N |
|
1.2.26 |
Ensure that the –request-timeout argument is set as appropriate |
Not set |
N |
|
1.2.27 |
Ensure that the –service-account-lookup argument is set to true |
Not set |
N |
|
1.2.28 |
Ensure that the –service-account-key-file argument is set as appropriate |
/etc/kubernetes/pki/sa.pub |
Y |
|
1.2.29 |
Ensure that the –etcd-certfile and –etcd-keyfile arguments are set as appropriate |
/etc/kubernetes/pki/apiserver-etcd-client.crt /etc/kubernetes/pki/apiserver-etcd-client.key |
Y |
|
1.2.30 |
Ensure that the –tls-cert-file and –tls-private-key-file arguments are set as appropriate |
/etc/kubernetes/pki/apiserver.crt /etc/kubernetes/pki/apiserver.key |
Y |
|
1.2.31 |
Ensure that the –client-ca-file argument is set as appropriate |
/etc/kubernetes/pki/ca.crt
|
Y |
|
1.2.32 |
Ensure that the –etcd-cafile argument is set as appropriate |
/etc/kubernetes/pki/etcd/ca.crt |
Y |
|
1.2.33 |
Ensure that the –encryption-provider-config argument is set as appropriate |
Not set |
N |
|
1.2.34 |
Ensure that encryption providers are appropriately configured |
Not set |
N |
|
1.2.35 |
Ensure that the API server only makes use of strong cryptographic ciphers |
Not set |
N |
As you can see from this table, at least half of the recommended security settings by the CIS Foundation Benchmarks aren’t set or enabled by default when installing Kubernetes from scratch using the kubeadm tool. Please consider evaluating and setting these configurations before putting your cluster into production.
RBAC authorization
Now that you’ve restricted access to your API server and reduced the number of people who can access it, how do you make sure that the engineers who are accessing the cluster won’t cause any damage? The answer to this is RBAC.
RBAC will allow you to configure who can access what in your cluster. We highly recommend that you enable RBAC authorization in your cluster, especially production ones. You can also restrict any user from accessing the kube-system namespace where all the control plane pods are located.
The RBAC in Kubernetes is enabled via the kube-api-server when starting it up with the following flag:
–authorization-mode=RBAC
How to check if RBAC is enabled
As seen in figure 3, the RBAC authorization module is already enabled by default in the latest versions; all you have to do is create the proper roles and assign or bind them to a specific set of users. But keep in mind that RBAC can still be disabled by a malicious user. To check if the RBAC has been disabled or otherwise, you can run the same command we ran before to check for the Kube API server configurations on your control plane and look for the –authorization-mode=RBAC:
ps -ef | grep kube-apiserver
When using RBAC authorization, there are four kinds of API objects that you can use:
- Role. This object will contain rules that represent a set of permissions within a namespace.
- RoleBinding. This object simply grants the permissions of a Role to one or more users.
- ClusterRole. This object will also contain rules that represent a set of permissions, but it is not tied to a namespace, and it will be applied on the cluster level.
- ClusterRoleBinding. Similar to RoleBinding, it also does permission-granting but for a ClusterRole to a set of users.
These set permissions mentioned on the Role and the ClusterRole are usually formed with a combination of a Verb and a Noun, which represents a Kubernetes object/resource. Some examples include:
- Get Pods
- List Secrets
- Watch ConfigMaps
Here’s how Role Object is represented into a YAML file:
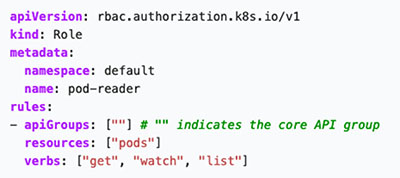
Figure 4. An example of a Role Object in YAML allowing users to Get, Watch and List pods on the default namespace
Image source: Kubernetes.io
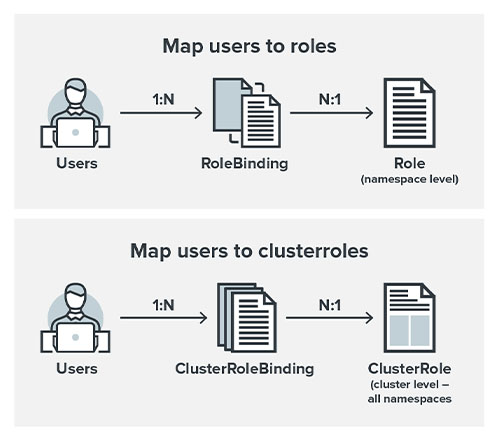
Figure 5. How users are related to Roles via the RoleBindings (same thing for ClusterRoles and ClusterRoleBindings)
It is important to note that after you create a binding between a Role (or ClusterRole) and a set of users, you won’t be able to change the Role or ClusterRole that it refers to. If you need to do that, you will first need to remove the binding object and then create a replacement for that object.
More details on how to implement RBAC in Kubernetes and some specific examples can be found in the official documentation.
The etcd
The etcd is the main data storage location for your cluster — this means that all of your cluster objects are saved here. Because of its hierarchal and standardized nature, Kubernetes deployments use it to store REST API objects and installation configurations. When the etcd is left exposed, it can potentially leak critical data. Unfortunately, etcd misconfiguration remains rampant — we’ve seen over 2,600 exposed etcd services on Shodan this year.
How to secure the etcd
As with any data storage system, the same security principles should be applied to etcd. Both encryption in transit and at rest should be implemented and enabled. To check if your etcd is configured with TLS encryption, type the following command on the control plane host:
ps -ef | grep etcd
After that, check if both arguments –cert-file and –key-file are set appropriately. If they aren’t, you will have to modify the etcd pod specification file located at /etc/kubernetes/manifests/etcd.yaml and set these arguments with their respective file paths, such as:
–cert-file=
			–key-file=
As of today, the current Kubernetes default installation already sets up the proper keys and certificates and TLS encryption to etcd. More detailed instructions can be found on item 2.1 of the CIS Kubernetes Benchmark.
If an attacker somehow bypasses the API server and is able to manipulate objects directly into etcd, it would be the same as having full access to the entire cluster. The attacker would have the ability to create pods, read secrets, and see sensitive data such as user credentials. To prevent this from happening, on top of having encryption in transit enabled, you would also need to have encryption at rest enabled to prevent data leakage or tampering with the etcd data.
After checking and protecting the in-transit data transfer, we can now proceed to encrypting all etcd data that is at rest and ensure higher security for the data inside your clusters.
To check if encryption at rest is already enabled, look for this argument in the kube-apiserver settings:
–encryption-provider-config
If it’s not enabled, you need to create an EncryptionConfiguration object and point the
–encryption-provider-config to that file location. After, restart your API server and the encryption should be applied. Here’s an example of the EncryptionConfiguration object that will encrypt all of your secrets before storing it to etcd:
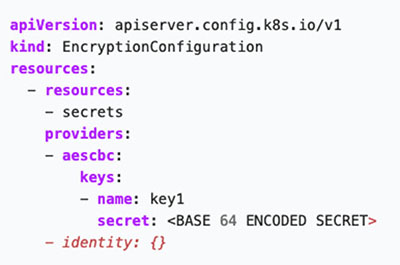
Figure 6. An example of an EncryptionConfiguration object to encrypt secrets
Image source: Kubernetes.io
The data will be encrypted when written to etcd and any created or updated secret should be encrypted when stored to etcd after you restart your kube-apiserver with the –encryption-provider-config argument. Further details on the different fields and encryption providers for this object can be found on the official documentation.
The network
By default, all pods in a cluster can communicate with any other pod on the same cluster, including pods from different namespaces, and this includes the main kube-system namespace where the control plane is hosted. Unless changed, this is the network policy that is configured when you install Kubernetes and deploy your cluster.
Now, let’s suppose an attacker is able to deploy a pod into any namespace on your cluster. To add, that pod can reach and access all of the pods that manage the Kubernetes cluster, which are located on the kube-system namespace. Can you already see the problem in this situation?
How to restrict pod communications
Network policies can help address this pod open communication issue. A network policy specifies how groups of pods can communicate with each other and other network endpoints. NetworkPolicy API resources use labels to select pods and define rules that specify what type of traffic is allowed for the selected pods. These policies can help you restrict access between pods or namespaces. All the access can be configured via labels in YAML files, allowing you to block pods from accessing other pods on the kube-system namespace, for example.
Here’s an example of a network policy:
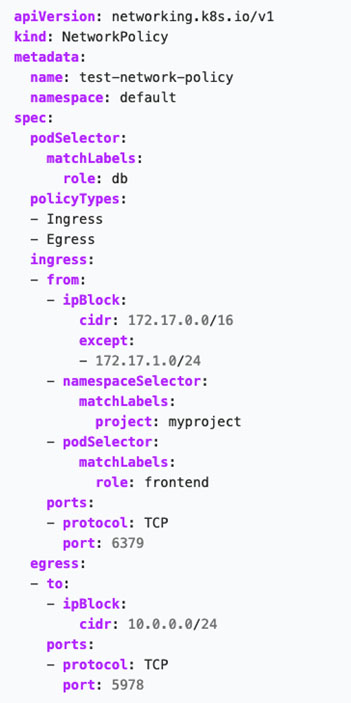
Figure 7. An example of a Kubernetes network policy
Source: Kubernetes.io
An important note: You need to be using a networking solution or a container network interface (CNI) that supports the NetworkPolicy object; otherwise, it will have no effect on your cluster. It’s vital to learn about network plugins and their features, as well as to be able to compare the most commonly used CNI plugins to see which one would best work for your system.
We’ve created a Kubernetes security list on GitHub that contains blogs, articles, tools and videos that discuss Kubernetes security for those who would like to learn tips on hardening their Kubernetes deployments.
In the second part of this series, we discuss how to protect worker nodes, the kubelet, and the pods. We’ll also tackle setting up audit logs that will give you greater visibility of what’s going on in your cluster.
Like it? Add this infographic to your site:
1. Click on the box below. 2. Press Ctrl+A to select all. 3. Press Ctrl+C to copy. 4. Paste the code into your page (Ctrl+V).
Image will appear the same size as you see above.
 Complexity and Visibility Gaps in Power Automate
 AI in the Crosshairs: Understanding and Detecting Attacks on AWS AI Services with Trend Vision One™
 Trend 2025 Cyber Risk Report
 The Road to Agentic AI: Navigating Architecture, Threats, and Solutions