Trojan.Win32.FRIVINHO.THABEBD
W32/KillMBR.NDS!tr (FORTINET)
Windows


Threat Type: Trojan
Destructiveness: No
Encrypted:
In the wild: Yes
OVERVIEW
This Trojan arrives on a system as a file dropped by other malware or as a file downloaded unknowingly by users when visiting malicious sites.
TECHNICAL DETAILS
Arrival Details
This Trojan arrives on a system as a file dropped by other malware or as a file downloaded unknowingly by users when visiting malicious sites.
Installation
This Trojan adds the following processes:
- schtasks.exe /Create /TN CustomMBR /ru SYSTEM /SC ONSTART /TR "{malware filepath}\{malware filename}.exe -BypassWarning"
Autostart Technique
This Trojan adds the following registry entries to enable its automatic execution at every system startup:
HKEY_CURRENT_USER\Software\Microsoft\
Windows\CurrentVersion\Run
CustomMBR = {malware filepath}\{malware filename}.exe -BypassWarning
Process Termination
This Trojan terminates the following processes if found running in the affected system's memory:
- wininit.exe
Other Details
This Trojan does the following:
- It overwrites all of the bootloader configurations in the affected system.
- It destroys the Master Boot Record (MBR) of all physical drives in the system making the affected machine dysfunctional.
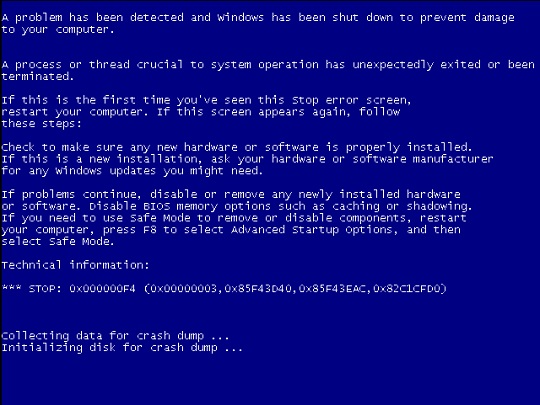
- It displays a warning message when executed without parameter.

- It displays a system message after crashing the system.

It accepts the following parameters:
- -BypassWarning → executes without warning message box
It adds the following scheduled tasks:
- Name = CustomMBR
Trigger = At system startup
Action = {malware filepath}\{malware filename}.exe
SOLUTION
Step 1
Trend Micro Predictive Machine Learning detects and blocks malware at the first sign of its existence, before it executes on your system. When enabled, your Trend Micro product detects this malware under the following machine learning name:
- TSPY.Win32.TRX.XXPE50FFF077
Step 2
Before doing any scans, Windows 7, Windows 8, Windows 8.1, and Windows 10 users must disable System Restore to allow full scanning of their computers.
Step 3
Note that not all files, folders, and registry keys and entries are installed on your computer during this malware's/spyware's/grayware's execution. This may be due to incomplete installation or other operating system conditions. If you do not find the same files/folders/registry information, please proceed to the next step.
Step 4
Restart in Safe Mode
Step 5
Deleting Scheduled Tasks
The following {Task Name} - {Task to be run} listed should be used in the steps identified below:
- CustomMBR = {malware filepath}\{malware filename}.exe -BypassWarning
For Windows 2000, Windows XP, and Windows Server 2003:
- Open the Windows Scheduled Tasks. Click Start>Programs>Accessories>
System Tools>Scheduled Tasks. - Locate each {Task Name} values listed above in the Name column.
- Right-click on the said file(s) with the aforementioned value.
- Click on Properties. In the Run field, check for the listed {Task to be run}.
- If the strings match the list above, delete the task.
For Windows Vista, Windows 7, Windows Server 2008, Windows 8, Windows 8.1, and Windows Server 2012:
- Open the Windows Task Scheduler. To do this:
• On Windows Vista, Windows 7, and Windows Server 2008, click Start, type taskschd.msc in the Search input field, then press Enter.
• On Windows 8, Windows 8.1, and Windows Server 2012, right-click on the lower left corner of the screen, click Run, type taskschd.msc, then press Enter. - In the left panel, click Task Scheduler Library.
- In the upper-middle panel, locate each {Task Name} values listed above in the Name column.
- In the lower-middle panel, click the Actions tab. In the Details column, check for the {Task to be run} string.
- If the said string is found, delete the task.
Step 6
Delete this registry value
Important: Editing the Windows Registry incorrectly can lead to irreversible system malfunction. Please do this step only if you know how or you can ask assistance from your system administrator. Else, check this Microsoft article first before modifying your computer's registry.
- In HKEY_CURRENT_USER\Software\Microsoft\Windows\CurrentVersion\Run
- CustomMBR = {malware filepath}\{malware filename}.exe -BypassWarning
- CustomMBR = {malware filepath}\{malware filename}.exe -BypassWarning
Step 7
Restart in normal mode and scan your computer with your Trend Micro product for files detected as Trojan.Win32.FRIVINHO.THABEBD. If the detected files have already been cleaned, deleted, or quarantined by your Trend Micro product, no further step is required. You may opt to simply delete the quarantined files. Please check this Knowledge Base page for more information.
Did this description help? Tell us how we did.