How to Set Up Email Encryption
 For this first article in a series on applying encryption, we’ll be looking at the most basic of encryption, and probably the type you’ll use the most often: email encryption.
Why encrypt your emails?
We’ll say this upfront: email encryption isn't likely to protect your data from certain government organizations if and when they decide to snoop on you. What email encryption will do is to stop other entities (cybercriminals, most likely) from reading your emails and preventing them from stealing your personal information if they somehow manage to get access to your email account. While good security practices can lessen the chances of that happening, it’s always better to err on the side of caution.
With that settled, let’s get on with encrypting your email. Do note that this is for webmail accounts – we’ll be tackling desktop email (such as in Outlook) in a future article.
Step 1: Choose your email encryption extension/add-on and install it.
Today's browsers are pretty impressive. They're easy to use, come with their own security and privacy features, and they also allow other developers to create add-ons (or extensions, if you’re using Chrome) for adding other functionalities. And yes, webmail encryption is one of those functionalities!
So check your browser's app/add-on download marketplace and look for those that pertain to webmail encryption. One of the most popular right now is Mailvelope, an add-on that’s available for both Chrome and Firefox (and with some tweaking, Opera). From here on in, we’ll assume that you picked Mailvelope, downloaded it from its page on your browser’s webstore, and installed it.
Step 2: Generate your encryption keypair.
In a previous article, we covered the basics of encryption and talked about encryption keys. Well, now we’ll have to generate a pair for our use: the public key and the private key. The public key, as we’ve explained previously, is used to encrypt a message, while the private key is used to decrypt the message. The latter in particular is so important to the process that accessing it is password-restricted, so no one but you can use it.
Current webmail encryption add-ons are able to generate keys with a single click. No need to download any other key generator app, since it’s all built-in. If you're using Mailvelope, you can just click on the add-on icon (the padlock icon next to the URL bar), then click Options. This’ll bring up the add-on page. From there, click Setup, then Generate Key.
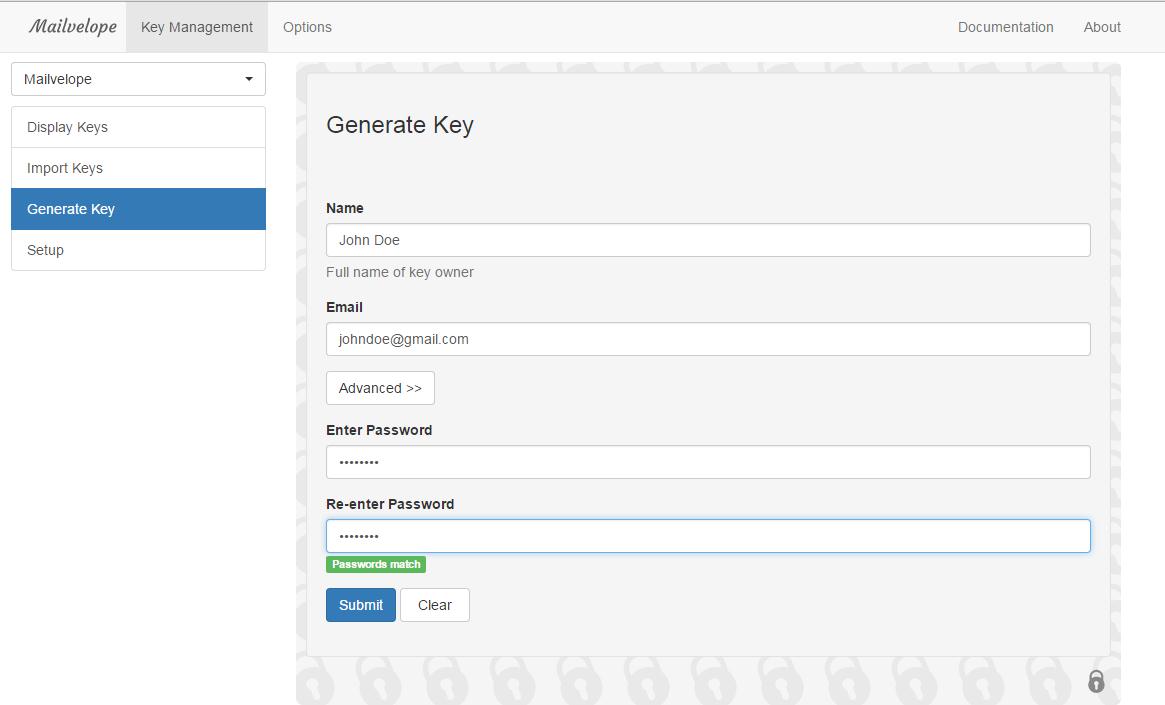
Fill out the blanks, make sure your password is secure (which means that it’s long and hard to figure out), and then press Submit. A green line of text will announce that the keypair generation has been successful.
Log in to the email account you want to use encryption on, and once you're in, click on the extension/add-on button once more to bring up the small menu, then click Add. This will add your webmail to the list of websites that you choose to use encryption on. With any luck, it’s already there, as Mailvelope comes pre-configured with the major webmail providers in mind (Gmail, Yahoo!Mail, Outlook, etc.)
Now you’re ready for encrypted webmail! Refresh your webmail tab and try to compose an email. Wait a few seconds, and in the email editor, a certain button should appear on the right-hand corner:
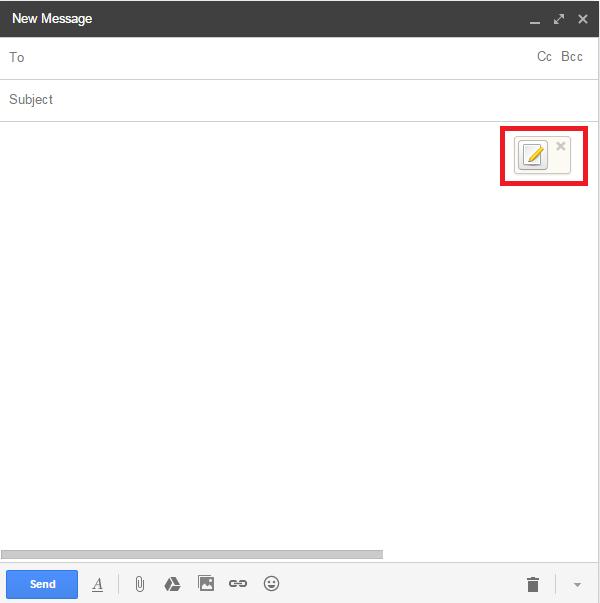
This button means that Mailvelope is ready to encrypt your message. Click that, and another window will pop up for your message.
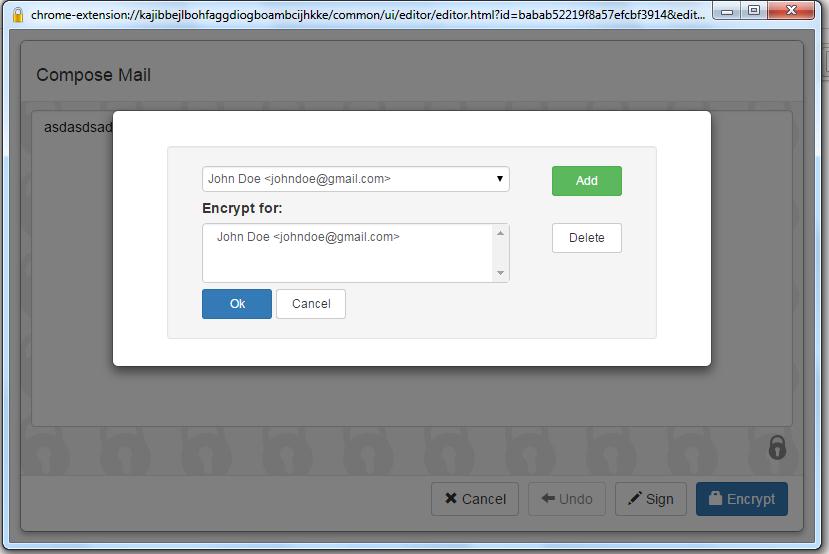
Once you’re done, Click Encrypt. Another dialog box will pop up, where you have to select the person you’re encrypting it for.
All encryption methods require that both the sender and receiver are using the same type of encryption method. Thankfully, most webmail encryption add-ons are free, so it shouldn't be difficult to have your contact download the same add-on and install it. Once that’s done, it’s just a matter of the both of you trading public keys, which is easy enough with Mailvelope’s Export-Import Key function.
To export your public key, just go to the add-on page, click Display Keys, then the key itself, and finally Export. You can either copy-paste the entire thing for your friend to export, or download the text file that you can send to him. Important note: Only share your public key!

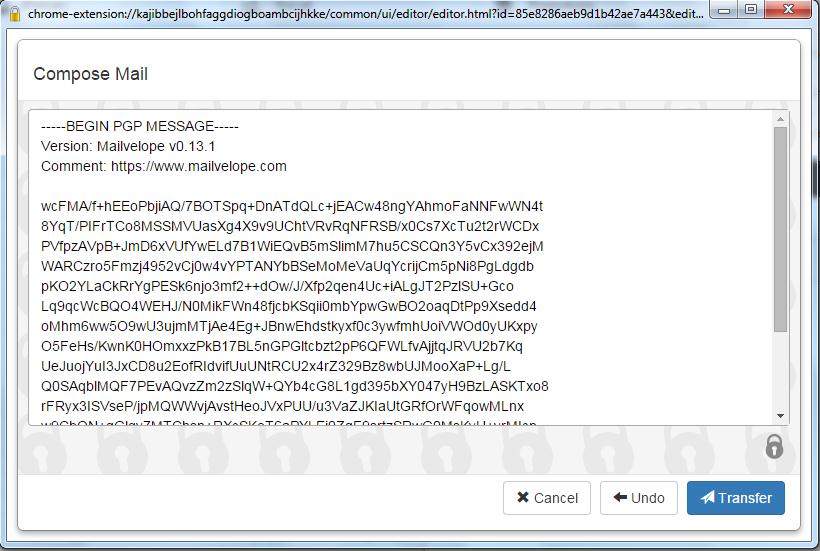
If all goes well, your contact’s name (the person you shared your public key with) should be there on the recipient list. Select their name, press OK, and your encrypted email should appear in the window.
Click Transfer, fill out the recipient and subject field, then Send.
Decrypting any encrypted email you receive is also easy with the add-on installed. Once you receive the email and open it, a button will appear over the encrypted text, in the shape of an envelope with a padlock on it. Click that and it will ask for your private key password. Input it and the email will be decrypted, allowing you to read it.
If you're worried about anyone reading your mail and stealing your private information from it, this should fix it. Even if an unauthorized person manages to log into your email, simple encryption like this can make sure that all they see is a random set of numbers and letters.
We’ll be tackling other types of encryption soon.
Like it? Add this infographic to your site:
1. Click on the box below. 2. Press Ctrl+A to select all. 3. Press Ctrl+C to copy. 4. Paste the code into your page (Ctrl+V).
Image will appear the same size as you see above.
Recent Posts
- Estimating Future Risk Outbreaks at Scale in Real-World Deployments
- The Next Phase of Cybercrime: Agentic AI and the Shift to Autonomous Criminal Operations
- Reimagining Fraud Operations: The Rise of AI-Powered Scam Assembly Lines
- The Devil Reviews Xanthorox: A Criminal-Focused Analysis of the Latest Malicious LLM Offering
- AI Security Starts Here: The Essentials for Every Organization
 Complexity and Visibility Gaps in Power Automate
 AI Security Starts Here: The Essentials for Every Organization
 The AI-fication of Cyberthreats: Trend Micro Security Predictions for 2026
 Stay Ahead of AI Threats: Secure LLM Applications With Trend Vision One