RANSOM_DIRCRYPT.THACOH
Trojan-PSW.Win32.Fareit.anvg (KASPERSKY), Mal/Zbot-QU (SOPHOS_LITE), Trojan:Win32/Kovter.C (MICROSOFT)
Windows


Threat Type: Ransomware
Destructiveness: No
Encrypted: No
In the wild: Yes
OVERVIEW
This Ransomware arrives on a system as a file dropped by other malware or as a file downloaded unknowingly by users when visiting malicious sites.
It connects to certain websites to send and receive information.
It encrypts files with specific file extensions.
TECHNICAL DETAILS
Arrival Details
This Ransomware arrives on a system as a file dropped by other malware or as a file downloaded unknowingly by users when visiting malicious sites.
Installation
This Ransomware drops the following files:
- %Desktop%\{Random Characters}.zip
- %AppDataLocal%\{Random Characters}\{Random Character}.zip
(Note: %Desktop% is the desktop folder, where it usually is C:\Documents and Settings\{user name}\Desktop in Windows 2000, Windows Server 2003, and Windows XP (32- and 64-bit); C:\Users\{user name}\Desktop in Windows Vista (32- and 64-bit), Windows 7 (32- and 64-bit), Windows 8 (32- and 64-bit), Windows 8.1 (32- and 64-bit), Windows Server 2008, and Windows Server 2012.. %AppDataLocal% is the Application Data folder found in Local Settings, where it is usually C:\Documents and Settings\{user name}\Local Settings\Application Data on Windows 2000, Windows Server 2003, and Windows XP (32- and 64-bit); C:\Users\{user name}\AppData\Local on Windows Vista (32- and 64-bit), Windows 7 (32- and 64-bit), Windows 8 (32- and 64-bit), Windows 8.1 (32- and 64-bit), Windows Server 2008, and Windows Server 2012.)
It drops the following copies of itself into the affected system:
- %User Temp%\{Random Characters}.exe
- %AppDataLocal%\{Random Folder}\{Random Characters}.exe
- %System Root%\{GUID}\{Random Characters}.exe
- %Program Files%\{Random Folder}\{Random Characters}.exe
(Note: %User Temp% is the user's temporary folder, where it usually is C:\Documents and Settings\{user name}\Local Settings\Temp on Windows 2000, Windows Server 2003, and Windows XP (32- and 64-bit); C:\Users\{user name}\AppData\Local\Temp on Windows Vista (32- and 64-bit), Windows 7 (32- and 64-bit), Windows 8 (32- and 64-bit), Windows 8.1 (32- and 64-bit), Windows Server 2008, and Windows Server 2012.. %AppDataLocal% is the Application Data folder found in Local Settings, where it is usually C:\Documents and Settings\{user name}\Local Settings\Application Data on Windows 2000, Windows Server 2003, and Windows XP (32- and 64-bit); C:\Users\{user name}\AppData\Local on Windows Vista (32- and 64-bit), Windows 7 (32- and 64-bit), Windows 8 (32- and 64-bit), Windows 8.1 (32- and 64-bit), Windows Server 2008, and Windows Server 2012.. %System Root% is the Windows root folder, where it usually is C:\ on all Windows operating system versions.. %Program Files% is the Program Files folder, where it usually is C:\Program Files on all Windows operating system versions; C:\Program Files (x86) for 32-bit applications running on Windows 64-bit operating systems.)
It adds the following mutexes to ensure that only one of its copies runs at any one time:
- Global\{GUID}
Autostart Technique
This Ransomware creates the following registry entries to enable automatic execution of dropped component at every system startup:
HKEY_CURRENT_USER\Software\Microsoft\
Windows\CurrentVersion\Run
{Random Characters} = %AppDataLocal%\{Random Folder}\{Random Characters}.exe
HKEY_LOCAL_MACHINE\SOFTWARE\Microsoft\
Windows NT\CurrentVersion\Winlogon
Userinit = %System%\userinit.exe,, %Program Files%\{Random Folder}\{Fandom Characters}.exe
It drops the following file(s) in the Windows User Startup folder to enable its automatic execution at every system startup:
- %User Startup%\{Random Characters}.exe
(Note: %User Startup% is the current user's Startup folder, which is usually C:\Documents and Settings\{user}\Start Menu\Programs\Startup on Windows 2000 and XP, and C:\Documents and Settings\{User name}\Start Menu\Programs\Startup on Windows Vista, 7, and 8.)
Other System Modifications
This Ransomware adds the following registry keys:
HKEY_LOCAL_MACHINE\SOFTWARE\{GUID}
ID = {Random Bytes}
HKEY_CURRENT_USER\Software\{GUID}
ID = {Random Bytes}
HKEY_CURRENT_USER\Software\{GUID}
PeriodDisabed = 1
HKEY_LOCAL_MACHINE\SOFTWARE\{GUID}
PeriodDisabed = 1
It modifies the following registry keys:
HKEY_LOCAL_MACHINE\SOFTWARE\Microsoft\
Windows\CurrentVersion\Policies\
System
EnableLUA = 0
HKEY_LOCAL_MACHINE\SYSTEM\ControlSet001\
services\SharedAccess\Parameters\
FirewallPolicy\StandardProfile
DisableNotifications = 1
HKEY_LOCAL_MACHINE\SYSTEM\ControlSet001\
services\SharedAccess\Parameters\
FirewallPolicy\StandardProfile
DoNotAllowExceptions = 0
HKEY_LOCAL_MACHINE\SYSTEM\ControlSet001\
services\SharedAccess\Parameters\
FirewallPolicy\StandardProfile
EnableFirewall = 0
HKEY_LOCAL_MACHINE\SYSTEM\ControlSet001\
services\wscsvc
Start = 4
HKEY_LOCAL_MACHINE\SYSTEM\ControlSet001\
services\wuauserv
Start = 4
HKEY_LOCAL_MACHINE\SYSTEM\ControlSet001\
services\MpsSvc
Start = 4
HKEY_LOCAL_MACHINE\SOFTWARE\Microsoft\
Security Center
AntiVirusOverride = 1
HKEY_LOCAL_MACHINE\SOFTWARE\Microsoft\
Security Center
AntiVirusDisableNotify = 1
HKEY_LOCAL_MACHINE\SOFTWARE\Microsoft\
Security Center
FirewallDisableNotify = 1
HKEY_LOCAL_MACHINE\SOFTWARE\Microsoft\
Security Center
FirewallOverride = 1
HKEY_LOCAL_MACHINE\SOFTWARE\Microsoft\
Security Center
UpdatesDisableNotify = 1
HKEY_LOCAL_MACHINE\SOFTWARE\Microsoft\
Security Center
UacDisableNotify = 1
HKEY_CURRENT_USER\Software\Microsoft\
Windows\CurrentVersion\Policies\
system
DisableTaskMgr = 1
Other Details
This Ransomware connects to the following website to send and receive information:
- http://{BLOCKED}.{BLOCKED}.192.94
- http://{BLOCKED}.{BLOCKED}.26.251
- {Random Domain}.com
It uses domain generation algorithm (DGA) for its C&C servers.
Ransomware Routine
This Ransomware encrypts files with the following extensions:
- .7z
- .accdb
- .ai
- .arw
- .avi
- .bay
- .cdr
- .cr2
- .crw
- .dbf
- .dcr
- .dng
- .doc
- .docm
- .docx
- .dwg
- .dxf
- .dxg
- .eps
- .erf
- .indd
- .iso
- .jpe
- .jpeg
- .jpg
- .kdc
- .mdb
- .mdf
- .mef
- .mpeg
- .mpg
- .mrw
- .nef
- .nrw
- .odb
- .odm
- .odp
- .ods
- .odt
- .ogg
- .orf
- .pdd
- .pef
- .png
- .ppt
- .pptx
- .psd
- .pst
- .ptx
- .r3d
- .raf
- .rar
- .raw
- .rtf
- .rw2
- .rwl
- .srf
- .srw
- .wb2
- .wmv
- .wpd
- .wps
- .xlk
- .xls
- .xlsb
- .xlsm
- .xlsx
- .zip
- .pptm
It avoids encrypting files with the following strings in their file name:
- {Random Characters}
- {Random Characters}.zip
It avoids encrypting files found in the following folders:
- Windows
- System32
- System
- Temporary Internet Files
It appends the following extension to the file name of the encrypted files:
- .enc.rtf
NOTES:
Opening an encrypted file will display the following: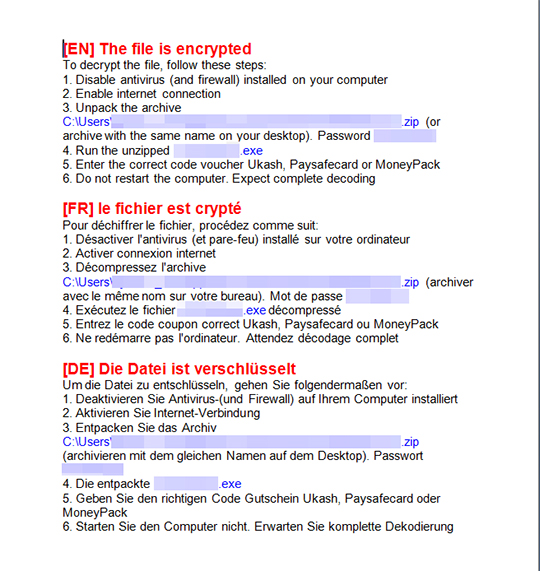
SOLUTION
Step 1
Before doing any scans, Windows XP, Windows Vista, and Windows 7 users must disable System Restore to allow full scanning of their computers.
Step 2
Note that not all files, folders, and registry keys and entries are installed on your computer during this malware's/spyware's/grayware's execution. This may be due to incomplete installation or other operating system conditions. If you do not find the same files/folders/registry information, please proceed to the next step.
Step 3
Since this malware cannot be removed in normal and safe mode, it is necessary to restart using the Windows Recovery Console. To restart the system using the Windows Recovery Console:
• On Windows XP and Server 2003 systems:
- Click Start>Run. In the Open input box, type secpol.msc and press Enter.
- In the left panel, double-click Local Policies>Security Options.
- In the right panel, double-click Recovery Console: Allow floppy copy and access to all drives and folders.
- Select Enabled and click OK.
- Insert the Windows Installation CD into the CD drive, then restart your computer.
- When prompted, press any key to boot from the CD.
- On the main menu, type r to go to the Recovery Console.
- Type the number that corresponds to the drive and directory that contains Windows (usually C:\WINDOWS) and press Enter.
- Type the Administrator password and press Enter.
- In the input box, type the following then press Enter:
SET AllowAllPaths = TRUE
• On Windows Vista, 7, and Server 2008 systems:
- Insert your Windows Installation DVD in the DVD drive, then Press the restart button.
- When prompted, press any key to boot from the DVD.
- Depending on your Windows Installation DVD, you might be required to select the installation language. Then on the Install Windows window, choose your language, locale, and keyboard layout or input method. Click Next, then click Repair your computer.
- Select Use recovery tools that can help fix problems starting Windows. Select your installation of Windows. Click Next.
- If the Startup Repair window appears, click Cancel, Yes, then Finish.
- In the System Recovery Options window, click Command Prompt.
- In the Command Prompt window, type the following then press Enter:
DATA_GENERIC
(Note: In Windows 7, all local drives will be assigned one more than normal. For example, the C: drive becomes D:.) - Type exit and press Enter to close the Command Prompt window.
- Click Restart to restart the system normally.
• On Windows 8, 8.1, and Server 2012 systems:
- Insert your Windows Installation DVD in the DVD drive, then restart your computer.
- When prompted, press any key to boot from the DVD.
- Depending on your Windows Installation DVD, you might be required to select the keyboard layout. Then on the Windows Setup window, choose your language, locale, and input method. Click Next, then click Repair your computer.
- Click Troubleshoot>Advanced Options>Command Prompt.
- In the Command Prompt window, type the following then press Enter:
DATA_GENERIC - Type exit and press Enter to close the Command Prompt window.
- Click Continue to restart the system normally.
Step 4
Delete this registry key
Important: Editing the Windows Registry incorrectly can lead to irreversible system malfunction. Please do this step only if you know how or you can ask assistance from your system administrator. Else, check this Microsoft article first before modifying your computer's registry.
- In HKEY_LOCAL_MACHINE\SOFTWARE\{GUID}
- ID = {Random Bytes}
- ID = {Random Bytes}
- In HKEY_LOCAL_MACHINE\SOFTWARE\{GUID}
- PeriodDisabed = 1
- PeriodDisabed = 1
- In HKEY_CURRENT_USER\Software\{GUID}
- ID = {Random Bytes}
- ID = {Random Bytes}
- In HKEY_CURRENT_USER\Software\{GUID}
- PeriodDisabed = 1
- PeriodDisabed = 1
- In HKEY_CURRENT_USER\Software\Microsoft\Windows\CurrentVersion\Run
- {Random Characters} = %AppDataLocal%\{Random Folder}\{Random Characters}.exe
- {Random Characters} = %AppDataLocal%\{Random Folder}\{Random Characters}.exe
Step 5
Restore this modified registry value
Important: Editing the Windows Registry incorrectly can lead to irreversible system malfunction. Please do this step only if you know how or you can ask assistance from your system administrator. Else, check this Microsoft article first before modifying your computer's registry.
- In HKEY_LOCAL_MACHINE\SOFTWARE\Microsoft\Windows NT\CurrentVersion\Winlogon
- From: "Userinit = %System%\userinit.exe,, %Program Files%\{Random Folder}\{Fandom Characters}.exe"
To: "Userinit = %System%\userinit.exe"
- From: "Userinit = %System%\userinit.exe,, %Program Files%\{Random Folder}\{Fandom Characters}.exe"
- In HKEY_LOCAL_MACHINE\SOFTWARE\Microsoft\Wdows\CurrentVersion\Policies\System
- From: "EnableLUA = 0"
To: "EnableLUA = 1"
- From: "EnableLUA = 0"
- In HKEY_LOCAL_MACHINE\SYSTEM\ControlSet001\services\SharedAccess\Parameters\FirewallPolicy\StandardProfile
- From: "DisableNotifications = 1"
To: "DisableNotifications = 0"
- From: "DisableNotifications = 1"
- In HKEY_LOCAL_MACHINE\SYSTEM\ControlSet001\services\SharedAccess\Parameters\FirewallPolicy\StandardProfile
- From: "DoNotAllowExceptions = 0"
To: "DoNotAllowExceptions = 1"
- From: "DoNotAllowExceptions = 0"
- In HKEY_LOCAL_MACHINE\SYSTEM\ControlSet001\services\SharedAccess\Parameters\FirewallPolicy\StandardProfile
- From: "EnableFirewall = 0"
To: "EnableFirewall = 1"
- From: "EnableFirewall = 0"
- In HKEY_LOCAL_MACHINE\SYSTEM\ControlSet001\services\wscsvc
- From: "Start = 4"
To: "Start = 2"
- From: "Start = 4"
- In HKEY_LOCAL_MACHINE\SYSTEM\ControlSet001\services\wuauserv
- From: "Start = 4"
To: "Start = 2"
- From: "Start = 4"
- In HKEY_LOCAL_MACHINE\SYSTEM\ControlSet001\services\MpsSvc
- From: "Start = 4"
To: "Start = 2"
- From: "Start = 4"
- In HKEY_LOCAL_MACHINE\SOFTWARE\Microsoft\Security Center
- From: "AntiVirusOverride = 1"
To: "AntiVirusOverride = 0"
- From: "AntiVirusOverride = 1"
- In HKEY_LOCAL_MACHINE\SOFTWARE\Microsoft\Security Center
- From: "AntiVirusDisableNotify = 1"
To: "AntiVirusDisableNotify = 0"
- From: "AntiVirusDisableNotify = 1"
- In HKEY_LOCAL_MACHINE\SOFTWARE\Microsoft\Security Center
- From: "FirewallDisableNotify = 1"
To: "FirewallDisableNotify = 0"
- From: "FirewallDisableNotify = 1"
- In HKEY_LOCAL_MACHINE\SOFTWARE\Microsoft\Security Center
- From: "FirewallOverride = 1"
To: "FirewallOverride = 0"
- From: "FirewallOverride = 1"
- In HKEY_LOCAL_MACHINE\SOFTWARE\Microsoft\Security Center
- From: "UpdatesDisableNotify = 1"
To: "UpdatesDisableNotify = 0"
- From: "UpdatesDisableNotify = 1"
- In HKEY_LOCAL_MACHINE\SOFTWARE\Microsoft\Security Center
- From: "UacDisableNotify = 1"
To: "UacDisableNotify = 0"
- From: "UacDisableNotify = 1"
- In HKEY_CURRENT_USER\Software\Microsoft\Wdows\CurrentVersion\Policies\system
- From: "DisableTaskMgr = 1"
To: "DisableTaskMgr = 0"
- From: "DisableTaskMgr = 1"
Step 6
Search and delete this file
- %AppDataLocal%\{Random Characters}\{Random Character}.zip
- %AppDataLocal%\{Random Folder}\{Random Characters}.exe
- %Desktop%\{Random Characters}.zip
- %Program Files%\{Random Folder}\{Random Characters}.exe
- %System Root%\{GUID}\{Random Characters}.exe
- %User Startup%\{Random Characters}.exe
- %User Temp%\{Random Characters}.exe
Step 7
Restart in normal mode and scan your computer with your Trend Micro product for files detected as RANSOM_DIRCRYPT.THACOH. If the detected files have already been cleaned, deleted, or quarantined by your Trend Micro product, no further step is required. You may opt to simply delete the quarantined files. Please check this Knowledge Base page for more information.
Step 8
Restore encrypted files from backup.
Did this description help? Tell us how we did.