Understanding the Kubernetes Security Triad: Image Scanning, Admission Controllers, and Runtime Security
By Magno Logan
Kubernetes, also known as K8s, is a very complex open-source platform that requires detailed attention to security. Despite previous efforts to increase its security, Kubernetes remains insecure by default and requires different security tools to protect the cluster. The 4C’s of cloud native security systems cover the triad of K8s security tools: image scanning, admission controllers and runtime security. This article discusses these tools and when to use them, and also provides some suggested open-source tools.
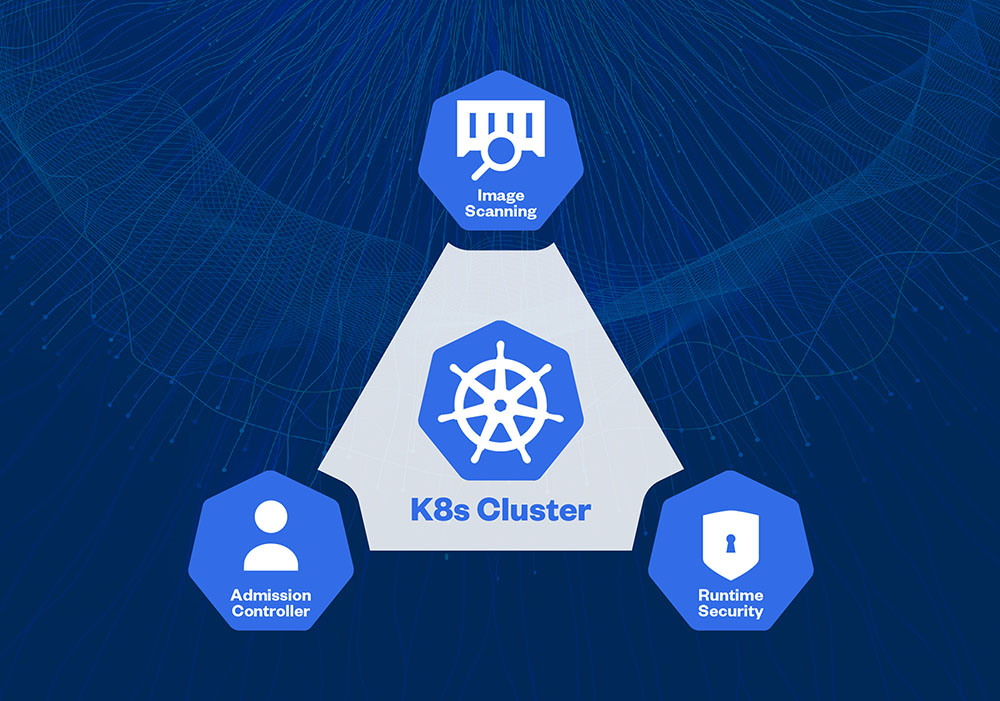
Figure 1. The Kubernetes security tools triad
Though there are many other options in the market, these are the only tools required and are considered to be the most important from an industry perspective.
Image Scanning
In Kubernetes clusters, we deploy pods, the smallest unit of K8s workloads. Each pod can share storage and network resources. Pods can contain one or more containers. Before running the containers in the cluster, ensure that the containers are trustworthy and do not contain any serious security issues. This process is called “image scanning” or “container scanning.”
Image scanning analyzes a specific container image for a series of security issues. These issues can be misconfigurations, vulnerabilities, or in some cases, malware. The image scanning process analyzes each container image layer (i.e., containers are made with layers) to see if the software installed or configured on each layer has a publicly known security issue. This process usually leverages a public vulnerability database such as National Vulnerability Database (NVD), Open Source Vulnerability (OSV) Database, or the GitHub Security Advisory (GHSA) database. Some commercial tools may also use their private vulnerability database.
Here is an example of image layers from the Apache httpd Docker image from Docker Hub:
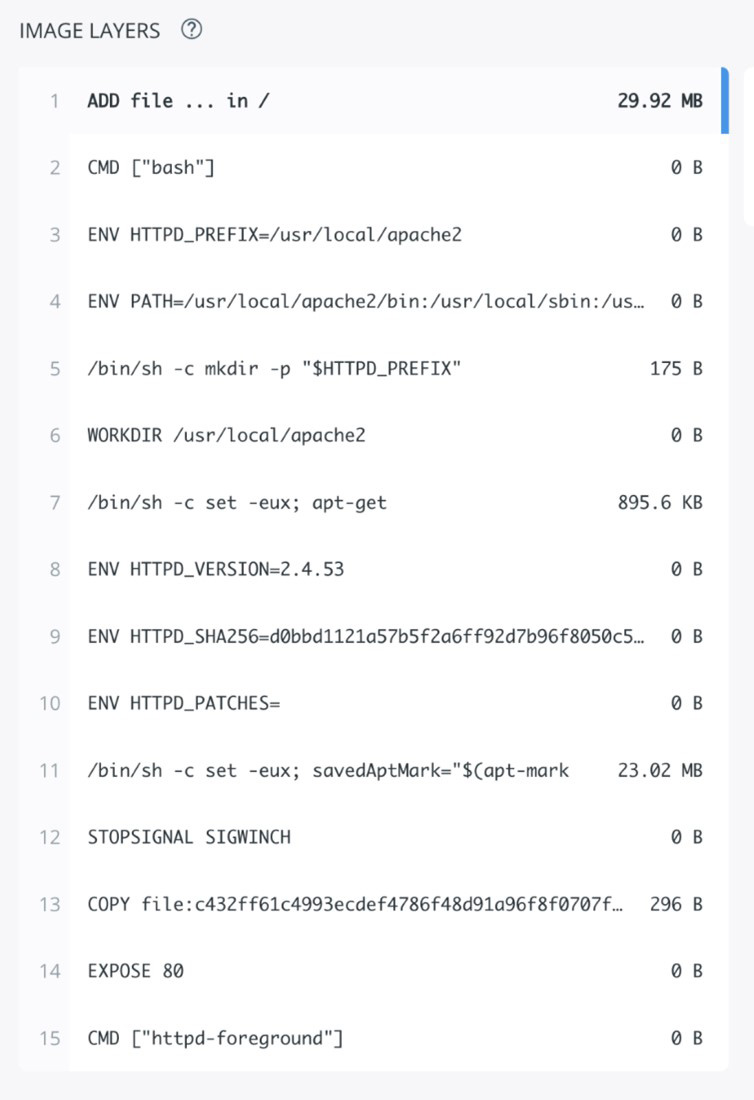
Figure 2. Image layers from Apache httpd docker, latest version for AMD64
By analyzing these image layers, the Image Scanning tool identifies applications installed as well as their versions to help it investigate any vulnerability related to these applications. Some container images are also created based on another container image, which we call the base image. This means that the new container image inherits any vulnerability found on the base image. This is important because changing the base image can sometimes dramatically reduce the vulnerabilities found in the final image. Some tools, like the docker scan command, suggest the safest base images.
In our latest Linux Threat Report, when we analyzed the top 15 of the most popular official Docker images on Docker Hub, all of them had at least one critical vulnerability. Unless you create containers from scratch or use tiny images like Alpine Linux, consider creating and enforcing a vulnerability policy for your container images. Another solution to this situation is by using the Distroless technique.

Figure 3. Vulnerabilities found on Docker Hub's top 15 popular official images
Clair
Clair is one of the first open-source image scanners — and currently one of the most popular. It was developed in Go and maintained by the Quay organization, which is part of Red Hat in IBM. It extracts container content information via its layers and identifies potential security vulnerabilities. There are multiple ways to run Clair to scan your container images. You can use the latest GitHub released version, download it and run the Docker image. You may also set up a local development environment using the GitHub repository and Docker Compose for test purposes.
Docker Scout
Another option for image scanning is the new Docker Scout command. Previously known as Docker Scan, Docker Scout continues to be in its early access phase of development. If you use the Docker CLI, you can use the Docker Scout command to scan and assess the vulnerability in your Docker images.
Added in 2020 and rebranded in 2023, Docker Scout makes it easy to scan container images anytime.
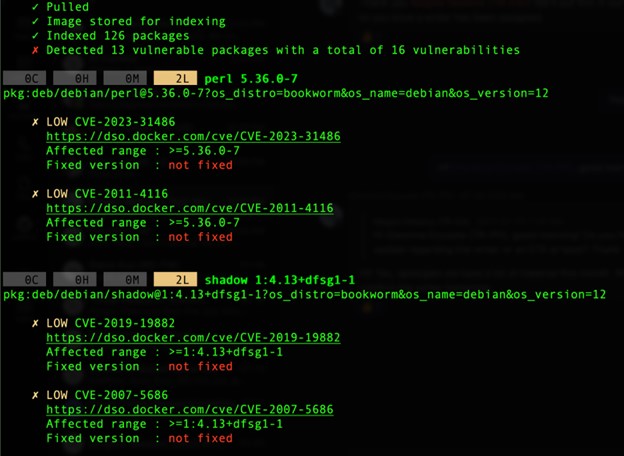
Figure 4. Trimmed results of the command: “docker scout cves debian:latest”
Like any other vulnerability scanning tool, container image scanning solutions scan the container image, collect data on layers, packages and versions installed, and then compare this information to a vulnerability database. Thus, the effectiveness of this method is dependent on the quality, organization and maintenance of the vulnerability database. Relying only on a public vulnerability database, such as the National Vulnerability Database (NVD), is usually insufficient.
Admission Controllers
Admission Controllers manage the admission of K8s objects to your clusters. The kube-apiserver calls the admission controllers after the authentication and authorization phases.
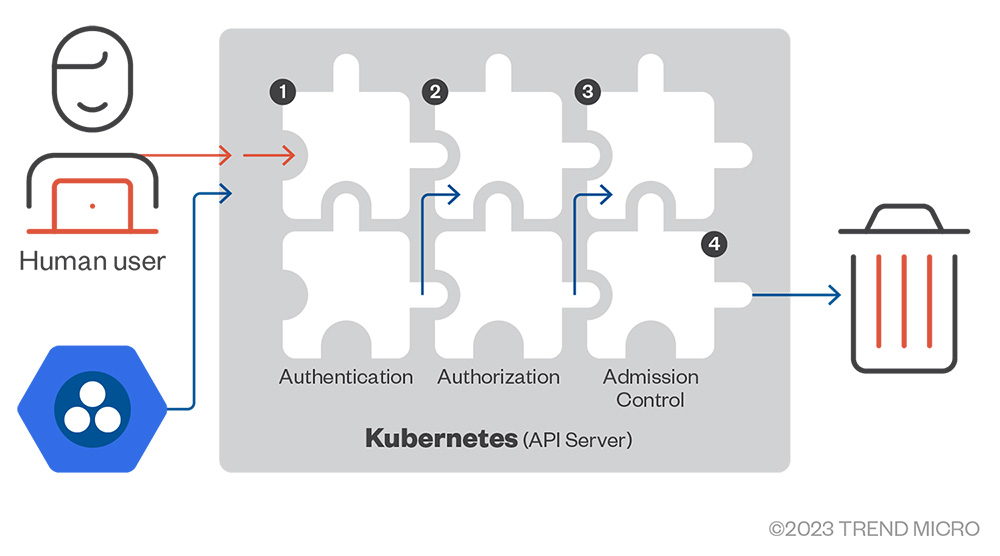
Figure 5. Request stages inside the kube-apiserver: AuthN, AuthZ, and Admission Control
There are three types of admission controllers:
- Mutating – This type can modify the objects in the request.
- Validating – This type only validates the current object structure and information.
- Both – This type performs both mutating and validating functions.
Multiple Admission Controllers are readily available in Kubernetes, which you can turn on in your cluster. For a complete list of native controllers, check the K8s documentation.
However, what is the point of enabling these admission controllers in your cluster? Would these settings make things slower or more complicated for the cluster?
If you want to run a container image available on Docker Hub, you need to ensure that this image is adequately scanned for vulnerabilities before allowing it to run on the cluster. How do you accomplish this task? We have examples using OPA/Gatekeeper and Kyverno, two external admission controllers.
Open Policy Agent (OPA) and Gatekeeper
Open Policy Agent (OPA) is a well-known cloud-native policy agent. OPA covers a broad scope of applications, not just K8s. It allows you to create policies for Continuous Integration (CI) / Continuous Deployment/Delivery (CD) pipelines, API Gateways, etc. These policies help ensure the application behaves as expected and enforce compliance requirements, such as ensuring that every container image is scanned before being deployed.
This article focuses on the more specialized version of OPA for K8s called Gatekeeper. Gatekeeper leverages the power of OPA’s Rego engine and native K8s resources for Kubernetes admission control.
Installing Gatekeeper
There are multiple ways to install Gatekeeper on your cluster. One of the easiest methods is by deploying a release using a pre-built image or via Helm. To deploy a released version with a pre-built image, run the “kubectl” command below; the following K8s API objects will be created:
$ kubectl apply -f https://raw.githubusercontent.com/open-policy-agent/gatekeeper/release-3.7/deploy/gatekeeper.yaml
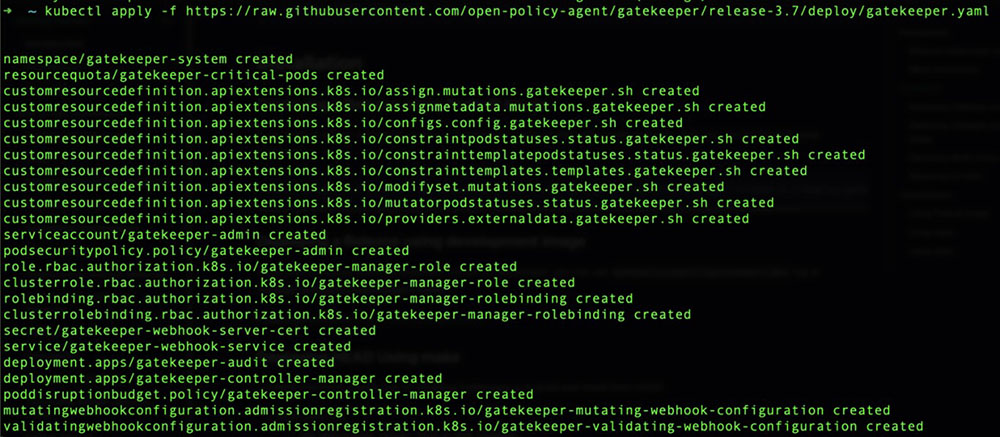
Figure 6. Kubernetes API Objects created to install Gatekeeper on the cluster.
After a few seconds, everything should be installed and running smoothly with all objects created. As shown from the image above, Gatekeeper creates its namespace called gatekeeper-system, so we can query this namespace using the “kubectl get all” command, as shown below:
$ kubectl get all -n gatekeeper-system
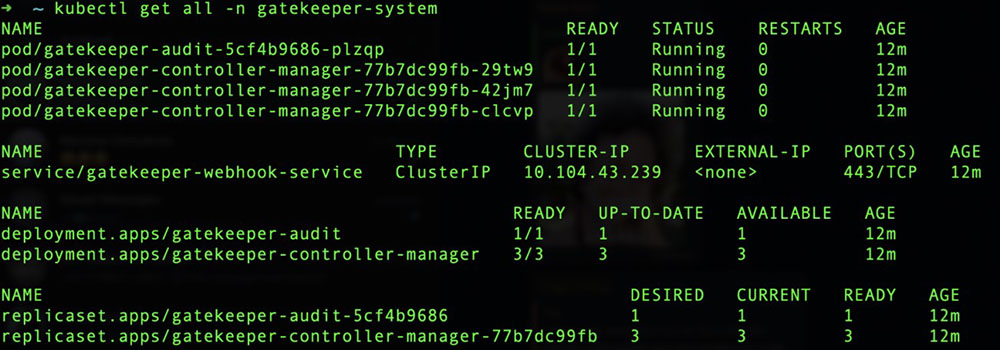
Figure 7. All objects created on the new gatekeeper-system namespace
How do you ensure that Gatekeeper works as expected and enforces policies on your cluster? If you need more help in using OPA and Gatekeeper or applying these in a testing environment, refer to the examples provided in the documentation.
Understanding how the Constraints and Constraint Templates work together can help you either create your policies or leverage the preexisting policies provided by the community and are available on the Gatekeeper library repository. Here is an example of the Allow Privilege Escalation policy: https://github.com/open-policy-agent/gatekeeper-library/tree/master/library/pod-security-policy/allow-privilege-escalation.
Kyverno
Kyverno is another tool that works as an Admission Controller in a K8s cluster. The “Kyverno” name comes from a Greek word meaning “govern.” An interesting fact about Kyverno is that it doesn’t require learning a new language (as OPA does with Rego). Like other admission controllers, it can mutate or validate the requests sent to the K8s API server.
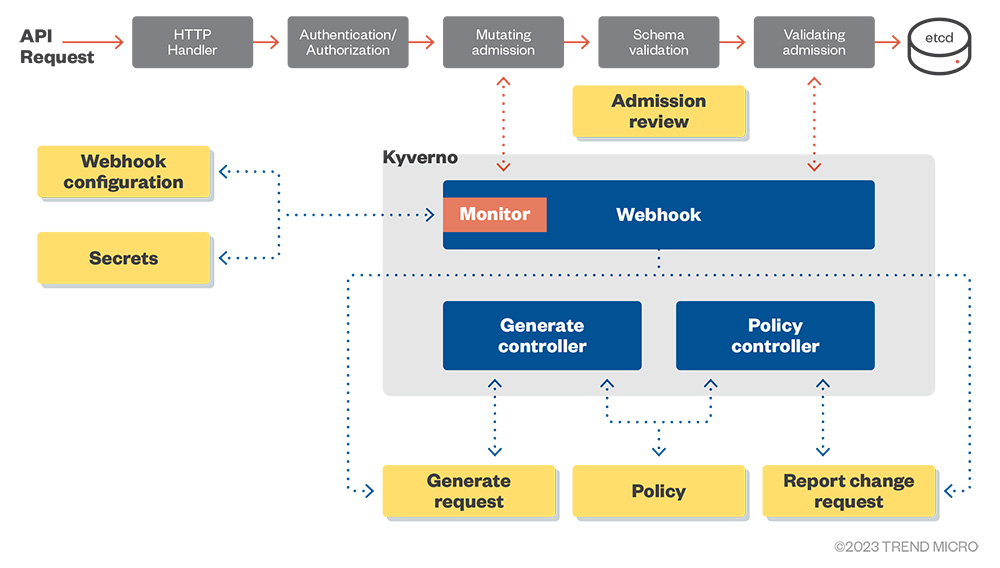
Figure 8. Kyverno high-level architecture overview
Installing Kyverno
Kyverno can easily be installed via Helm or using the YAML manifests. Keep in mind that the latest versions of Kyverno (versions 1.6 to 1.10) only support Kubernetes clusters version 1.16 and above. Thus, make sure that your cluster is up to date before installing Helm or YAML.

Figure 9. Kyverno versions and Kubernetes support
Here is an example of what you can expect in your cluster once you install Kyverno 1.6.2 using the Helm chart:
$ kubectl get all –n kyverno
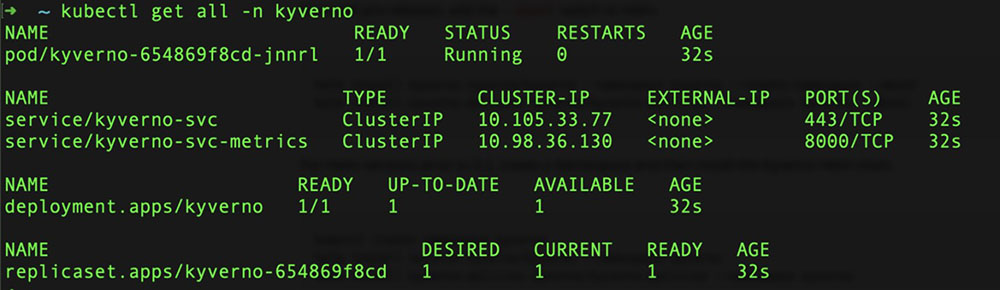
Figure 10. All objects created on the new kyverno namespace
The diagram presents the architecture of the objects using the default installation:
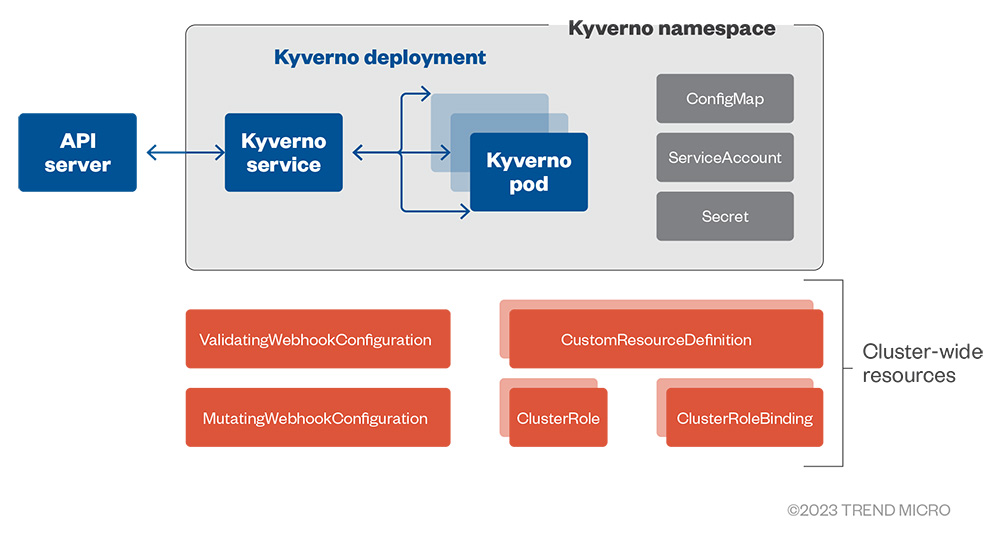
Figure 11. Default Kyverno installation objects and architecture
Similar to OPA and Gatekeeper, Kyverno creates an Admission Controller that processes mutating and validating requests from the kube-apiserver when applying policies and rules. Based on these policies and rules, Kyverno can block the request if the validation is set to enforce or allow the request and log the issue if the validation is set to audit.
After installing Kyverno and its policies, you will notice that an object named “policy reports” is created for every Kubernetes namespace on the cluster containing resources, excluding the “kube-system” and “kyverno” namespace. You can list all the policy reports generated by “kyverno” using the following command:
$ kubectl get policyreport –A

Figure 12. Policy reports generated by Kyverno for the namespaces
Pod Security Policy x Pod Security Admission
When mentioning Admission Controllers, it is important to address the deprecated Pod Security Policy (PSP) and the new Pod Security Admission. PSP served as an earlier version of the Admission Controller that allowed you to specify a set of privilege and access control settings for pods, also known as a security context. Here are a few examples of security context that PSP can enforce:
- AllowPrivilegeEscalation – This setting checks if the container can obtain more privileges than its parent process. As a best practice, it is recommended to configure this setting to “False.”
- RunAsNonRoot – This setting forces the container to run as a non-root user. This setting should be configured to “True.”
- ReadOnlyRootFileSystem – This setting mounts the container root file system in a read-only mode. This setting should be configured to “True.”
For a complete list of security context settings, check the K8s' official documentation.
PSPs have been deprecated since Kubernetes version 1.21 and removed entirely on version 1.25, which reached its End of Life (EOL) on October 2023. If you still use these versions, consider upgrading your clusters to recent ones. For more details on the PSP deprecation, please check this official K8s blog post.
The new Pod Security Admission, a replacement for the PSP, is currently in the Beta stage and has been enabled by default since Kubernetes version 1.23. This new built-in admission controller allows you to categorize your pods based on three levels of security:
- Privileged – This level provides unrestricted access and allows for privilege escalations.
- Baseline – The level provides minimal restrictions and is the default pod configuration.
- Restricted – This level provides heavy restrictions and follows pod hardening best practices.
You can also define the admission control mode you want to enforce for your pods on each namespace. These modes are:
- Enforce – In this mode, violations reject any pods from entering the cluster.
- Audit – When using this mode, violations are recorded in the audit log, but the system still allows pods to enter the cluster.
- Warn – In this mode, violations show warnings to the user but does not log these entries.
| Pod Security Levels | Pod Security Mode |
| Privileged | Enforce |
| Baseline | Audit |
| Restricted | Warn |
Table 1. Different Pod Security Levels and Pod Security Modes available with the new PSA.
Runtime Security
Assuming that you are scanning your container images and controlling their admissions to your clusters, the last step in this triad is ensuring that the running containers do not get modified after execution. This means ensuring that what is running on the cluster matches the content in the container image. This is where Runtime Security comes in.
If admission controllers were like the bouncers in a nightclub, runtime security would be referees in a soccer game. In soccer matches, referees see what is happening inside the field and monitors what each player (pod or container) is doing. Runtime security can detect and alert suspicious behaviors, similar to referees giving a yellow or red card in a soccer game. These actions include blocking suspicious activities or completely removing them from the cluster.
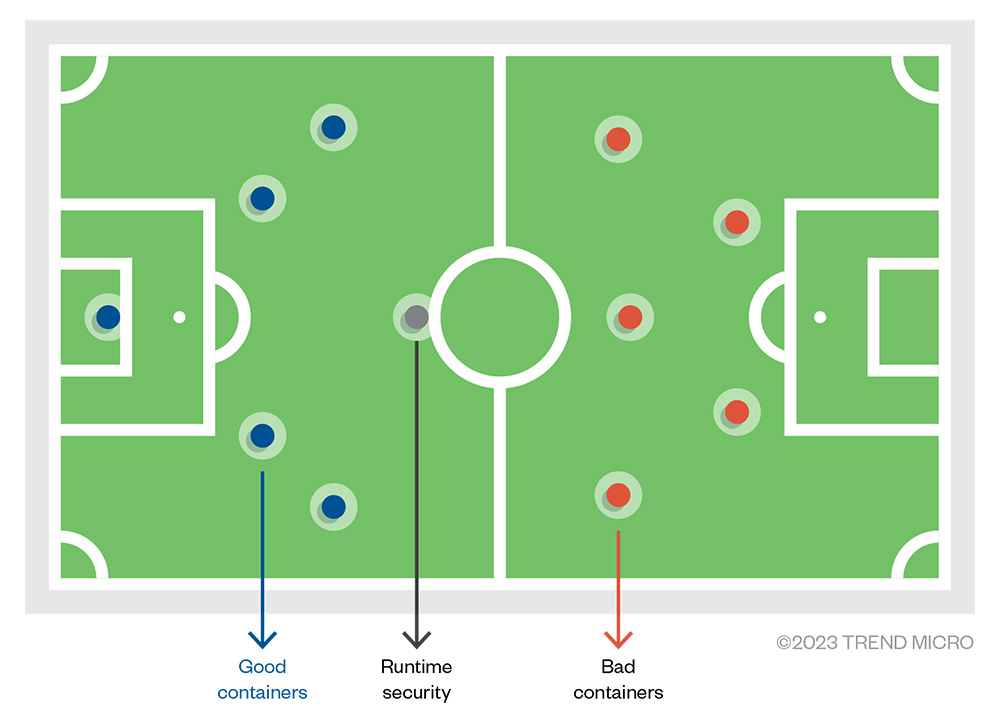
Figure 13. Analogy of Runtime Security as a referee in a soccer match
One of the mechanisms used at this stage is called “drift detection.” This mechanism works by checking the original container image and comparing it with the actual state of the running container. If there are differences between them (e.g., processes running, packages installed), there is a drift; the container has been modified after execution. Technically, this situation should not happen, but it does, at times.
Following the immutable infrastructure principle, containers should not change after execution. Containers are not patched or updated like regular servers. Whenever there is a patch or update for a container image, a new version of the image needs to replace the old one. This process ensures that the image contents always match what’s being executed in the production environment.
But what if an attacker compromises the application in a container environment and installs new software, such as malicious packages or cryptocurrency miners? That is one of the primary goals of runtime security – to detect suspicious or malicious changes at runtime. One of the leading technologies used to achieve this is eBPF.
eBPF
eBPF (previously known as extended Berkeley Packet Filter) is the underlying technology used by many container security solutions. eBPF allows you to run sandboxed or isolated programs within the kernel of an operating system. According to ebpf.io, eBPF can safely and efficiently extend the kernel's capabilities without requiring changing kernel source code or load kernel modules. We recently published how attackers leverage eBPF for malicious purposes.
Falco
Falco is one of the leading open-source tools for security and observability practices. It is a Cloud Native Computing Foundation (CNCF) project with a customizable and flexible rules engine that allows you to create rules and alerts to monitor suspicious behaviors on your systems. It is recognized as the Intrusion Detection System (IDS) for containers.
Even if you do not have the expertise or resources to create your own rules, you can still take advantage of Falco by using the default rule sets provided by the maintainers or by using specific rules developed by the community available at https://securityhub.dev/.
Below is the current list of checks that Falco performs from its default rule set, according to the Falco documentation:
- Privilege escalation using privileged containers
- Namespace changes using tools like setns
- Read/Writes to well-known directories such as /etc, /usr/bin, /usr/sbin, etc
- Creating symlinks
- Ownership and Mode changes
- Unexpected network connections or socket mutations
- Spawned processes using execve
- Executing shell binaries such as sh, bash, csh, zsh, etc
- Executing SSH binaries such as ssh, scp, sftp, etc
- Mutating Linux coreutils executables
- Mutating login binaries
- Mutating shadowutil or passwd executables such as shadowconfig, pwck, chpasswd, getpasswd, change, useradd, etc, and others.
Conclusion
This article showcases the three core components of a Kubernetes security toolset called the “K8s Security Triad: Image Scanning, Admission Controllers, and Runtime Security". We reviewed their functions and capabilities, giving some examples of open-source tools. Like the "Shift Security Left” strategy in DevSecOps, the sooner you detect security issues on your containers, the easier and faster it will be to fix them. It is essential to understand that no single tool will protect your cluster from attacks, so it is vital to have a holistic view of security regarding Kubernetes.
Always bear in mind a defense in depth strategy and apply the least privilege principle. These strategies can ultimately help you minimize the impact in the event of an attack.
Like it? Add this infographic to your site:
1. Click on the box below. 2. Press Ctrl+A to select all. 3. Press Ctrl+C to copy. 4. Paste the code into your page (Ctrl+V).
Image will appear the same size as you see above.
Ultime notizie
- TrendAI™ 2026 Cyber Risk Report
- The Hidden Risk in Your AI Rollout: Your Endpoints
- When AI Becomes a Zero-Day Machine: What Public Sector Organizations Need to Know
- A Data-Driven View of Cyber Risk Structure: How Attack Pressure and Exposure Shape Damage
- Hunt Them All: An AI-Powered Vulnerability Sweep of 19,000 MCP Servers
 Fault Lines in the AI Ecosystem: TrendAI™ State of AI Security Report
 It’s By Design: The Use-After-Free of Azure Cloud
 TrendAI™ 2026 Cyber Risk Report
 Guarding LLMs With a Layered Prompt Injection Representation