In our previous article, we talked about the different ways developers can protect control plane components, including Kube API server configurations, RBAC authorization, and limitations in the communication between pods through network policies.
This time, we focus on best practices that developers can implement to protect worker nodes and their components. We will talk about the kubelet, the pods, and how to set up audit logs to have better visibility into your cluster. At the end, we include a few basic tips that, though they might seem like common sense, still need to be highlighted.
For most of our examples, it should be noted that we will use a kubeadm cluster setup with Kubernetes v1.18.
The worker nodes
If the control plane is the brains of the operation, the worker nodes are the muscles. They run and control all the pods and containers from your cluster. You can have zero or more worker nodes on your cluster, although it is not recommended to run your pods on the same node as the control plane. The main components of a Worker are the kubelet, the container runtime interface (which is Docker by default, but could be another), and the kube-proxy. You can see all your nodes, including the primary node, by using this kubectl command: kubectl get nodes. The output should be something similar to the following image:

Figure 1. The output of the kubectl get nodes command
Let's start with the recommended worker nodes configuration files' ownership and permissions. These are the main files you should monitor for any changes on your Workers, according to the CIS Kubernetes Benchmark v1.5.1:
|
File or directory |
Recommended ownership |
Recommended permission (or more restrictive) |
|
/etc/systemd/system/kubelet.service.d/10-kubeadm.conf |
root:root |
644 |
|
kube-proxy config file |
root:root |
644 |
|
/etc/kubernetes/kubelet.conf |
root:root |
644 |
|
certificate authorities file |
root:root |
644 |
|
/var/lib/kubelet/config.yaml |
root:root |
644 |
Table 1. CIS Kubernetes Benchmark v1.5.1 recommendations
The kubelet
The kubelet is the agent that runs on each node of your cluster and makes sure that all containers are running in a pod. It is also the agent that makes any configuration changes on the nodes. Although it is not shown on the main Kubernetes architecture diagram, even the Master Node has a kubelet (and a kube-proxy) agent running in case you want to run other pods there, although it is not recommended.
There are two main matters that you need to worry about with regard to your kubelet security settings: restricting the kubelet permissions and rotating the kubelet certificates. Restricting the kubelet permissions can prevent attackers from reading your kubelet credentials after they break out of the container and can do other things in your cluster.
To check for these settings, you can run ps -ef | grep kube-apiserver on any of your master node and see what is enabled by default, such as in the image here (Note that we are using the default settings of a kubeadm cluster setup with v1.18.5, so the results here might differ from yours).

Figure 2. Command output of the ps -ef | grep kube-apiserver showing the kubelet security settings
RBAC for Kubelet
From the preceding image, it is observable that the --authorization-mode parameter is already set with the “Node, RBAC” values, which are the ones that are enabled by default. However, this might be different on your cluster, so it is always important to double-check it.
We have not mentioned admission controllers before, but they are pieces of code that can be called during the requests to the Kube API server after the authentication and authorization phase of the request for performing certain validations or changes (also known as mutations). Validation and mutation are two types of admission controllers in Kubernetes. Admission controllers can also be a combination of both. The only difference between them is that mutation controllers can modify the objects while validation cannot.
To check which admission controllers are enabled on your cluster, check for the –enable-admission-plugin parameter on your kube-apiserver settings. You can do this by typing this command on your master node: ps -ef | grep kube-apiserver | grep enable-admission-plugins. On our testing cluster, the only admission controller enabled by default is the NodeRestriction. This limits the objects that a kubelet can modify, so it limits what secrets can be read by which pods. In doing so, it does not allow the pods to read any secrets in the cluster, except the ones that are attached to their node or the secrets that are allowed to be seen.
To learn more about admission controllers and which ones you can enable, please check the official Kubernetes documentation.
The kubelet agent authenticates the API server using certificates, which are valid for one year. You should also configure the kubelet certification rotation to generate a new key and request a new certificate from the Kubernetes API when the current certificate is close to expiring.
You can find more information on certificate rotation here.
The pods
After protecting the control plane, the worker nodes, and most of the components, it might seem that we’re now safe — but this isn’t so. As discussed in the first article, we always try to apply a defense-in-depth approach to reduce our attack surface and make it harder for attackers to exploit our clusters.
There are three main actions that you can take to ensure the basic level of security for your pods:
- Limit resources. The last thing you would want to happen on your cluster is for one of your pods to start consuming all the resources available on your node, leaving the other pods with performance issues and possibly causing a denial of service (DoS) on the node. Kubernetes has a solution for that, called ResourceQuotas. You can also define hard and soft limits on the PodSpec, but that becomes hard to manage quickly. Meanwhile, ResourceQuota is an object that allows you to set hard and soft resource limits in a namespace. To enable ResourceQuota, you need to have it set on the kube-apiserver flag –enable-admission-plugins=ResourceQuota. You can check your kube-apiserver settings using this command: ps –ef | grep kube-apiserver. Here’s a sample of a ResourceQuota object:
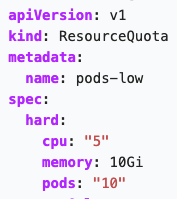
Figure 3. Sample ResourceQuota object
- Create and apply a security context. A security context allows you to define privilege and access control permissions for a pod or a container. Here are a few security controls that you should always use whenever possible:
- AllowPrivilegeEscalation. This controls whether a process can gain more privileges than its parent process. This should be set to false.
- ReadOnlyRootFileSystem. This defines whether the container has a read-only root file system or not. The default setting is false, but we recommend that you set it to true.
- RunAsNonRoot. This setting indicates if the container must run as a non-root user and should be set to true. As a result of setting this to true, in any event that the container tries to run as a root user (UID 0), the kubelet will validate it and fail to start the container.
- Use Seccomp, AppArmor, and SELinux. These are Linux kernel security features that can also be set up via the SecurityContext. The details of how they work, however, are outside the scope of this article. For more information, you can check The Linux Foundation's overview.
- Seccomp. This feature filters the system calls of a process. Currently, it is only available on the alpha version of the API and can be set as such in the SecurityContext object definition: seccomp.security.alpha.kubernetes.io/pod: runtime/default.
- AppArmor. This feature uses program profiles to restrict the capabilities of individual programs: that is, by confining programs to a limited set of resources. It is currently available on the beta version and can be set like so:
container.apparmor.security.beta.kubernetes.io/container: runtime/default. - SELinux. This enables the SELinux module, which applies security labels to objects and evaluates all security-relevant interactions via the security policy. Here is an example of how to apply it:
securityContext:
seLinuxOptions:
level: "s0:c123,c456"
The Pod Security Policy
A Pod Security Policy (PSP) is an object that can control most of the security settings mentioned previously on the cluster level. To do that, you also need to enable an admission controller called PodSecurityPolicy, which is not enabled by default. Once a PSP is created, you need to authorize the user so that they can use it via RBAC through the ClusterRole and ClusterRoleBinding we mentioned in the first part of this series of articles. You can also use Role and RoleBinding, but these will limit the PSP usage to the specific namespace. Here is a list of things you can control on your cluster via the PodSecurityPolicy:
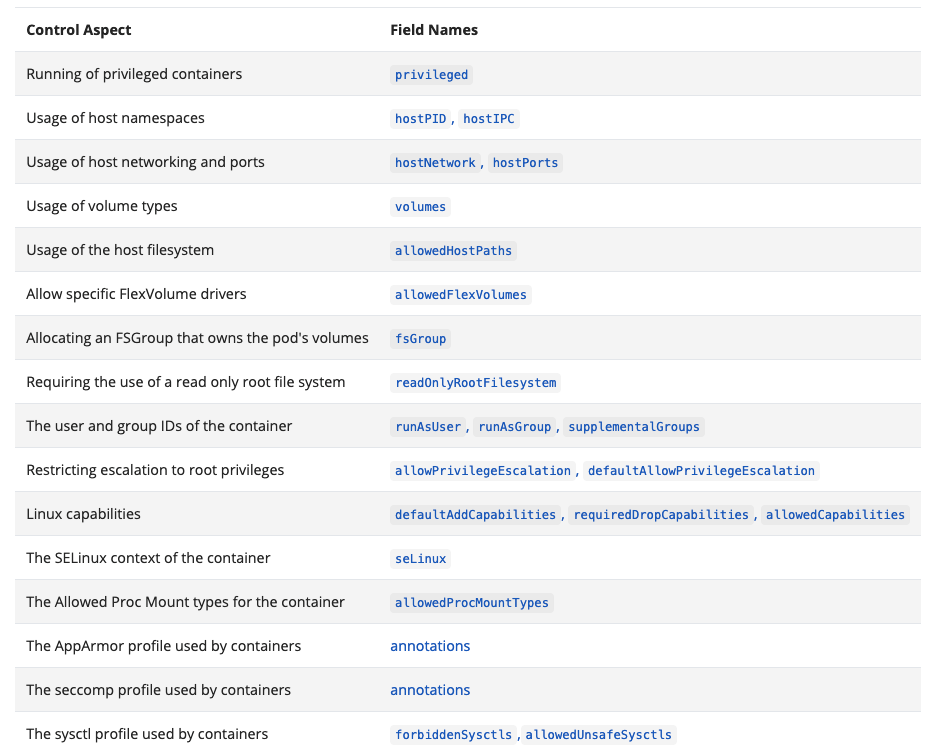
Figure 4. A list of what can be controlled on a cluster via PodSecurityPolicy
Source: Kubernetes documentation on Pod Security Policies
More examples of PodSecurityPolicies can be seen in the official Kubernetes documentation.
The audit logs
Logs are an important part of a system, especially a complex one such as a Kubernetes cluster. The audit logs can record all the requests made to the Kube API server since it is a central point of communication inside the cluster. Unfortunately, the Kubernetes audit logs are disabled by default since they increase the memory consumption of the API server.
It is your job as the cluster administrator to set this up. We highly recommend that you do that before putting your cluster in production; this will not only help you detect any security issues but will also help your developers with debugging and troubleshooting. To do that, you need to set up at least the first two flags on your kube-apiserver configuration:
- --audit-log-path: Tells the location of the log file where you want Kubernetes to save the logs
- --audit-policy-file: Tells the location of the audit policy file you have defined for your cluster
- audit-log-maxage: Tells the number of days to retain the audit log file
- --audit-log-maxbackup: Tells the number of audit log files to save as backup
- --audit-log-maxsize: Tells the size of each audit log file before it gets rotated
The way to do that is by creating an audit policy object that defines what events should be recorded and which data should be collected. You can have different logging levels for different resources on your cluster. There are four known audit levels for the policy:
- None. No events that match will be logged
- Metadata. Only logs request metadata, not the request or response body
- Request. Logs request metadata and request body, but not the response
- RequestResponse. Logs event metadata, request, and response body
This is a basic example of an audit policy that logs all the request metadata:
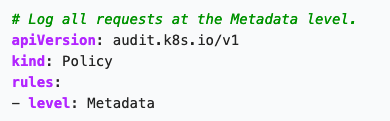
Figure 5. Sample audit policy for logging all request metadata
Now that you have a policy, how do you tell Kubernetes to start logging the data? To do so, you'll need to apply the changes made to the kube-apiserver.yaml file. One last thing to remember is that if the kube-apiserver is deployed as a Pod, you need to mount the hostPath with the location of the log and the policy files.
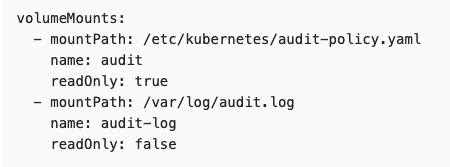
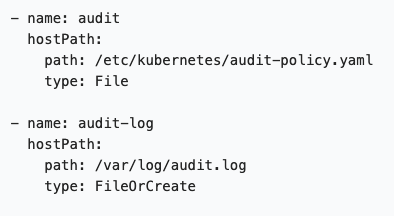
Figure 6. Sample of mounted volumes (top); sample of mounted hostPath (bottom)
Source: Kubernetes documentation on auditing and log backend
Additionally, we emphasize the following because we believe that it is very important to do it: Please consider enabling audit logs on your cluster. Still, don’t forget to have a proper policy for it; otherwise, you will run out of space quickly.
More information about auditing Kubernetes can be found in the official documentation. You can also check out this great presentation on audit logs made by Datadog during KubeCon NA 2019.
Here’s one quick tip: If you have Trend MicroTM Deep SecurityTM or Trend Micro Cloud OneTM agent installed on your nodes, make sure to check if you have enabled these Intrusion Prevention System (IPS) rules to detect any changes on your cluster and protect it from known Kubernetes vulnerabilities and attacks:
- 1009450 – Kubernetes API Proxy Request Handling Privilege Escalation Vulnerability (CVE-2018-1002105)
- 1009493 – Kubernetes Dashboard Authentication Bypass Information Disclosure Vulnerability (CVE-2018-18264)
- 1009561 – Kubernetes API Server Denial of Service Vulnerability (CVE-2019-1002100)
These Integrity Monitoring (IM) rules monitor both the Master and Worker nodes' main files and processes for any suspicious changes and alert them:
- 1009060 – Kubernetes Cluster Master
- 1009434 – Kubernetes Cluster Node
The following Log Inspection (LI) rule checks the logs of the Kubernetes Master Node components and alerts them based on different events.
- 1009105 – Kubernetes Control Plane
The basics of securing Kubernetes clusters
Lastly, always remember the basics. Aside from applying the aforementioned measures to protect your Kubernetes environment, do not forget some basic housekeeping rules for your day-to-day work with clusters:
- Update your Kubernetes environment version early and often through kubectl update. Apply this on a test environment before applying in production.
- Do not use the admin user for your daily work; the admin should only be used by continuous integration and continuous deployment (CI/CD) tools.
- Unless you have any business or compliance restrictions, consider using managed services such as Azure Kubernetes Service (AKS), Amazon Elastic Kubernetes Service (Amazon EKS), or Google Kubernetes Engine (GKE) as they usually have better defaults for your security posture and the costs for maintaining the control plane are very low.
- Apply the security best practices outlined in the CIS Benchmark documents for Kubernetes, which have been developed and accepted by different industries.
- Check out, star, and fork our Awesome K8s Security List on GitHub
Like it? Add this infographic to your site:
1. Click on the box below. 2. Press Ctrl+A to select all. 3. Press Ctrl+C to copy. 4. Paste the code into your page (Ctrl+V).
Image will appear the same size as you see above.
Recent Posts
- TrendAI™ 2026 Cyber Risk Report
- The Hidden Risk in Your AI Rollout: Your Endpoints
- When AI Becomes a Zero-Day Machine: What Public Sector Organizations Need to Know
- A Data-Driven View of Cyber Risk Structure: How Attack Pressure and Exposure Shape Damage
- Hunt Them All: An AI-Powered Vulnerability Sweep of 19,000 MCP Servers
 Fault Lines in the AI Ecosystem: TrendAI™ State of AI Security Report
 It’s By Design: The Use-After-Free of Azure Cloud
 TrendAI™ 2026 Cyber Risk Report
 Guarding LLMs With a Layered Prompt Injection Representation