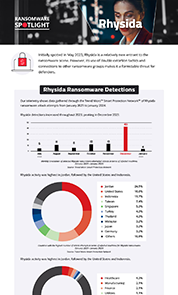
Ransom.Win32.RHYSIDA.YXDGTT
VHO:Trojan-Ransom.Win32.Agent.gen (KASPERSKY)
Windows


Threat Type: Ransomware
Destructiveness: No
Encrypted: No
In the wild: Yes
OVERVIEW
This Ransomware arrives on a system as a file dropped by other malware or as a file downloaded unknowingly by users when visiting malicious sites.
It gathers certain information on the affected computer.
It drops files as ransom note. It avoids encrypting files with the following file extensions.
TECHNICAL DETAILS
Arrival Details
This Ransomware arrives on a system as a file dropped by other malware or as a file downloaded unknowingly by users when visiting malicious sites.
Installation
This Ransomware adds the following processes:
- %System%\cmd.exe /c cmd.exe /c vssadmin.exe Delete Shadows /All /Quiet
- %System%\cmd.exe /c cmd.exe /c for /F "tokens=*" %1 in ('wevtutil.exe el') DO wevtutil.exe cl "%1"
- %System%\cmd.exe /c cmd.exe /c start powershell.exe -WindowStyle Hidden -Command "Sleep -Milliseconds 1000; schtasks /end /tn Rhsd; schtasks /delete /tn Rhsd /f; schtasks /create /sc ONSTART /tn Rhsd /tr \"'{Malware File Path}\{Malware File Name}.exe' {accepted arguments}\" /ru system; schtasks /run /tn Rhsd /i
- %System%\cmd.exe /c cmd.exe /c start powershell.exe -WindowStyle Hidden -Command \"Sleep -Milliseconds 1000; schtasks /delete /tn Rhsd /f
- %System%\cmd.exe /c cmd.exe /c start ping 127.0.0.1 -n 2 > nul && del /f /q "{Malware File Path}\{Malware File Name}.exe"
- %System%\cmd.exe /c cmd.exe /c reg delete \"HKCU\Contol Panel\Desktop\" /v Wallpaper /f
- %System%\cmd.exe /c cmd.exe /c reg delete \"HKCU\Conttol Panel\Desktop\" /v WallpaperStyle /f
- %System%\cmd.exe /c cmd.exe /c reg add \"HKCU\Software\Microsoft\Windows\CurrentVersion\Policies\ActiveDesktop\" /v NoChangingWallPaper /t REG_SZ /d 1 /f
- %System%\cmd.exe /c cmd.exe /c reg add \"HKLM\Software\Microsoft\Windows\CurrentVersion\Policies\ActiveDesktop\" /v NoChangingWallPaper /t REG_SZ /d 1 /f
- %System%\cmd.exe /c cmd.exe /c reg add \"HKCU\Control Panel\Desktop\" /v Wallpaper /t REG_SZ /d \"%Public%\bg.jpg\" /f
- %System%\cmd.exe /c cmd.exe /c reg add \"HKLM\Software\Microsoft\Windows\CurrentVersion\Policies\System\" /v Wallpaper /t REG_SZ /d \"%Public%\bg.jpg\" /f
- %System%\cmd.exe /c cmd.exe /c reg add \"HKLM\Software\Microsoft\Windows\CurrentVersion\Policies\System\" /v WallpaperStyle /t REG_SZ /d 2 /f
- %System%\cmd.exe /c cmd.exe /c reg add \"HKCU\Control Panel\Desktop\" /v WallpaperStyle /t REG_SZ /d 2 /f
- %System%\cmd.exe /c rundll32.exe user32.dll,UpdatePerUserSystemParameters
(Note: %System% is the Windows system folder, where it usually is C:\Windows\System32 on all Windows operating system versions.. %Public% is the folder that serves as a repository of files or folders common to all users, which is usually C:\Users\Public in Windows Vista, 7, and 8.)
Other System Modifications
This Ransomware changes the desktop wallpaper by modifying the following registry entries:
HKEY_CURRENT_USER\Software\Microsoft\
Windows\CurrentVersion\Policies\
ActiveDesktop
NoChangingWallPaper = 1
(Note: The default value data of the said registry entry is 0.)
HKEY_LOCAL_MACHINE\SOFTWARE\Microsoft\
Windows\CurrentVersion\Policies\
ActiveDesktop
NoChangingWallPaper = 1
(Note: The default value data of the said registry entry is 0.)
HKEY_CURRENT_USER\Control Panel\Desktop
Wallpaper = %Public%\bg.jpg
HKEY_LOCAL_MACHINE\SOFTWARE\Microsoft\
Windows\CurrentVersion\Policies\
System
Wallpaper = %Public%\bg.jpg
HKEY_LOCAL_MACHINE\SOFTWARE\Microsoft\
Windows\CurrentVersion\Policies\
System
WallpaperStyle = 2
(Note: The default value data of the said registry entry is 0.)
HKEY_CURRENT_USER\Control Panel\Desktop
WallpaperStyle = 2
(Note: The default value data of the said registry entry is 0.)
It sets the system's desktop wallpaper to the following image:
- %Public%\bg.jpg
Information Theft
This Ransomware gathers the following information on the affected computer:
- Number of processors
- System information
It accepts the following parameters:
- -d {path to encrypt} → used to specify directory to encrypt
- -sr → used to remove/delete itself if -S is not passed as an argument
- -nobg → avoids replacing desktop wallpaper and avoids disabling the ability to replace desktop wallpaper
- -md5
- -S → avoids ransomware routine and creates scheduled task named Rhsd to execute itself on system startup
Other Details
This Ransomware adds the following registry keys:
HKEY_CURRENT_USER\Software\Microsoft\
Windows\CurrentVersion\Policies
ActiveDesktop =
HKEY_LOCAL_MACHINE\SOFTWARE\Microsoft\
Windows\CurrentVersion\Policies
ActiveDesktop =
It does the following:
- It changes the desktop wallpaper after encryption and prevents the user from changing it back by modifying the NoChangingWallpaper registry value.
- It uses wevtutil.exe to clear Windows event logs.
- It initializes resources based on the number of processors available in the system.
- It encrypts all available drives from A to Z.
It adds the following scheduled tasks:
- Task Name: Rhsd
Trigger: At system startup
Action: Start a program: {Malware File Path}\{Malware File Name}.exe {accepted commands}
Ransomware Routine
This Ransomware avoids encrypting files found in the following folders:
- $Recycle.Bin
- Boot
- Documents and Settings
- PerfLogs
- ProgramData
- Recovery
- System Volume Information
- Windows
- $RECYCLE.BIN
- ApzData
It appends the following extension to the file name of the encrypted files:
- .rhysida
It drops the following file(s) as ransom note:
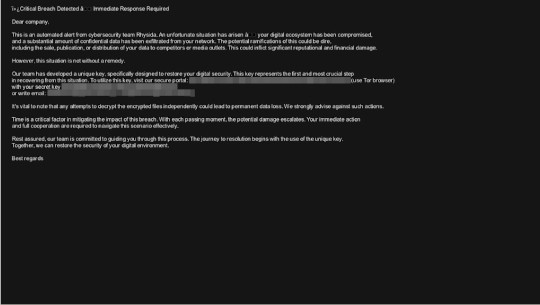
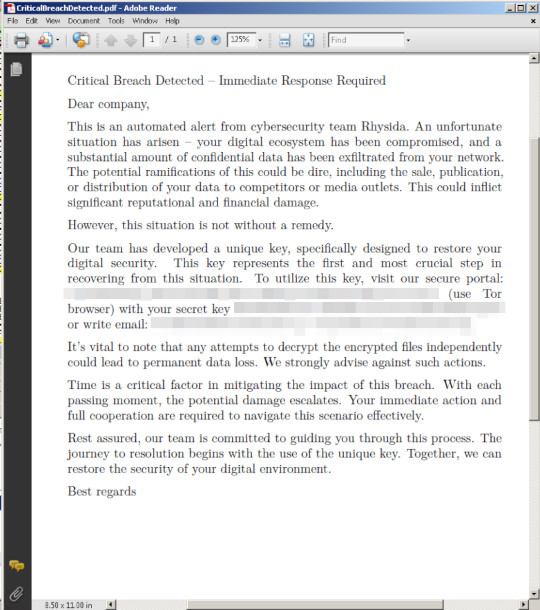
- {Encrypted Directory}\CriticalBreachDetected.pdf
It avoids encrypting files with the following file extensions:
- .bat
- .bin
- .cab
- .cmd
- .com
- .cur
- .diagcab
- .diagcfg
- .diagpkg
- .drv
- .dll
- .exe
- .hlp
- .hta
- .ico
- .msi
- .ocx
- .ps1
- .psm1
- .scr
- .sys
- .ini
- .Thumbs.db
- .url
- .iso
SOLUTION
Step 1
Trend Micro Predictive Machine Learning detects and blocks malware at the first sign of its existence, before it executes on your system. When enabled, your Trend Micro product detects this malware under the following machine learning name:
-
Troj.Win32.TRX.XXPE50FFF071
Step 2
Note that not all files, folders, and registry keys and entries are installed on your computer during this malware's/spyware's/grayware's execution. This may be due to incomplete installation or other operating system conditions. If you do not find the same files/folders/registry information, please proceed to the next step.
Step 3
Before doing any scans, Windows 7, Windows 8, Windows 8.1, and Windows 10 users must disable System Restore to allow full scanning of their computers.
Step 4
Restart in Safe Mode
Step 5
Deleting Scheduled Tasks while in Safe Mode
- Still in safe mode, the following {Task Name}-{Task to be run} listed should be used in the steps identified below:
- Task Name: Rhsd
Task to be run: {Malware File Path}\{Malware File Name}.exe {accepted commands}
- Task Name: Rhsd
- For Windows 7 and Server 2008 (R2) users, click Start>Computer.
- For Windows 8, 8.1, 10, and Server 2012 users, right-click on the lower left corner of the screen, then click File Explorer.
- In the Search Computer/This PC input box, type:
- %System%\Tasks\{Task Name}
- Once located, select the file then press SHIFT+DELETE to delete it.
- Open Registry Editor. To do this:
- For Windows 7 and Server 2008 (R2) users, click the Start button, type regedit in the Search input field, and press Enter.
- For Windows 8, 8.1, 10, and Server 2012 (R2) users, right-click on the lower left corner of the screen, click Run, type regedit in the text box
- In the left panel of the Registry Editor window, double-click the following:
- HKEY_LOCAL_MACHINE>SOFTWARE>Microsoft>Windows NT>CurrentVersion>Schedule>TaskCache>Tree>{Task Name}
- Locate the created entry and take note of the registry value's data:
- ID={Task Data}
- After taking note of the data, delete the registry key:
- HKEY_LOCAL_MACHINE>SOFTWARE>Microsoft>Windows NT>CurrentVersion>Schedule>TaskCache>Tree>{Task Name}
- In the left panel of the Registry Editor window, double-click the following:
- HKEY_LOCAL_MACHINE>SOFTWARE>Microsoft>Windows NT>CurrentVersion>Schedule>TaskCache>Tasks
- Still in the left panel, locate and delete the registry key with the same name as the located Task Data in step #6:
- ={Task Data}
- Close Registry Editor.
Step 6
Restore this modified registry value
Important: Editing the Windows Registry incorrectly can lead to irreversible system malfunction. Please do this only if you know how to or you can seek your system administrator’s help. You may also check out this Microsoft article first before modifying your computer's registry.
- In HKEY_CURRENT_USER\Software\Microsoft\Windows\CurrentVersion\Policies\ActiveDesktop
- NoChangingWallPaper = 1
- NoChangingWallPaper = 1
- In HKEY_LOCAL_MACHINE\SOFTWARE\Microsoft\Windows\CurrentVersion\Policies\ActiveDesktop
- NoChangingWallPaper = 1
- NoChangingWallPaper = 1
- In HKEY_CURRENT_USER\Control Panel\Desktop
- Wallpaper = %Public%\bg.jpg
- Wallpaper = %Public%\bg.jpg
- In HKEY_LOCAL_MACHINE\SOFTWARE\Microsoft\Windows\CurrentVersion\Policies\System
- Wallpaper = %Public%\bg.jpg
- Wallpaper = %Public%\bg.jpg
- In HKEY_LOCAL_MACHINE\SOFTWARE\Microsoft\Windows\CurrentVersion\Policies\System
- WallpaperStyle = 2
- WallpaperStyle = 2
- In HKEY_CURRENT_USER\Control Panel\Desktop
- WallpaperStyle = 2
- WallpaperStyle = 2
Step 7
Delete this registry key
Important: Editing the Windows Registry incorrectly can lead to irreversible system malfunction. Please do this step only if you know how or you can ask assistance from your system administrator. Else, check this Microsoft article first before modifying your computer's registry.
- In HKEY_CURRENT_USER\Software\Microsoft\Windows\CurrentVersion\Policies
- ActiveDesktop
- ActiveDesktop
- In HKEY_LOCAL_MACHINE\SOFTWARE\Microsoft\Windows\CurrentVersion\Policies
- ActiveDesktop
- ActiveDesktop
Step 8
Search and delete this file
- %Public%\bg.jpg
Step 9
Restart in normal mode and scan your computer with your Trend Micro product for files detected as Ransom.Win32.RHYSIDA.YXDGTT. If the detected files have already been cleaned, deleted, or quarantined by your Trend Micro product, no further step is required. You may opt to simply delete the quarantined files. Please check this Knowledge Base page for more information.
Step 10
Restore encrypted files from backup.
Step 11
Reset your Desktop properties
Did this description help? Tell us how we did.