TSPY_ZBOT.PNR
Win32/Spy.Zbot.AAQ trojan (NOD32), Trojan.Zbot (Norton), Troj/Zbot-DUY (Sophos)
Windows 2000, Windows XP (32-bit and 64-bit), Windows Server 2003, Windows Vista (32-bit and 64-bit), Windows 7 (32-bit and 64-bit)


Threat Type: Spyware
Destructiveness: No
Encrypted: Yes
In the wild: Yes
OVERVIEW
Downloaded from the Internet, Dropped by other malware
This malware is the main payload of the file infector attack that was detected on January 2014. Users with systems affected by this malware may find their personal information stolen and their online banking accounts compromised.
To get a one-glance comprehensive view of the behavior of this Spyware, refer to the Threat Diagram shown below.
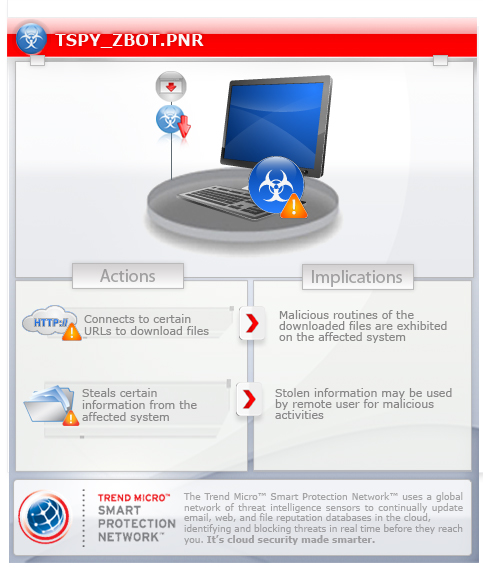
This Spyware arrives on a system as a file dropped by other malware or as a file downloaded unknowingly by users when visiting malicious sites.
It deletes the initially executed copy of itself.
TECHNICAL DETAILS
180,000 bytes
EXE
Yes
20 Jan 2014
Connects to URLs/IPs, Downloads files, Steals information
Arrival Details
This Spyware arrives on a system as a file dropped by other malware or as a file downloaded unknowingly by users when visiting malicious sites.
Installation
This Spyware drops the following copies of itself into the affected system:
- %Application Data%\{random folder name 1}\{random file name 1}.exe
(Note: %Application Data% is the current user's Application Data folder, which is usually C:\Documents and Settings\{user name}\Application Data on Windows 2000, XP, and Server 2003, or C:\Users\{user name}\AppData\Roaming on Windows Vista, 7, and 8.)
It drops the following files:
- %Application Data%\gmon.out - Contains encrypted information (Non-malicious)
- {Malware Path}\gmon.out - Contains encrypted information (Non-malicious)
- %Application Data%\{random folder name 2}\{random file name 2}.{random extension}
- %Application Data%\Microsoft\Address Book\{user name}.wab
- %Application Data%\Microsoft\Address Book\{user name}.wab~
(Note: %Application Data% is the current user's Application Data folder, which is usually C:\Documents and Settings\{user name}\Application Data on Windows 2000, XP, and Server 2003, or C:\Users\{user name}\AppData\Roaming on Windows Vista, 7, and 8.)
It creates the following folders:
- %Application Data%\{random folder name 1}
- %Application Data%\{random folder name 2}
- %Application Data%\Microsoft\Address Book
(Note: %Application Data% is the current user's Application Data folder, which is usually C:\Documents and Settings\{user name}\Application Data on Windows 2000, XP, and Server 2003, or C:\Users\{user name}\AppData\Roaming on Windows Vista, 7, and 8.)
It adds the following mutexes to ensure that only one of its copies runs at any one time:
- Global\{GUID}
- Local\{GUID}
It injects threads into the following normal process(es):
- explorer.exe
Autostart Technique
This Spyware adds the following registry entries to enable its automatic execution at every system startup:
HKEY_CURRENT_USER\Software\Microsoft\
Windows\CurrentVersion\Run
{GUID} = "%Application Data%\{random folder name 1}\{random file name 1}.exe"
Other System Modifications
This Spyware adds the following registry keys:
HKEY_CURRENT_USER\Software\Microsoft\
{random}
HKEY_CURRENT_USER\Software\Microsoft\
WAB
It adds the following registry entries:
HKEY_CURRENT_USER\Software\Microsoft\
Internet Explorer\Privacy
CleanCookies = "0"
Download Routine
This Spyware connects to the following URL(s) to download its configuration file:
- http://dinos.{BLOCKED}i.me/file.php
Information Theft
This Spyware gathers the following data:
- Data on cookie files (URLs)
- FTP credentials
- Online banking credentials
- Flashplayer data
- Personal digital cerificates
Stolen Information
This Spyware sends the gathered information via HTTP POST to the following URL:
- http://dinos.{BLOCKED}i.me/file.php
Other Details
This Spyware connects to the following URL(s) to check for an Internet connection:
- http://www.google.com/webhp
It connects to the following URL(s) to get the affected system's IP address:
- http://checkip.dyndns.org
It deletes the initially executed copy of itself
NOTES:
The configuration file may contain the following information:
- Download link to an updated copy of itself
- Site(s) where it will send its stolen information
- Download link to an updated copy of its configuration file
- Configuration for stealing online banking account credentials (including targeted banks)
It prevents the execution of newly created processes of analysis tools such as the following:
- ImPrec
- LodPE
- OllyDbg
- WinHex
- Stud PE
- ProcDump
- PESam
It creates the following registry entry(ies) to bypass Windows Firewall:
HKEY_LOCAL_MACHINE\SYSTEM\CurrentControlSet\Services\SharedAccess\Parameters\FirewallPolicy\StandardProfile\AuthorizedApplications\List
%Windows%\Explorer.EXE
= "%Windows%\Explorer.EXE:*:Enabled:DNS #{random}"
HKEY_LOCAL_MACHINE\SYSTEM\CurrentControlSet\Services\SharedAccess\Parameters\FirewallPolicy\StandardProfile\AuthorizedApplications\List
%System%\ctfmon.exe = "%System%\ctfmon.exe:*:Enabled:DNS #{random}"
SOLUTION
9.700
10.552.03
20 Jan 2014
10.553.00
21 Jan 2014
Step 1
Before doing any scans, Windows 7, Windows 8, Windows 8.1, and Windows 10 users must disable System Restore to allow full scanning of their computers.
Step 2
Scan your computer with your Trend Micro product and note files detected as TSPY_ZBOT.PNR
Step 3
Restart in Safe Mode
Step 4
Delete this registry key
Important: Editing the Windows Registry incorrectly can lead to irreversible system malfunction. Please do this step only if you know how or you can ask assistance from your system administrator. Else, check this Microsoft article first before modifying your computer's registry.
- In HKEY_CURRENT_USER\Software\Microsoft
- WAB
- WAB
Step 5
Delete this registry value
Important: Editing the Windows Registry incorrectly can lead to irreversible system malfunction. Please do this step only if you know how or you can ask assistance from your system administrator. Else, check this Microsoft article first before modifying your computer's registry.
- In HKEY_LOCAL_MACHINE\SYSTEM\CurrentControlSet\Services\SharedAccess\Parameters\FirewallPolicy\StandardProfile\AuthorizedApplications\List
- %Windows%\Explorer.EXE = "%Windows%\Explorer.EXE:*:Enabled:DNS #{random}"
- %Windows%\Explorer.EXE = "%Windows%\Explorer.EXE:*:Enabled:DNS #{random}"
- In HKEY_LOCAL_MACHINE\SYSTEM\CurrentControlSet\Services\SharedAccess\Parameters\FirewallPolicy\StandardProfile\AuthorizedApplications\List
- %System%\ctfmon.exe = "%System%\ctfmon.exe:*:Enabled:DNS #{random}"
- %System%\ctfmon.exe = "%System%\ctfmon.exe:*:Enabled:DNS #{random}"
- In HKEY_CURRENT_USER\Software\Microsoft\Windows\CurrentVersion\Run
- {GUID} = "%Application Data%\{random folder name 1}\{random file name 1}.exe"
- {GUID} = "%Application Data%\{random folder name 1}\{random file name 1}.exe"
- In HKEY_CURRENT_USER\Software\Microsoft\Internet Explorer\Privacy
- CleanCookies = "0"
- CleanCookies = "0"
Step 6
Search and delete this folder
- %Application Data%\{random folder name 1}
- %Application Data%\{random folder name 2}
- %Application Data%\Microsoft\Address Book
Step 7
Search and delete these files
- {Malware Path}\gmon.out
Step 8
Restart in normal mode and scan your computer with your Trend Micro product for files detected as TSPY_ZBOT.PNR. If the detected files have already been cleaned, deleted, or quarantined by your Trend Micro product, no further step is required. You may opt to simply delete the quarantined files. Please check this Knowledge Base page for more information.
Step 9
The following created files/folders/registry keys/registry entries cannot be identified by the user since there are no reference values in the created key. The only way it can be identified is by comparing the present system information with a backup. Note that the said components do not have to be deleted since it won't be harmful to the system.
- HKEY_CURRENT_USER\Software\Microsoft\{random}
Did this description help? Tell us how we did.