TSPY_BANKER.WSTA
Backdoor.Win32.Androm.emby (Kaspersky)
Windows 2000, Windows Server 2003, Windows XP (32-bit, 64-bit), Windows Vista (32-bit, 64-bit), Windows 7 (32-bit, 64-bit)


Threat Type: Spyware
Destructiveness: No
Encrypted: Yes
In the wild: Yes
OVERVIEW
Downloaded from the Internet, Spammed via email
This ZEUS/ZBOT variant is found to be distributed via spam campaign in mid-2014. The spammed messages in the said campaign used a certain file storage service.
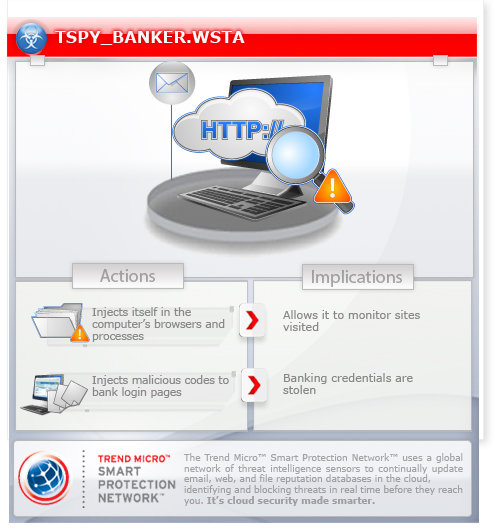
To get a one-glance comprehensive view of the behavior of this Spyware, refer to the Threat Diagram shown below.
This malware is known as Dyre Banking Trojan, also called as “Dyreza."
This spyware arrives as an attachment to email messages spammed by other malware/grayware or malicious users. It arrives on a system as a file dropped by other malware or as a file downloaded unknowingly by users when visiting malicious sites.
It attempts to steal sensitive online banking information, such as user names and passwords. This routine risks the exposure of the user's account information, which may then lead to the unauthorized use of the stolen data. It attempts to steal information, such as user names and passwords, used when logging into certain banking or finance-related websites.
It connects to certain websites to send and receive information. It deletes the initially executed copy of itself.
TECHNICAL DETAILS
246,784 bytes
EXE
Yes
11 Jun 2014
Connects to URLs/IPs
Arrival Details
This spyware arrives as an attachment to email messages spammed by other malware/grayware or malicious users.
It arrives on a system as a file dropped by other malware or as a file downloaded unknowingly by users when visiting malicious sites.
Installation
This spyware drops the following copies of itself into the affected system and executes them:
- %Application Data%\googleupdaterr.exe
(Note: %Application Data% is the current user's Application Data folder, which is usually C:\Documents and Settings\{user name}\Application Data on Windows 2000, XP, and Server 2003, or C:\Users\{user name}\AppData\Roaming on Windows Vista and 7.)
It drops the following component file(s):
- %Application Data%\userdata.dat - encrypted configuration file which contains bot id and list of target banks
(Note: %Application Data% is the current user's Application Data folder, which is usually C:\Documents and Settings\{user name}\Application Data on Windows 2000, XP, and Server 2003, or C:\Users\{user name}\AppData\Roaming on Windows Vista and 7.)
It injects itself into the following processes running in the affected system's memory:
- explorer.exe
- chrome.exe
- firefox.exe
- iexplore.exe
It adds the following mutexes to ensure that only one of its copies runs at any one time:
- RangisMutex5
Autostart Technique
This spyware creates the following registry entries to enable automatic execution of dropped component at every system startup:
HKEY_CURRENT_USER\Software\Microsoft\
Windows\CurrentVersion\Run
GoogleUpdate = "%Application Data%\googleupdaterr.exe"
Information Theft
This spyware attempts to steal sensitive online banking information, such as user names and passwords. This routine risks the exposure of the user's account information, which may then lead to the unauthorized use of the stolen data.
It attempts to steal information from the following banks and/or other financial institutions:
- Bank of America
- Citibank
- NatWest
- The Royal Bank of Scotland
- Ulster Bank
Stolen Information
This spyware sends the gathered information via HTTP POST to the following URL:
- {BLOCKED}.{BLOCKED}.148.6
Other Details
This spyware connects to the following URL(s) to get the affected system's IP address:
- http://{BLOCKED}zip.com
It connects to the following website to send and receive information:
- {BLOCKED}.{BLOCKED}.207.151
- {BLOCKED}.{BLOCKED}.6.61
It deletes the initially executed copy of itself
NOTES:
This spyware steals important banking information by injecting malicious codes to bank login webpages with URLs containing any of the following:
- businessaccess.citibank.citigroup.com
- cashproonline.bankofamerica.com
- www.bankline.natwest.com
- www.bankline.rbs.com
- www.bankline.ulsterbank.ie
Some of the important banking information stolen are the following:
- Business Code
- Business Name
- Company ID
- Password
- Token
- User ID
The banking information is sent to the a C&C server after the user clicks on the login or submit button. The webpage then returns to the original bank login page without the malicious codes where users can log in in again normally.
SOLUTION
9.700
10.860.06
13 Jun 2014
10.861.00
14 Jun 2014
Step 1
Before doing any scans, Windows XP, Windows Vista, and Windows 7 users must disable System Restore to allow full scanning of their computers.
Step 2
Before doing any scans, Windows XP, Windows Vista, and Windows 7 users must disable System Restore to allow full scanning of their computers.
Step 3
Restart in Safe Mode
Step 4
Note that not all files, folders, and registry keys and entries are installed on your computer during this malware's/spyware's/grayware's execution. This may be due to incomplete installation or other operating system conditions. If you do not find the same files/folders/registry information, please proceed to the next step.
Step 5
Delete this registry value
Important: Editing the Windows Registry incorrectly can lead to irreversible system malfunction. Please do this step only if you know how or you can ask assistance from your system administrator. Else, check this Microsoft article first before modifying your computer's registry.
- In HKEY_CURRENT_USER\Software\Microsoft\Windows\CurrentVersion\Run
- GoogleUpdate = "%Application Data%\googleupdaterr.exe"
- GoogleUpdate = "%Application Data%\googleupdaterr.exe"
Step 6
Remove malware/grayware files dropped/downloaded by TSPY_BANKER.WSTA. (Note: Please skip this step if the threats listed below have already been removed.)
Step 7
Search and delete these files
- %Application Data%\userdata.dat
Step 8
Search and delete this file
- %User Temp%\xwjfk.exe
- %User Temp%\kurit.exe
Step 9
Restart in normal mode and scan your computer with your Trend Micro product for files detected as TSPY_BANKER.WSTA. If the detected files have already been cleaned, deleted, or quarantined by your Trend Micro product, no further step is required. You may opt to simply delete the quarantined files. Please check this Knowledge Base page for more information.
Step 10
Scan your computer with your Trend Micro product to delete files detected as TSPY_BANKER.WSTA. If the detected files have already been cleaned, deleted, or quarantined by your Trend Micro product, no further step is required. You may opt to simply delete the quarantined files. Please check this Knowledge Base page for more information.
Step 11
Search and delete the file detected as TSPY_BANKER.WSTA
Did this description help? Tell us how we did.