TrojanSpy.Win32.BANRAP.AS
Win32/Spy.Banker.AEGU (ESET-NOD32), SPR/RemoteAdmin.AO (Avira)
Windows


Threat Type: Trojan Spy
Destructiveness: No
Encrypted: Yes
In the wild: Yes
OVERVIEW
This Trojan Spy may be dropped by other malware.
It attempts to steal information, such as user names and passwords, used when logging into certain banking or finance-related websites.
TECHNICAL DETAILS
Arrival Details
This Trojan Spy may be dropped by the following malware:
Installation
This Trojan Spy drops the following files:
- %Public%\chrome.LNK ← execute the vbs scripts
- %Public%\Chrome\5.4.8\manifest.json
- %Public%\Chrome\5.4.8\eventPage.js
- %Public%\Chrome\5.4.8\6.js
- %Public%\Chrome\5.4.8\jquery-3.1.1.min.js ← normal file
- %Public%\Chrome\5.4.8\BJava_{6 random characters}{1 random number}_.js ← detected as Trojan.JS.BANKER.THBAIAI
- %Public%\Chrome\5.4.8\GJava_{6 random characters}{1 random number}__.js ← detected as Trojan.JS.BANKER.THBAIAI
- %Public%\Chrome\5.4.8\WJava_{6 random characters}{1 random number}_.js ← detected as Trojan.JS.BANKER.THBAIAI
- %Public%\Chrome\5.4.8\iconos\Java_{6 random characters}{1 random number}_.bmp
- %Public%\Java_{6 random characters}{1 random number}_\us ← Contains Machine name and Password
- %Public%\Java_{6 random characters}{1 random number}_.vbs ← Execute the batch file
- %Public%\Java_{6 random characters}{1 random number}_.bat ← Batch file that will add the Trojan.JS.BANKER.THBAIAI as chrome extensions.
- %AppDataLocal%\w ← Chrome Login Data.
- %Application Data%\Microsoft\.Out
- %Public%\Administrador\DP.zip ← detected as HKTL_RADMIN
It drops and executes the following files:
- %Application Data%\Microsoft\l.ps1 ← Obfuscated powershell that gathers email from files in the infected machine.
- %Public%\Administrador\install.bat ← batch file HKTL_RADMIN installation config
- %Public%\Administrador\RDPWInst.exe ← detected as HKTL_RADMIN
(Note: %Application Data% is the current user's Application Data folder, which is usually C:\Documents and Settings\{user name}\Application Data on Windows 2000, XP, and Server 2003, or C:\Users\{user name}\AppData\Roaming on Windows Vista, 7, and 8.. %Public% is the folder that serves as a repository of files or folders common to all users, which is usually C:\Users\Public in Windows Vista, 7, and 8.)
It creates the following folders:
- %Public%\Chrome\5.4.8
- %Public%\fx6\{5 random numbers}
- %Public%\Chrome\5.4.8\iconos
- %Public%\fx6\{5 random numbers}\iconos
- %Public%\Administrador
(Note: %Public% is the folder that serves as a repository of files or folders common to all users, which is usually C:\Users\Public in Windows Vista, 7, and 8.)
It adds the following mutexes to ensure that only one of its copies runs at any one time:
- f_185761_G ← If currently login as Administrator in the machine
- A_242381_B
Other System Modifications
This Trojan Spy deletes the following files:
- %User Startup%\*.vbs
(Note: %User Startup% is the current user's Startup folder, which is usually C:\Windows\Profiles\{user name}\Start Menu\Programs\Startup on Windows 98 and ME, C:\WINNT\Profiles\{user name}\Start Menu\Programs\Startup on Windows NT, C:\Documents and Settings\{User name}\Start Menu\Programs\Startup on Windows XP, or C:\Users\{user name}\AppData\Roaming\Microsoft\Windows\Start Menu\Programs\Startup on Windows Vista, 7, and 8.)
It adds the following registry entries as part of its installation routine:
HKEY_LOCAL_MACHINE\SYSTEM\ControlSet001\
Control\Terminal Server\WinStations\
RDP-Tcp
UserAuthentication = 0
HKEY_LOCAL_MACHINE\SYSTEM\ControlSet001\
Control\Terminal Server
fSingleSessionPerUser = 0
HKEY_LOCAL_MACHINE\SYSTEM\ControlSet001\
Control\Terminal Server
fDenyTSConnections = 0
HKEY_LOCAL_MACHINE\SOFTWARE\Policies\
Microsoft\Windows Defender
DisableAntiSpyware = 1
HKEY_CURRENT_USER\Software\Microsoft\
Windows\CurrentVersion\Internet Settings\
Zones\0
1407 = 0
HKEY_CURRENT_USER\Software\Microsoft\
Windows\CurrentVersion\Internet Settings\
Zones\1
1407 = 0
HKEY_CURRENT_USER\Software\Microsoft\
Windows\CurrentVersion\Internet Settings\
Zones\2
1407 = 0
HKEY_CURRENT_USER\Software\Microsoft\
Windows\CurrentVersion\Internet Settings\
Zones\3
1407 = 0
HKEY_CURRENT_USER\Software\Microsoft\
Windows\CurrentVersion\Internet Settings\
Zones\4
1407 = 0
HKEY_LOCAL_MACHINE\SOFTWARE\Microsoft\
Windows\CurrentVersion\Policies\
System
dontdisplaylastusername = 0
HKEY_LOCAL_MACHINE\SYSTEM\ControlSet001\
Control\Terminal Server\WinStations\
RDP-Tcp
SecurityLayer = 0
HKEY_LOCAL_MACHINE\SOFTWARE\Microsoft\
Windows\CurrentVersion\Policies\
System
ConsentPromptBehaviorAdmin = 0
HKEY_LOCAL_MACHINE\SOFTWARE\Microsoft\
Windows\CurrentVersion\Policies\
System
ConsentPromptBehaviorUser = 0
HKEY_LOCAL_MACHINE\SYSTEM\ControlSet001\
Control\Lsa
LimitBlankPasswordUse = 0
HKEY_LOCAL_MACHINE\SOFTWARE\Policies\
Microsoft\Windows NT\Terminal Services
Shadow = 0
Information Theft
This Trojan Spy attempts to steal information from the following banks and/or other financial institutions:
- Banco Bradesco
- Banco do Brasil
- Sicredi
It saves the email addresses it gathers into the following files:
- %Application Data%\Microsoft\.Outlook
(Note: %Application Data% is the current user's Application Data folder, which is usually C:\Documents and Settings\{user name}\Application Data on Windows 2000, XP, and Server 2003, or C:\Users\{user name}\AppData\Roaming on Windows Vista, 7, and 8.)
It gathers the following data:
- Machine Name
- Machine Password
- Outlook Email addresses
- Chrome Login Data
Stolen Information
This Trojan Spy sends the gathered information via HTTP POST to the following URL:
- https://{BLOCKED}.{BLOCKED}.00.2
- https://{BLOCKED}.{BLOCKED}s.net/logsD/index.php?CHLG
- https://{BLOCKED}.{BLOCKED}s.net/al/index.php
Other Details
This Trojan Spy does the following:
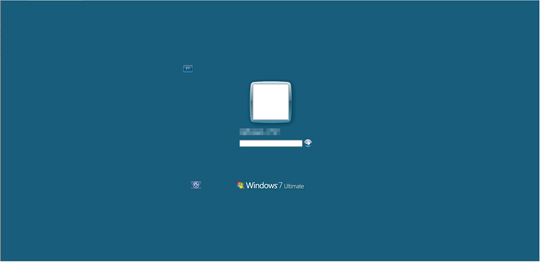
- It locks and displays the fake Windows login to a key-logged machine password:
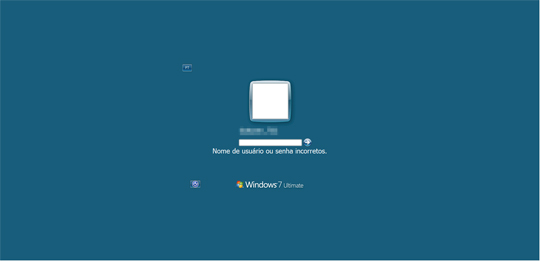
- It uses the Windows security logon and shows the following upon entering a wrong password:.
- It deletes all the following shortcuts:
- %Application Data%\Microsoft\Internet Explorer\Quick Launch\User Pinned\ImplicitAppShortcuts\Google Chrome(2).LNK
- %Application Data%\Microsoft\Internet Explorer\Quick Launch\User Pinned\ImplicitAppShortcuts\Google Chrome.LNK
- %Application Data%\Microsoft\Internet Explorer\Quick Launch\User Pinned\ImplicitAppShortcuts\Chrome.LNK
- %Application Data%\Microsoft\Internet Explorer\Quick Launch\User Pinned\TaskBar\Google Chrome(2).LNK
- %Application Data%\Microsoft\Internet Explorer\Quick Launch\User Pinned\TaskBar\Google Chrome.LNK
- %Application Data%\Microsoft\Internet Explorer\Quick Launch\User Pinned\TaskBar\Chrome.LNK
- %Application Data%\Microsoft\Internet Explorer\Quick Launch\Google Chrome(2).LNK
- %Application Data%\Microsoft\Internet Explorer\Quick Launch\Google Chrome.LNK
- %Application Data%\Microsoft\Internet Explorer\Quick Launch\Chrome.LNK
- %Programs%\Google Chrome\Google Chrome2.LNK
- %Programs%\Google Chrome\Google Chrome.LNK
- %Programs%\Google Chrome\Chrome.LNK
- %Desktop%\Google Chrome2.LNK
- %Desktop%\Google Chrome.LNK
- %Desktop%\Chrome.LNK
- Execute the following commands to create its own malicious Google Chrome shortcuts:
- cmd.exe /C copy "C:\Users\Public\Chrome.LNK" ,"%Application Data%\Microsoft\Internet Explorer\Quick Launch\User Pinned\ImplicitAppShortcuts\Google Chrome.LNK"
- cmd.exe /C copy "C:\Users\Public\Chrome.LNK" ,"%Application Data%\Roaming\Microsoft\Internet Explorer\Quick Launch\User Pinned\TaskBar\Google Chrome.LNK"
- cmd.exe /C copy "C:\Users\Public\Chrome.LNK" ,"%Application Data%\Roaming\Microsoft\Internet Explorer\Quick Launch\Google Chrome.LNK"
- cmd.exe /C copy "C:\Users\Public\Chrome.LNK" ,"%Desktop%\Google Chrome.LNK"
- cmd.exe /C copy "C:\Users\Public\Chrome.LNK" ,"%All Users Profile%\Menu Iniciar\Programas\Google Chrome.LNK"
- cmd.exe /C copy "C:\Users\Public\Chrome.LNK" ,"%Common Programs%\Google Chrome.LNK"
- cmd.exe /C copy "C:\Users\Public\Chrome.LNK" ,"%Common Programs%\Google Chrome\Google Chrome.LNK"
- cmd.exe /C copy "C:\Users\Public\Chrome.LNK" ,"%All Users Profile%\Menu Iniciar\Programas\Google Chrome\\Google Chrome.LNK"
- cmd.exe /C copy "C:\Users\Public\Chrome.LNK" ,"%All Users Profile%\Menu Iniciar\Programas\\Google Chrome.LNK"
- It stops and disables the following windows components by using the following commands:
- cmd.exe /C sc config wuauserv start= disabled;
- net stop wuauserv
- It deletes the following files after its routine:
- %Application Data%\Microsoft\Internet Explorer\Quick Launch\User Pinned\ImplicitAppShortcuts
- %Public%\Public\Administrador\DP.zip
- %Public%\Public\Administrador
- %Public%\Public\Administrador\install.bat
- %Public%\Administrador\RDPWInst.exe
- %Application Data%\Microsoft\l.ps1
- It won't proceed to its routine if found not running on the following Windows OS through registry checking:
- Windows 7
- Windows 8
- Windows 8.1
- Windows 10
- Once a user tries to open Google Chrome, it does the following:
- Execute the following commands:
- %System%\taskill -f -im xcopy.exe
- %System%\xcopy /I /S "%Public%\chrome\5.4.8""%Public%\fx6\{5 random numbers}
- %System%\taskill -f -im chrome
- It creates a copy of %Public%\chrome and name as:
- %Public%\fx6\{5 random numbers}
- It executes the following command to add Google Chrome extensions:
- cmd.exe %Program Files%\Google\chrome\Application\chrome.exe" --load-extension="%Public%\fx6\{5 random numbers}"
- Execute the following commands:
- It monitors the user's banking activies by checking the browser for the following strings which are related to banking sites:
- bb.com.br
- Desativar extens
- Banco Bradesco
- Banco Santander Brasil
- aplicativo bradesco
- Banco do Brasil
- Sicredi
- aplicativo ita
- aplicativobradescover
- banco bradesco
- bancobrasil
- netbankingcai
- Internet Banking
- banco ita
- 30 horas
- banco de brasil
- bancobrasil.com.br
- bb clt
- bb.com
- bb.com.br
- bradesco.com
- sicredi
SOLUTION
Step 1
Before doing any scans, Windows XP, Windows Vista, and Windows 7 users must disable System Restore to allow full scanning of their computers.
Step 2
Note that not all files, folders, and registry keys and entries are installed on your computer during this malware's/spyware's/grayware's execution. This may be due to incomplete installation or other operating system conditions. If you do not find the same files/folders/registry information, please proceed to the next step.
Step 3
Restart in Safe Mode
Step 4
Delete this registry value
Important: Editing the Windows Registry incorrectly can lead to irreversible system malfunction. Please do this step only if you know how or you can ask assistance from your system administrator. Else, check this Microsoft article first before modifying your computer's registry.
- In HKEY_LOCAL_MACHINE\SOFTWARE\Policies\Microsoft\Windows Defender
- DisableAntiSpyware = "1"
- DisableAntiSpyware = "1"
- In HKEY_LOCAL_MACHINE\SOFTWARE\Microsoft\Windows\CurrentVersion\Policies\System
- dontdisplaylastusername = "0"
- dontdisplaylastusername = "0"
- In HKEY_LOCAL_MACHINE\SOFTWARE\Microsoft\Windows\CurrentVersion\Policies\System
- ConsentPromptBehaviorAdmin = "0"
- ConsentPromptBehaviorAdmin = "0"
- In HKEY_LOCAL_MACHINE\SOFTWARE\Microsoft\Windows\CurrentVersion\Policies\System
- ConsentPromptBehaviorUser = "0"
- ConsentPromptBehaviorUser = "0"
- In HKEY_LOCAL_MACHINE\SYSTEM\ControlSet001\Control\Lsa
- LimitBlankPasswordUse = "0"
- LimitBlankPasswordUse = "0"
- In HKEY_LOCAL_MACHINE\SOFTWARE\Policies\Microsoft\Windows NT\Terminal Services
- Shadow = "0"
- Shadow = "0"
Step 5
Restore this file from backup only Microsoft-related files will be restored. If this malware/grayware also deleted files related to programs that are not from Microsoft, please reinstall those programs on you computer again.
Step 6
Search and delete these folders
- %User Startup%\Java_{6 random character}{1 random number}.LNK
- %Public%\Java_{6 random characters}{1 random number}_.vbs
- %Public%\Java_{6 random characters}{1 random number}_.bat
- %Public%\chrome.LNK
- %Public%\Java_{6 random characters}{1 random number}_
- %Public%\Chrome
- %Public%\fx6
- %AppDataLocal%\w
- %Application Data%\Microsoft\.Outlook
- %Application Data%\Microsoft\.Out
Step 7
Restart in normal mode and scan your computer with your Trend Micro product for files detected as TrojanSpy.Win32.BANRAP.AS. If the detected files have already been cleaned, deleted, or quarantined by your Trend Micro product, no further step is required. You may opt to simply delete the quarantined files. Please check this Knowledge Base page for more information.
Step 8
Scan your computer with your Trend Micro product to delete files detected as TrojanSpy.Win32.BANRAP.AS. If the detected files have already been cleaned, deleted, or quarantined by your Trend Micro product, no further step is required. You may opt to simply delete the quarantined files. Please check the following Trend Micro Support pages for more information:
Did this description help? Tell us how we did.