Use the Conformity Knowledge Base AI to help improve your Cloud Posture

DKIM Enabled

Trend Micro Cloud One™ – Conformity is a continuous assurance tool that provides peace of mind for your cloud infrastructure, delivering over 750 automated best practice checks.

Risk Level: Low (generally tolerable level of risk)
Rule ID: SES-001

Ensure DomainKeys Identified Mail (DKIM) feature is enabled within your AWS SES settings to protect both email senders and receivers against phishing attacks by using DKIM-signature headers to make sure that each message sent is authentic.

This rule resolution is part of the Conformity Security & Compliance tool for AWS.

Security

By enabling DKIM signing for your AWS SES outgoing email messages you will demonstrate that these messages are legitimate and have not been modified in transit by spammers.


Audit

To determine if your AWS Simple Email Service (SES) identities (domains and email addresses) are configured to use DKIM signatures, perform the following:

Using AWS Console

01 Sign in to the AWS Management Console.

02 Navigate to SES dashboard at https://console.aws.amazon.com/ses/.

03 In the left navigation panel, under Identity Management section, choose either Domains or Email Addresses, depending whether you want to enable DKIM signing for a domain or an email address registered with AWS SES.

04 Select the identity (domain or email address) that you want to examine then click the View Details button from the dashboard top menu.

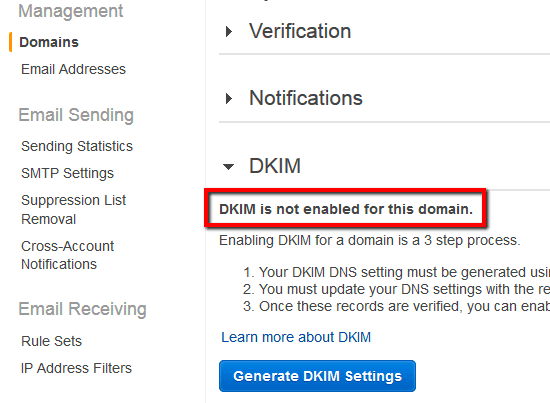
05 On the selected identity configuration page click DKIM to expand the feature tab. If the current status is set to "DKIM is not enabled for this domain.":

DKIM is not enabled for this identity.

the emails sent from the selected identity do not receive a DKIM signature, therefore these messages are not protected against phishing attacks.

06 Repeat step no. 4 and 5 to verify the DKIM configuration for other AWS SES identities, available in the current region.

07 Change the AWS region from the navigation bar and repeat the audit process for other regions.

Using AWS CLI

01 Run list-identities command (OSX/Linux/UNIX) to list all the identities (email addresses and domains) registered with AWS SES, available within the selected AWS region:

aws ses list-identities
	--region us-east-1

02 The command output should return information about the requested identities:

{
    "Identities": [
        "cloudconformity.com",
        "contact@cloudconformity.com"
    ]
}

03 Run get-identity-dkim-attributes to expose the current status of the Easy DKIM feature for the identities passed as command parameters (i.e. AWS SES domains and/or email addresses):

aws ses get-identity-dkim-attributes
	--region us-east-1
	--identities "cloudconformity.com" "contact@cloudconformity.com"

04 The command output should return the DKIM signing status for the specified SES identities:

{
    "DkimAttributes": {
        "contact@cloudconformity.com": {
            "DkimEnabled": false,
            "DkimVerificationStatus": "NotStarted"
        },
        "cloudconformity.com": {
            "DkimEnabled": false,
            "DkimVerificationStatus": "NotStarted"
        }
    }
}

Check the DkimEnabled property value for each identity metadata object returned. If the current value is set to false (as shown in the example above), the emails sent from the selected AWS SES identities (e.g. cloudconformity.com and contact@cloudconformity.com) are not getting a DKIM signature, therefore these email messages are not protected against phishing attacks.

05 Repeat steps no. 1 – 4 to repeat the entire audit process for other AWS regions.

Remediation / Resolution

To enable DKIM signing for your existing AWS Simple Email Service (SES) registered identities (domains and email addresses), perform the following:

Using AWS Console

01 Sign in to the AWS Management Console.

02 Navigate to SES dashboard at https://console.aws.amazon.com/ses/.

03 In the navigation panel, under Identity Management section, choose either Domains or Email Addresses, depending whether you want to enable DKIM signing for a domain or an email address registered with AWS SES.

04 Select the identity (domain or email address) that you want to configure to use DKIM signatures then click the View Details button from the dashboard top menu.

05 On the selected identity configuration page click DKIM to expand the feature tab then click Generate DKIM Settings button to generate the necessary DNS records for enabling DKIM signatures.

06 Once the requested DNS (CNAME) records are created copy them one by one and update the registered identity DNS zone file with the CNAME record information displayed. The DKIM Verification Status for the selected identity will change from pending verification to verified as soon as AWS SES is detecting the changes made to your DNS zone file.

07 Click (enable) next to DKIM: to enable the feature in order to sign all the email messages sent by the selected identity using a DKIM signature.

08 Within Enable DKIM dialog box, click Yes, enable DKIM to confirm the action.

09 Repeat steps no. 3 – 8 to enable Easy DKIM feature for other AWS SES identities available in the current region.

10 Change the AWS region from the navigation bar and repeat the entire process for other regions.

Using AWS CLI

01 Run set-identity-dkim-enabled command (OSX/Linux/UNIX) to enable Easy DKIM feature for the selected identity, e.g. cloudconformity.com (if successful, the command does not return an output):

aws ses set-identity-dkim-enabled
	--region us-east-1
	--identity cloudconformity.com
	--dkim-enabled

02 Now run get-identity-dkim-attributes command (OSX/Linux/UNIX) to return the DKIM tokens generated for the selected identity and required to construct the DNS CNAME records:

aws ses get-identity-dkim-attributes
	--region us-east-1
	--identities "cloudconformity.com"

03 The command output should return the specified identity DKIM metadata (including tokens):

{
    "DkimAttributes": {
        "cloudconformity.com": {
            "DkimTokens": [
                "rdovp3xm4bewm4kdf3lhpwv245ez57gh",
                "nduuaxymjaqwsdvtvbbdjni7bwwprix4",
                "cor4uexv3k3g34r6fal7glk4qk6p7aib"
            ],
            "DkimEnabled": true,
            "DkimVerificationStatus": "Pending"
        }
    }
}

04 Use the DKIM tokens returned at the previous step to create DNS CNAME records that point to DKIM public keys hosted by AWS SES. Construct the CNAME records components as shown in the following example (replace the highlighted values with your own values):

Record Name: puovp3xm4bewm4kdf3lhpwv245ez57gf._domainkey.cloudconformity.com
Record Value: puovp3xm4bewm4kdf3lhpwv245ez57gf.dkim.amazonses.com
Record Type: CNAME

05 Once the requested DNS (CNAME) records are created copy them one by one and update the registered identity DNS zone file with the CNAME record information compiled at the previous step.

06 Repeat steps no. 1 - 5 to enable Easy DKIM feature for other AWS SES identities available in the current region.

07 Change the AWS region and repeat the entire process for other regions.

References

Publication date Sep 10, 2016

Unlock the Remediation Steps


Free 30-day Trial

Automatically audit your configurations with Conformity
and gain access to our cloud security platform.

Confirmity Cloud Platform

No thanks, back to article

You are auditing:

DKIM Enabled

Risk Level: Low