Use the Conformity Knowledge Base AI to help improve your Cloud Posture

Underutilized DynamoDB Table Writes

Trend Micro Cloud One™ – Conformity is a continuous assurance tool that provides peace of mind for your cloud infrastructure, delivering over 750 automated best practice checks.

Risk Level: Medium (should be achieved)

Identify any Amazon DynamoDB tables with underutilized write capacity and downsize the provisioned capacity to lower the cost of your monthly AWS bill. The write capacity downsize process should be used in conjunction with DynamoDB Auto Scaling in order to manage the throughput capacity automatically and save costs. Once enabled, DynamoDB Auto Scaling will dynamically adjust provisioned write capacity on your behalf, in response to current traffic patterns (i.e. when the workload decreases, the throughput will also decrease automatically in order to stop paying for unused provisioned capacity). By default, a DynamoDB table write capacity is considered "underutilized" when the number of write capacity units consumed is lower than the number of provisioned write capacity units set for a table over a specified time period.
The AWS CloudWatch metrics used to detect underused DynamoDB write capacity are:
ProvisionedWriteCapacityUnits - the number of provisioned write capacity units for a DynamoDB table (Units: Count).
ConsumedWriteCapacityUnits - the number of write capacity units consumed over the specified time period (Units: Count).

Cost
optimisation

You are being charged for AWS DynamoDB write capacity, regardless whether or not you use the provisioned capacity units for your tables. To avoid unexpected charges on your AWS bill, it is recommended to downsize the provisioned write capacity to the bare minimum and use DynamoDB Auto Scaling to manage the throughput capacity based on workload.


Audit

To identify any DynamoDB tables with underutilized write capacity, available in your AWS account, perform the following actions:

Using AWS Console

01 Sign in to the AWS Management Console.

02 Navigate to DynamoDB dashboard at https://console.aws.amazon.com/dynamodb/.

03 In the left navigation panel, under Dashboard, click Tables.

04 Choose the DynamoDB table that you want to examine then copy its identifier (name), listed in the Name column.

05 Now navigate to CloudWatch dashboard at https://console.aws.amazon.com/cloudwatch/.

06 In the left navigation panel, under CloudWatch section, select Metrics.

07 On the AWS CloudWatch metrics page, choose DynamoDB then click on Table Metrics to access the metrics available for your DynamoDB tables.

08 Paste the name of the DynamoDB table copied at step no. 4 inside the panel search box and press Enter. Once the search process is complete, the dashboard will list all CloudWatch metrics available for the selected DynamoDB table.

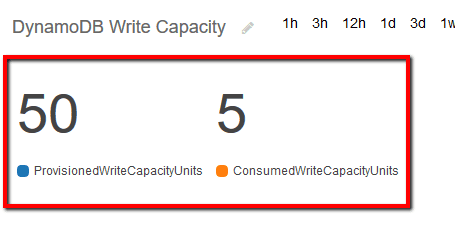
09 Select the ProvisionedWriteCapacityUnits and ConsumedWriteCapacityUnits entries to get the usage data for the provisioned and consumed write capacity, then use the dashboard top-right menu to set the graph type to Number and the period of time to Relative, 1 minute.

10 Verify the numbers returned for ProvisionedWriteCapacityUnits and ConsumedWriteCapacityUnits metrics. If the ConsumedWriteCapacityUnits value is lower than ProvisionedWriteCapacityUnits value:

DynamoDB Write Capacity

the total number of write capacity units consumed over the last minute is lower than the number of provisioned write capacity units, therefore the selected Amazon DynamoDB table can be marked as underutilized.

11 Repeat steps no. 4 – 10 to verify the provisioned and the consumed write capacity for other DynamoDB tables available in the current region.

12 Change the AWS region from the navigation bar and repeat the audit process for other regions.

Using AWS CLI

01 Run list-tables command (OSX/Linux/UNIX) using custom query filters to list the names of all DynamoDB tables provisioned in the selected region:

aws dynamodb list-tables
	--region us-east-1
	--output table
	--query 'TableNames'

02 The command output should return the requested NoSQL table names:

-------------------------
|      ListTables       |
+-----------------------+
|  cc-customer-catalog  |
|  cc-board-comments    |
+-----------------------+

03 Run get-metric-statistics command (OSX/Linux/UNIX) to get the statistics recorded by AWS CloudWatch for the ProvisionedWriteCapacityUnits metric, representing the total number of provisioned write capacity units for the selected DynamoDB table. The following command example returns the total number of ProvisionedWriteCapacityUnits, utilized by an AWS DynamoDB table identified by the name "cc-customer-catalog", data captured over 1-hour time period, using a time interval of 60 seconds as the granularity for the returned datapoints:

aws cloudwatch get-metric-statistics
	--region us-east-1
	--metric-name ProvisionedWriteCapacityUnits
	--start-time 2017-11-10T12:00:00
	--end-time 2017-11-10T13:00:00
	--period 60
	--namespace AWS/DynamoDB
	--statistics Sum
	--dimensions Name=TableName,Value=cc-customer-catalog

04 The command output should return the recorded data available for the ProvisionedWriteCapacityUnits metric:

{
    "Datapoints": [
        {
            "Timestamp": "2017-11-10T12:00:00Z",
            "Sum": 50.0,
            "Unit": "Count"
        },
        {
            "Timestamp": "2017-11-10T12:01:00Z",
            "Sum": 50.0,
            "Unit": "Count"
        },
        {
            "Timestamp": "2017-11-10T12:02:00Z",
            "Sum": 50.0,
            "Unit": "Count"
        },

        ...

        {
            "Timestamp": "2017-11-10T12:58:00Z",
            "Sum": 50.0,
            "Unit": "Count"
        },
        {
            "Timestamp": "2017-11-10T12:59:00Z",
            "Sum": 50.0,
            "Unit": "Count"
        },
        {
            "Timestamp": "2017-11-10T13:00:00Z",
            "Sum": 50.0,
            "Unit": "Count"
        }
    ],
    "Label": "ProvisionedWriteCapacityUnits"
}

05 Execute again get-metric-statistics command (OSX/Linux/UNIX) to get the statistics recorded by AWS CloudWatch for the ConsumedWriteCapacityUnits metric, representing the total number of write capacity units consumed over a specified period of time by the selected DynamoDB table. The following command example returns the total number of ConsumedWriteCapacityUnits, consumed by an AWS DynamoDB table identified by the name "cc-customer-catalog", data captured over 1-hour time period, using a time interval of 60 seconds as the granularity for the returned datapoints:

aws cloudwatch get-metric-statistics
	--region us-east-1
	--metric-name ConsumedWriteCapacityUnits
	--start-time 2017-11-10T12:00:00
	--end-time 2017-11-10T13:00:00
	--period 60
	--namespace AWS/DynamoDB
	--statistics Sum
	--dimensions Name=TableName,Value=cc-customer-catalog

06 The command output should return the recorded throughput data available for the ConsumedWriteCapacityUnits metric:

{
    "Datapoints": [
        {
            "Timestamp": "2017-11-10T12:00:00Z",
            "Sum": 3.0,
            "Unit": "Count"
        },
        {
            "Timestamp": "2017-11-10T12:01:00Z",
            "Sum": 3.0,
            "Unit": "Count"
        },
        {
            "Timestamp": "2017-11-10T12:02:00Z",
            "Sum": 3.0,
            "Unit": "Count"
        },

        ...

        {
            "Timestamp": "2017-11-10T12:58:00Z",
            "Sum": 2.5,
            "Unit": "Count"
        },
        {
            "Timestamp": "2017-11-10T12:59:00Z",
            "Sum": 2.5,
            "Unit": "Count"
        },
        {
            "Timestamp": "2017-11-10T13:00:00Z",
            "Sum": 3.0,
            "Unit": "Count"
        }
    ],
    "Label": "ConsumedWriteCapacityUnits"
}

07 Verify the Sum values returned for the ProvisionedWriteCapacityUnits metric at step no. 4 and the ones returned for the ConsumedWriteCapacityUnits metric at step no. 6. If the values returned for ConsumedWriteCapacityUnits are lower than the ones returned for ProvisionedWriteCapacityUnits, the total number of write capacity units consumed over the specified time period is lower than the number of provisioned write capacity units, therefore the selected Amazon DynamoDB table can be pronounced underutilized.

08 Repeat steps no. 3 – 7 to verify the provisioned and the consumed write capacity for other DynamoDB tables available in the current region.

09 Change the AWS region by updating the --region command parameter value and repeat steps no. 1 - 8 to perform the audit process for other regions.

Remediation / Resolution

To downsize the provisioned write capacity for your underutilized Amazon DynamoDB tables and enable Auto Scaling in order to automate capacity management, perform the following:

Using AWS Console

01 Sign in to the AWS Management Console.

02 Navigate to DynamoDB dashboard at https://console.aws.amazon.com/dynamodb/.

03 In the left navigation panel, under Dashboard, click Tables.

04 Select the DynamoDB table that you want to reconfigure (see Audit section part I to identify the right resource).

05 Select the Capacity tab from the right panel to access the table configuration.

06 Inside Auto Scaling section, perform the following actions:

  1. Check Write capacity checkbox to display the Auto Scaling settings for the selected table.
  2. In Target utilization box, provide the target utilization for the table (percentage).
  3. For Minimum provisioned capacity, type your lower boundary for the auto-scaling range to reduce the number of provisioned capacity units to the bare minimum, based on your DynamoDB usage requirements.
  4. For Maximum provisioned capacity, type your upper boundary for the auto-scaling range.
  5. Check Apply same settings to global secondary indexes checkbox. This option allows DynamoDB Auto Scaling to uniformly scale all the global secondary indexes on the base table selected. This includes existing global secondary indexes and any other indexes that you may create for this table in the future.
  6. Inside IAM Role section, select New role: DynamoDBAutoscaleRole option from I authorize DynamoDB to scale capacity using the following role, to use the predefined IAM role made available by AWS DynamoDB.
  7. Click Save to apply the configuration changes and enable DynamoDB Auto Scaling.

07 Repeat steps no. 4 - 6 to enable and configure Auto Scaling for other Amazon DynamoDB tables provisioned within the current region.

08 Change the AWS region from the navigation bar and repeat the process for other regions.

Using AWS CLI

01 First, you need to define the trust relationship policy for the required IAM service role. The IAM service role allows Auto Scaling to modify the provisioned throughput settings for your DynamoDB table as if you were modifying them yourself. To create the trust relationship policy for the role, paste the following information into a new policy document file named service-role-trust-policy.json:

{
  "Version": "2012-10-17",
  "Statement": [
    {
      "Effect": "Allow",
      "Principal": {
        "Service": "application-autoscaling.amazonaws.com"
      },
      "Action": "sts:AssumeRole"
    }
  ]
}

02 Run create-role command (OSX/Linux/UNIX) to create the necessary IAM service role using the trust relationship policy defined at the previous step (i.e. service-role-trust-policy.json):

aws iam create-role
	--role-name cc-dynamodb-autoscale-role
	--assume-role-policy-document file://service-role-trust-policy.json

03 The command output should return the IAM service role metadata:

{
    "Role": {
        "AssumeRolePolicyDocument": {
            "Version": "2012-10-17",
            "Statement": [
                {
                    "Action": "sts:AssumeRole",
                    "Effect": "Allow",
                    "Principal": {
                        "Service": "application-autoscaling.amazonaws.com"
                    }
                }
            ]
        },
        "RoleId": "AAAAABBBBBCCCCCDDDDDD",
        "CreateDate": "2017-11-10T17:15:18.926Z",
        "RoleName": "cc-dynamodb-autoscale-role",
        "Path": "/",
        "Arn": "arn:aws:iam::123456789012:role/cc-dynamodb-autoscale-role"
    }
}

04 Define the access policy for the newly created AWS IAM service role. To create the required access policy, paste the following information into a new JSON document named service-role-access-policy.json:

{
    "Version": "2012-10-17",
    "Statement": [
        {
            "Effect": "Allow",
            "Action": [
                "dynamodb:DescribeTable",
                "dynamodb:UpdateTable",
                "cloudwatch:PutMetricAlarm",
                "cloudwatch:DescribeAlarms",
                "cloudwatch:GetMetricStatistics",
                "cloudwatch:SetAlarmState",
                "cloudwatch:DeleteAlarms"
            ],
            "Resource": "*"
        }
    ]
}

05 Run create-policy command (OSX/Linux/UNIX) to create the IAM service role policy using the document defined at the previous step, i.e. service-role-access-policy.json:

aws iam create-policy
	--region us-east-1
	--policy-name cc-dynamodb-autoscale-policy
	--policy-document file://service-role-access-policy.json

06 The command output should return the command request metadata (including the access policy ARN):

{
    "Policy": {
        "PolicyName": "cc-dynamodb-autoscale-policy",
        "CreateDate": "2017-11-10T17:16:30.926Z",
        "AttachmentCount": 0,
        "IsAttachable": true,
        "PolicyId": "AAAABBBBCCCCCDDDDEEEE",
        "DefaultVersionId": "v1",
        "Path": "/",
        "Arn": "arn:aws:iam::123456789012:policy/cc-dynamodb-autoscale-policy",
        "UpdateDate": "2017-11-10T17:16:30.926Z"
    }
}

07 Run attach-role-policy command (OSX/Linux/UNIX) to attach the access policy created at step no. 5, identified by the ARN "arn:aws:iam::123456789012:policy/cc-dynamodb-autoscale-policy", to the IAM service role created at step no. 2, named "cc-dynamodb-autoscale-role" (the command does not produce an output):

aws iam attach-role-policy
	--region us-east-1
	--role-name cc-dynamodb-autoscale-role
	--policy-arn arn:aws:iam::123456789012:policy/cc-dynamodb-autoscale-policy

08 To continue the setup process, run register-scalable-target command (OSX/Linux/UNIX) to register the DynamoDB table's write capacity as a scalable target with Amazon Application Auto Scaling. The following Auto Scaling configuration allows the service to adjust the provisioned write capacity for "cc-customer-catalog" table within the range of 3 to 50 capacity units (the command does not return an output):

aws application-autoscaling register-scalable-target
	--region us-east-1
	--service-namespace dynamodb
	--resource-id "table/cc-customer-catalog"
	--scalable-dimension "dynamodb:table:WriteCapacityUnits"
	--min-capacity 3
	--max-capacity 50
	--role-arn arn:aws:iam::123456789012:role/cc-dynamodb-autoscale-role

09 Define the policy for the scalable target created at the previous step. To create the required scaling policy, paste the following information into a new policy document named scaling-policy.json:

{
    "PredefinedMetricSpecification": {
        "PredefinedMetricType": "DynamoDBWriteCapacityUtilization"
    },
    "ScaleOutCooldown": 60,
    "ScaleInCooldown": 60,
    "TargetValue": 70.0
}

10 Execute put-scaling-policy command (OSX/Linux/UNIX) to attach the scaling policy defined at the previous step to the scalable target registered at step no. 8. The put-scaling-policy command request will also enable Application Auto Scaling to create two AWS CloudWatch alarms - one for the upper and one for the lower boundary of the scaling target range:

aws application-autoscaling put-scaling-policy
	--region us-east-1
	--service-namespace dynamodb
	--resource-id "table/cc-customer-catalog"
	--scalable-dimension "dynamodb:table:WriteCapacityUnits"
	--policy-name "cc-scaling-policy"
	--policy-type "TargetTrackingScaling"
	--target-tracking-scaling-policy-configuration file://scaling-policy.json

11 The command output should return the request metadata, including information regarding the newly created Amazon CloudWatch alarms:

{
    "Alarms": [
        {
            "AlarmName": "TargetTracking-table/cc-customer-catalog-ProvisionedCapacityHigh-aaaaaaaa-bbbb-cccc-dddd-eeeeeeeeeee",
            "AlarmARN": "arn:aws:cloudwatch:us-east-1:123456789012:alarm:TargetTracking-table/cc-customer-catalog-ProvisionedCapacityHigh-aaaaaaaa-bbbb-cccc-dddd-eeeeeeeeeee"
        },
        {
            "AlarmName": "TargetTracking-table/cc-customer-catalog-ProvisionedCapacityLow-aaaaaaaa-bbbb-cccc-dddd-eeeeeeeeeee",
            "AlarmARN": "arn:aws:cloudwatch:us-east-1:123456789012:alarm:TargetTracking-table/cc-customer-catalog-ProvisionedCapacityLow-aaaaaaaa-bbbb-cccc-dddd-eeeeeeeeeee"
        }
    ],
    "PolicyARN": "arn:aws:autoscaling:us-east-1:123456789012:scalingPolicy:aaaaaaaa-bbbb-cccc-dddd-eeeeeeeeeee:resource/dynamodb/table/cc-customer-catalog:policyName/cc-scaling-policy"
}

12 Repeat steps no. 8 – 11 to enable and configure Auto Scaling for other Amazon DynamoDB tables provisioned within the current region.

13 Change the AWS region by updating the --region command parameter value and repeat the entire process for other regions.

References

Publication date Nov 21, 2017

Unlock the Remediation Steps


Free 30-day Trial

Automatically audit your configurations with Conformity
and gain access to our cloud security platform.

Confirmity Cloud Platform

No thanks, back to article

You are auditing:

Underutilized DynamoDB Table Writes

Risk Level: Medium