Use the Conformity Knowledge Base AI to help improve your Cloud Posture

Detailed billing

Trend Micro Cloud One™ – Conformity is a continuous assurance tool that provides peace of mind for your cloud infrastructure, delivering over 750 automated best practice checks.

Risk Level: High (not acceptable risk)
Rule ID: Budgets-006

Ensure that Detailed Billing feature is enabled for your AWS account in order to improve visibility into your AWS spending patterns and prevent unexpected costs on your AWS bill. Detailed Billing generates reports about your usage of AWS resources and estimated costs for that usage by the hour/day/month, by product and product resource, by each account within your organization or by tags that you create. These reports can be used with other services such as AWS Cost Explorer - for graphical analysis of your costs and spending forecasts, or AWS CloudWatch and SNS - for custom billing alerts in the event of going above your customer-set threshold. Cloud Conformity is also using the data provided by this billing feature to generate AWS spend analysis reports such as Cost Analysis Report, Cost Over Time Report, Current Month Projected Cost, Amortized Costs Over Time, Annual Projected Cost, Savings Analysis, Data Transfer Analysis and Data Transfer Over Time. These reports are available within your Cloud Conformity account together with your AWS cost breakdown and other useful cost-based analytics.
Note: If the AWS Multiple Account Billing strategy is used, you will need to enable Detailed Billing only for the AWS master billing account. In this way AWS will generate a cost report for each individual account associated with your payer (master) account. However, as a best practice, consider not having any AWS resources provisioned within the account you designate as the payer account in order to reduce confusion that can arise because payer account usage appears twice in the detailed billing reports (once as an aggregated line item and again as an allocated line item).

This rule can help you with the following compliance standards:

  • CISAWSF

For further details on compliance standards supported by Conformity, see here.

This rule can help you work with the AWS Well-Architected Framework.

This rule resolution is part of the Conformity Security & Compliance tool for AWS.

Security
Cost
optimisation

With Detailed Billing feature you can gain more visibility into your AWS spending in order to better understand your costs, keep track of their trends and create more accurate forecasts. From the security standpoint, using Detailed Billing will also help identify any unusual spending patterns that may require further investigation (i.e. identify who created the resource that add unexpected charges to your AWS monthly bill, verify the permissions of the entity that created the resource, etc).


Audit

To determine if AWS Detailed Billing is currently enabled within your AWS account, perform the following:

Note: Checking for AWS Detailed Billing feature status via Command Line Interface (CLI) is not currently supported.

Using AWS Console

01 Sign in to the AWS Management Console using your root credentials.

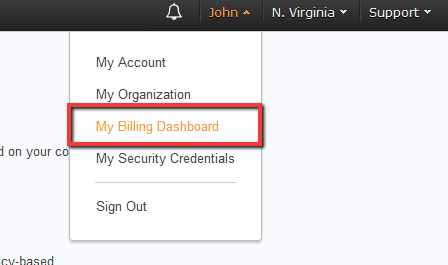
02 Click on the AWS account name or number in the upper-right corner of the management console and select My Billing Dashboard from the dropdown menu:

Budget Billing Dashboard

03 On Billing & Cost Management Dashboard page, select Preferences from the left navigation panel.

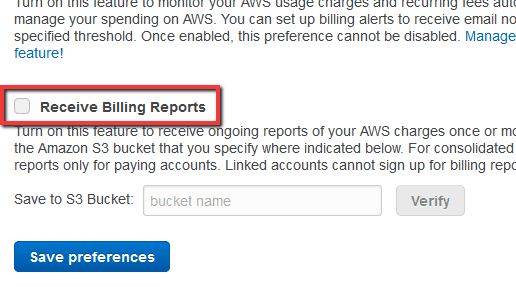
04 On the Preferences page, verify whether the Receive Billing Reports setting checkbox is selected or not. If the setting checkbox is not selected:

Receive Billing Reports

the Detailed Billing feature is not currently enabled, therefore the billing reports for your AWS account are not being generated.

05 Repeat steps no. 1 – 4 for each Amazon Web Services account that you want to examine.

Remediation / Resolution

To enable AWS Detailed Billing feature in order to receive billing reports, perform the following actions:

Note:Note: Enabling Detailed Billing for your AWS account via Command Line Interface (CLI) is not currently supported.
Using AWS Console

01 Sign in to the AWS Management Console using your root credentials.

02 Navigate to AWS S3 dashboard at https://console.aws.amazon.com/s3/.

03 Click the Create bucket button from the dashboard top menu to create the S3 bucket where AWS Detailed Billing will publish your detailed billing reports.

04 In the Create Bucket dialog box, provide the following information:

  1. In the Bucket name box, enter a unique name for the new bucket, e.g. cloudconformity-billing-reports.
  2. From Region dropdown list, choose the AWS region where the new S3 bucket will be created.
  3. Click Next until you reach the Review section without changing the default settings.
  4. Review the bucket configuration then click Create Bucket to instantiate the new S3 bucket.

05 Choose the newly created S3 bucket then select the Permissions tab from the top panel to access the bucket access permissions.

06 On the Permissions panel, click Bucket Policy and paste the following S3 access policy required to allow AWS Detailed Billing to publish billing reports to the selected bucket (replace <aws_account_number> and <s3_billing_bucket_name> with your own account and S3 bucket details):

{
  "Version": "2008-10-17",
  "Statement": [
    {
      "Effect": "Allow",
      "Principal": {
        "AWS": "arn:aws:iam:::root"
      },
      "Action": [
        "s3:GetBucketAcl",
        "s3:GetBucketPolicy"
      ],
      "Resource": "arn:aws:s3:::"
    },
    {
      "Effect": "Allow",
      "Principal": {
        "AWS": "arn:aws:iam:::root"
      },
      "Action": [
        "s3:PutObject"
      ],
      "Resource": "arn:aws:s3:::/*"
    }
  ]
}


07 Once your S3 bucket policy is defined click Save to validate and apply the policy.

08 Now click on the AWS account name or number in the upper-right corner of the management console and select My Billing Dashboard from the dropdown menu:

Budget Billing Dashboard

09 On Billing & Cost Management Dashboard page, select Preferences from the left navigation panel.

10 On the Preferences page select Receive Billing Reports checkbox to turn on the feature.

11 For Save to S3 Bucket, provide the name of the AWS S3 bucket designated to receive and store the detailed billing reports, created at step no. 4.

12 Click the Verify button next to the Save to S3 Bucket box to check if your designated bucket has the appropriate permissions set.

13 Click Save preferences to enable the feature and receive ongoing reports of your AWS charges. Once the feature is enabled, the billing reports can take up to 24 hours to start being generated. After 24 hours, the detailed reports should be available within your designated S3 bucket.

14 Repeat steps no. 1 – 13 to enable Detailed Billing reports for other Amazon Web Services accounts.

References

Publication date May 7, 2017

Unlock the Remediation Steps


Free 30-day Trial

Automatically audit your configurations with Conformity
and gain access to our cloud security platform.

Confirmity Cloud Platform

No thanks, back to article

You are auditing:

Detailed billing

Risk Level: High