Use the Conformity Knowledge Base AI to help improve your Cloud Posture

Route 53 In Use

Trend Micro Cloud One™ – Conformity is a continuous assurance tool that provides peace of mind for your cloud infrastructure, delivering over 750 automated best practice checks.

Risk Level: Medium (not acceptable risk)
Rule ID: Route53-001

Ensure that AWS Route 53 Domain Name System (DNS) service is used within your AWS account to manage DNS zones for your domains. AWS Route 53 is an authoritative Domain Name System service built on top of AWS highly available, scalable and reliable infrastructure.

This rule can help you with the following compliance standards:

  • NIST4

For further details on compliance standards supported by Conformity, see here.

This rule can help you work with the AWS Well-Architected Framework.

This rule resolution is part of the Conformity Security & Compliance tool for AWS.

Reliability

With AWS Route 53 you can create and manage DNS hosted zones for all your domain names registered with AWS or with other domain registrars. Route 53 has several advantages over other DNS service providers: is fast – currently using a global network of dedicated DNS servers available in 17 locations worldwide, is secure - can be integrated with AWS IAM to manage access permissions and prevent unauthorized access to the DNS configuration, is highly available – engineered on top of AWS global infrastructure for 100% uptime, easy to use - manage DNS records with just few clicks using the Management Console or programmatically via API, cost effective - you pay only what you use (e.g. hosted zones and DNS queries made) and can be easily integrated with other AWS components such as Elastic Load Balancer, Elastic Beanstalk, Cloudfront or S3.


Audit

To determine if AWS Route 53 is used as DNS service for your domain names, perform the following:

Using AWS Console

01 Login to the AWS Management Console.

02 Navigate to Route 53 dashboard at https://console.aws.amazon.com/route53/.

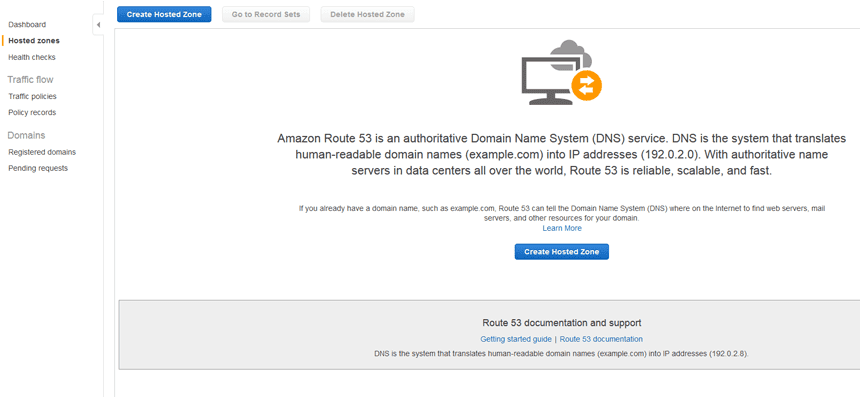
03 In the left navigation panel, under Dashboard, click Hosted Zones. A hosted zone is a collection of DNS record set for a specified domain name. If there are no hosted zones listed, instead a Get Started page is displayed:

Hosted Zone Page

the Route 53 service is not currently used as DNS service for your registered domain names.

Using AWS CLI

01 Run list-hosted-zones command (OSX/Linux/UNIX) to retrieve a list with all the DNS hosted zones available in your AWS account:

aws route53 list-hosted-zones

02 The command output should return an array with all the zones available and their metadata:

{
    "HostedZones": []
}

If the HostedZones array returned does not contain any elements (DNS hosted zones names), the Route 53 service is not currently used as DNS service for your registered domains.

Remediation / Resolution

In order to utilize AWS Route 53 as DNS service for your domain names, you must create and configure Route 53 hosted zones. To create your own DNS hosted zones, perform the following:

Using AWS Console

01 Login to the AWS Management Console.

02 Navigate to Route 53 dashboard at https://console.aws.amazon.com/route53/.

03 In the left navigation panel, under Dashboard, click Hosted Zones.

04 Click Create Hosted Zones button from the AWS dashboard top menu.

05 In the Create Hosted Zone right panel, enter the following information:

  1. In the Domain Name field, enter the domain name (e.g. domain.com) that you want to manage with this DNS hosted zone.
  2. (Optional) In the Comment field, enter a description for the DNS zone file.
  3. Select Public Hosted Zone from the Type dropdown list.

06 Click Create to create the zone file for the specified domain name. Once the hosted zone is created, AWS Route 53 creates automatically a Name Server (NS) DNS record and a Start of Authority (SOA) record.

07 On the newly created hosted zone page, add the necessary DNS records from your current DNS service provider. There are two ways to add the required records:

  1. Migrate the DNS configuration by exporting the zone file from your current DNS provider and importing the file using Route 53 Import feature:\
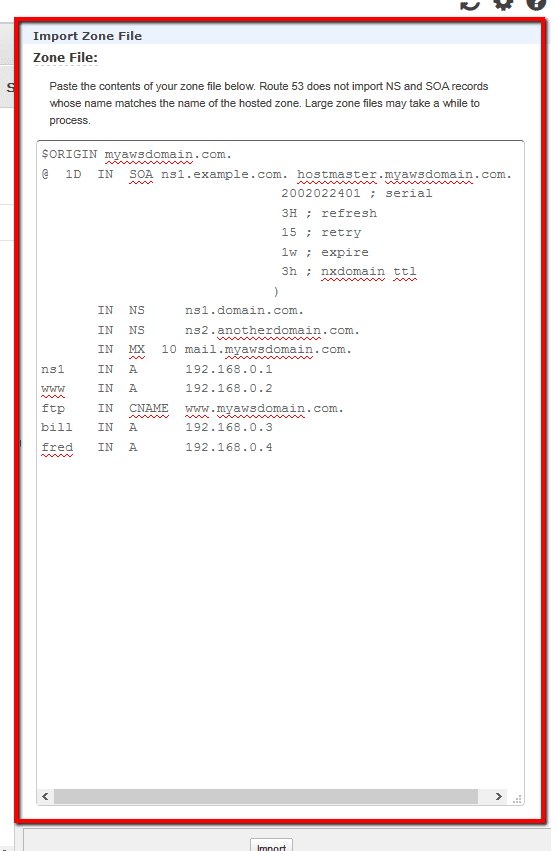
    • Click Import Zone File button from the AWS dashboard top menu.
    • In the Zone File text box, paste the contents of the zone file exported from your current DNS provider (e.g. In the Zone File text box, paste the contents of the zone file exported from your current DNS provider).
    • Click Import button to import the file. Once the DNS zone is successfully added, Route 53 will display the following message: “Your operation has been committed successfully.”.
  2. Migrate your existing DNS records manually. Create the necessary records (A, CNAME, MX, TXT, etc) using the AWS Route 53 dashboard menu and the record values taken from your current DNS provider:
    • Click Create Record Set button from the dashboard top menu.
    • In the Name field, enter the record name of the DNS record that you want to migrate.
    • From the Type dropdown list select the record set type (e.g. A, CNAME, MX).
    • In the TTL (Seconds) field, enter a Time to Live value in seconds.
    • In the Value text box, enter the value(s) required by the selected record type (e.g. IP addresses, domain names, text strings) taken from your existing DNS zone file.
    • From the Routing Policy dropdown list, select the routing method for the current DNS record.
    • Click Create to add the new record to the hosted zone. To add new records repeat the process.

08 Repeat steps no. 5 – 7 for each domain name that you want to manage with AWS Route 53 DNS service.

Using AWS CLI

01 Run create-hosted-zone command (OSX/Linux/UNIX) to create a new Route 53 hosted zone. The following command example creates a new hosted zone for a domain name called myawsdomain.com:

aws route53 create-hosted-zone
	--name myawsdomain.com
	--caller-reference 2016-05-08-18:45
	--hosted-zone-config Comment="Public DNS hosted zone for myawsdomain.com"

02 The command output should return the new hosted zone metadata (including the zone ID - highlighted):

{
    "HostedZone": {
        "ResourceRecordSetCount": 2,
        "CallerReference": "2016-05-08-18:45",
        "Config": {
            "Comment": "Public DNS hosted zone for myawsdomain.com",
            "PrivateZone": false
        },
        "Id": "/hostedzone/Z326VIKTTL6ACZ",
        "Name": "myawsdomain.com."
    },
    "DelegationSet": {
        "NameServers": [
            "ns-1329.awsdns-38.org",
            "ns-608.awsdns-12.net",
            "ns-1842.awsdns-38.co.uk",
            "ns-490.awsdns-61.com"
        ]
    },
    "Location": "http://route53.amazonaws.com/hostedzone/Z326VIKTTL6ACZ",
    "ChangeInfo": {
        "Status": "PENDING",
        "SubmittedAt": "2016-05-07T10:39:31.137Z",
        "Id": "/change/C2MW22PIPINF09"
    }
}

03 In order to add a DNS record to the newly created hosted zone, you must create first a Route 53 change file (in this case a JSON file named cname-record-set.json) to declare the new DNS record set. The following example describes a CNAME record definition for a domain name called myawsdomain.com (to create other types of DNS records using AWS CLI, check the record set syntax provided by AWS at http://docs.aws.amazon.com/cli/latest/reference/route53/change-resource-record-sets.html):

{
  "Comment": "CNAME record set for myawsdomain.com hosted zone.",
  "Changes": [
    {
      "Action": "CREATE",
      "ResourceRecordSet": {
        "Name": "api.myawsdomain.com.",
        "Type": "CNAME",
        "TTL": 86400,
        "ResourceRecords": [
          {
            "Value": "myawsdomain.com"
          }
        ]
      }
    }
  ]
}

04 Run change-resource-record-sets command (OSX/Linux/UNIX) using the hosted zone ID returned at step no. 2 and the Route 53 change file (cname-record-set.json) as command parameters:

aws route53 change-resource-record-sets
	--hosted-zone-id Z326VIKTTL6ACZ
	--change-batch file://cname-record-set.json

05 The command output should return the new DNS record set metadata. The record set status should be PENDING at this moment:

{
    "ChangeInfo": {
        "Status": "PENDING",
        "Comment": "CNAME record set for myawsdomain.com hosted zone.",
        "SubmittedAt": "2016-05-07T10:43:21.663Z",
        "Id": "/change/CW22QA2MN6TUN"
    }
}

06 Run get-change command (OSX/Linux/UNIX) using the Route 53 change file ID returned at the previous step to get the current status for the newly added record set:

aws route53 get-change
	--id CW22QA2MN6TUN

07 The command output should return the current status of the DNS record batch request. The current status should be set to INSYNC which indicates that the change was fully propagated to all AWS Route 53 DNS server nodes:

{
  "ChangeInfo": {
    "Status": "INSYNC",
    "Comment": "A new record set for the zone.",
    "SubmittedAt": "2013-12-06T00:00:00.000Z",
    "Id": "/change/CHANGEID123"
  }
}

08 Repeat steps no. 1 – 7 for each domain name that you want to manage with AWS Route 53 DNS service.

References

Publication date May 7, 2016

Unlock the Remediation Steps


Free 30-day Trial

Automatically audit your configurations with Conformity
and gain access to our cloud security platform.

Confirmity Cloud Platform

No thanks, back to article

You are auditing:

Route 53 In Use

Risk Level: Medium